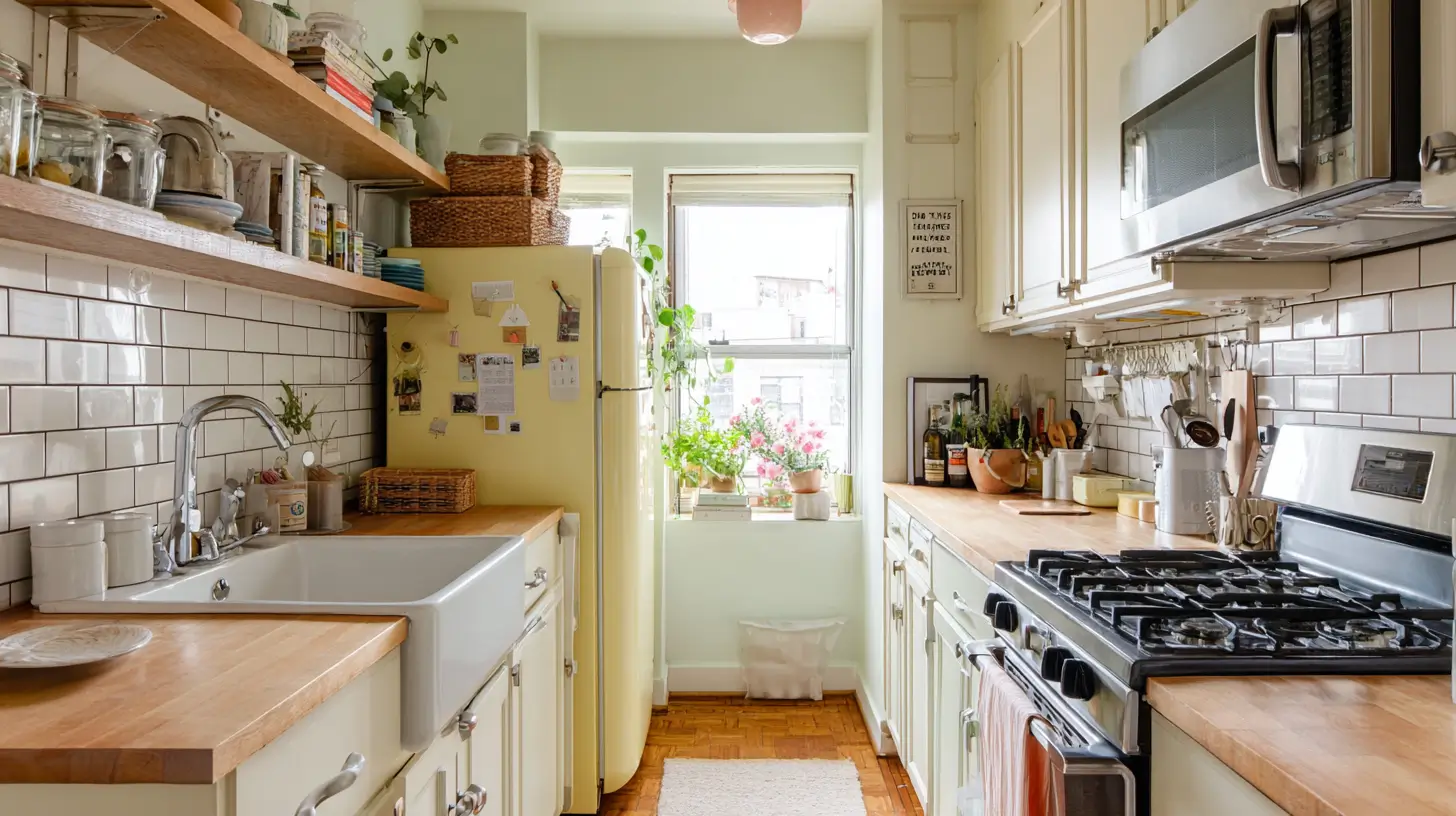
The Problem Nobody Talks About
You open your kitchen and feel it immediately. Too small. Too cluttered. No room to actually cook.
You push things aside just to chop an onion. The counter is always full. The drawers stick because they’re stuffed. And every time you try to cook something real, you end up frustrated before the pan even heats up.
Here’s the truth: the problem isn’t your kitchen size. It’s how the space is being used.
The average New York City apartment kitchen is 80 square feet. That’s smaller than most parking spaces. And yet people cook full meals, host small dinners, and run food blogs out of kitchens exactly like yours.
The 17 ideas in this guide will show you how. No expensive renovation needed. No contractor. Just smart, specific changes you can start this week.
1. Fix Your Layout Before You Buy Anything

Most people skip this step. They go straight to buying organizers and storage bins. Then they wonder why the kitchen still feels broken.
Layout is the foundation. Get it wrong and nothing else works.
There’s a concept called the work triangle. It connects your three main work zones: the stove, the sink, and the fridge. These three points form a triangle. The idea is simple. You want to move between all three without bumping into anything or walking long distances.
The National Kitchen and Bath Association recommends each leg of the triangle be between 4 and 9 feet. Too short and you feel cramped. Too long and you’re walking laps while cooking.
Here’s a quick test you can do right now. Walk from your fridge to your stove. Then from your stove to your sink. Then back to the fridge. Count your steps. If the total is more than 12 steps, your layout is making cooking harder than it needs to be.
The best layout for a small kitchen is called galley style. Two parallel counters with a walkway in the middle. It keeps everything within arm’s reach. Many professional kitchens use this same setup.
Do this first: Walk your work triangle today. If one of the three points is blocked by a cart, table, or appliance that doesn’t belong, move it.
2. Go Vertical: Your Walls Are Free Storage Space

Look up. Then look higher.
Most small kitchens use their lower cabinets and counters. The walls stay empty. That’s wasted space.
A wall rail system gives you a place to hang utensils, pots, cutting boards, and spice jars. The IKEA KUNGSFORS rail system costs around $15 and mounts above your counter. Once it’s up, you free an entire drawer.
Pegboards are another option. The IKEA SKADIS pegboard costs between $20 and $40. You can add hooks, shelves, and bins in any configuration. Move things around as your needs change. It’s flexible storage that grows with you.
Floating shelves work too. Install one shelf above the counter, 18 inches above the surface. Keep your most used items there. Glasses, bowls, cooking oils. Things you grab every day.
What about the space above your cabinets? Most people store nothing there. Use it. Add a row of uniform storage boxes or baskets for items you use a few times a year. Holiday platters, extra appliances, bulk items.
If you rent and can’t drill, Command strips rated for 5 to 10 pounds work for lightweight rails and small shelves.
Pro Tip: Only put things on open shelves that you use at least once a week. If it sits there collecting dust, it belongs in a cabinet.
3. More Cabinets Won’t Fix a Small Kitchen

This sounds backwards. But hear it out.
Upper cabinets that go all the way to the ceiling make a small kitchen feel like a box. They create visual weight. Your eye hits cabinet after cabinet and the room feels smaller, not bigger.
Open shelving does the opposite. When you see through to the wall, the space feels more open. Your brain reads it as bigger.
This doesn’t mean rip out all your cabinets. It means be selective. Keep lower cabinets for items you want hidden. Use open shelves for items you use daily and that look reasonably tidy.
Here’s the honest part: open shelves only work if you keep them organized. Messy open shelves make a kitchen look worse than no shelves at all.
A useful rule from professional organizers: most people use fewer than 30 items in their kitchen regularly. Everything else is taking up space. Do a kitchen edit before adding any new storage.
If you rent and can’t change the cabinets, try removing the cabinet doors. No screws into walls. No damage. Just unscrew the hinges and store the doors. It instantly makes the space feel less heavy.
Do this first: Pick one upper cabinet. Remove everything from it. Only put back what you’ve used in the last 30 days.
4. Counter Space Is Sacred. Treat It That Way.

Your counter is your cooking workspace. The more of it you have, the better you cook.
Right now, something is probably sitting on your counter that doesn’t need to be there. A coffee maker you use twice a week. A fruit bowl that mostly holds random stuff. An appliance you got as a gift and rarely use.
Clear the counter. Everything off. Then only put back what you use every single day.
Now, here are three ways to add prep space without changing your kitchen at all.
First, get an over the sink cutting board. It sits across your sink and gives you 2 to 3 square feet of prep space above it. The OXO Over the Sink Cutting Board costs around $35. It works over most standard sinks.
Second, get a stovetop cover board. When your burners aren’t on, a wooden board placed across the stove gives you another prep surface. It’s a simple swap that costs $20 to $40.
Third, if you have 18 inches of floor space, a rolling kitchen cart earns its place. The IKEA RASKOG rolling cart costs $35. Wheel it out when you cook. Tuck it away when you don’t. It doubles as a prep surface, a serving cart, and storage all at once.
Pro Tip: Think of your counter like a desk. You wouldn’t work at a desk covered in papers and tools you never use. The same logic applies here.
5. Swap 6 Appliances and Reclaim Your Kitchen

Appliances take up more space than you think. Not just when they sit on the counter. But when you open their doors, pull out their drawers, and stand in front of them.
Here are six swaps that make a real difference.
Swap 1: Replace a separate toaster and toaster oven with a single air fryer combo unit. You get both functions. You lose one appliance footprint.
Swap 2: Get an under cabinet coffee maker. The Black and Decker Spacemaker mounts underneath your upper cabinet. Your counter stays clear.
Swap 3: If you live alone or with one other person, consider a two burner induction cooktop instead of a four burner range. You free up counter space and get a more efficient cooking surface.
Swap 4: If you wash dishes by hand and have under sink space, a countertop dishwasher connects to your sink faucet. The hOmeLabs Countertop Dishwasher holds 6 place settings. It costs around $300 and saves daily counter space used for drying racks and dish soap clutter.
Swap 5: Replace your full size fridge with a compact model if you live alone. A full size fridge uses 10 to 20 square feet when you count the door swing. A compact model can reclaim up to 8 square feet. Pair it with a small pantry cabinet for dry goods.
Swap 6: One Instant Pot replaces five appliances. Slow cooker, pressure cooker, rice cooker, steamer, and saute pan. One appliance. Five uses. That’s a real space win.
6. Lighting: The Cheapest Way to Make Your Kitchen Feel Bigger

Bad lighting makes small kitchens feel like caves.
One overhead light is not enough. It casts shadows everywhere. Your counter looks dark. The corners disappear. The whole room feels smaller and harder to work in.
The fix is layered lighting. That means more than one light source at different levels.
The single best upgrade for a small kitchen is under cabinet LED strips. They cost between $15 and $60. You stick them under your upper cabinets. They shine directly onto your counter. Your prep space becomes bright and easy to see. The kitchen feels bigger because the dark corners light up.
Color temperature matters more than most people realize. Look for bulbs and strips in the 2700K to 3000K range. That’s warm white. It makes a kitchen feel inviting. Avoid 5000K and above. That’s the harsh blue white you see in offices and hospitals. It makes small spaces feel clinical.
If you have a window, keep the sill completely clear. No plants, no dishes, no anything. Let every bit of natural light come in. Use sheer curtains or no curtains at all if privacy allows.
Glossy tiles and reflective backsplashes bounce light around the room. If you’re choosing new materials, lean toward gloss over matte for exactly this reason.
Pro Tip: Govee LED strip lights cost around $20 on Amazon and come with an app for adjusting color temperature. Buy a warm white and stick them under every upper cabinet.
7. The Right Colors Make Your Kitchen Look Bigger Without Touching the Layout

Paint is the cheapest renovation you can do.
But the rule is not just “go white.” That’s oversimplified advice.
The real goal is visual continuity. When your walls, cabinets, and trim are all similar in color, your eye moves smoothly through the space. There’s no visual stop and start. The room looks larger.
Try a monochromatic approach. Pick one base color and use different shades of it throughout. Light sage green on the walls, medium sage on the lower cabinets, soft white on the upper ones. It all reads as one connected space.
Matching your cabinet color to your wall color is one of the most effective tricks in small kitchen design. When the cabinets blend into the wall, they stop competing for visual attention. The room opens up.
For 2026, Sherwin Williams and Benjamin Moore both leaned toward warm whites, soft greiges (that’s gray beige), and muted sage greens in their small space recommendations. These colors reflect light well and don’t feel cold.
Avoid putting an accent color on all four walls. Pick one wall, usually the one you face when you enter the kitchen, and use your accent color there. Leave the rest neutral.
Do this first: Look at your cabinets and walls. Are they fighting each other? Try painting your cabinets the same shade as your walls and see how different it looks.
8. The 30 Minute Kitchen Reset That Changes Everything

Before you buy one more organizer, do this.
Set a timer for 30 minutes. Pull everything off your counters and out of your top two drawers. Put it all on your kitchen table or floor.
Now ask yourself three questions about each item. Do I use this at least once a week? Does it have a specific place to live? Is this the only one I need?
Anything that fails those questions goes in a donate box or a trash bag.
Most kitchens have three spatulas. Two of them never get used. Most kitchens have five wooden spoons. Two are enough. Most kitchens have appliances pushed to the back of the counter that haven’t been touched in months.
Professional organizers consistently report that most households use fewer than 30 kitchen items regularly. Everything else is just taking up room.
Marie Kondo’s method applies well here. Hold each item and ask if it serves you now, not someday. Not “I might use this for a dinner party eventually.” Does it earn its space today?
The Sortly app (free on iOS and Android) lets you photograph and catalog your kitchen items. It sounds like extra work. But many people who use it are shocked to discover how much duplicate stuff they own.
Pro Tip: Apply the one in, one out rule going forward. Before any new kitchen item enters your home, one existing item has to leave.
9. The Storage Space Everyone Forgets About

Look at the inside of your cabinet doors.
Not the outside. The inside. That flat surface is empty in almost every kitchen. And it’s prime storage real estate.
An over the door organizer on the inside of your pantry door holds spice jars, foil and wrap boxes, small bags of snacks, and condiment packets. It keeps all of it visible and off your shelves.
The Rev A Shelf brand makes door mounted systems built to fit inside standard cabinets. They attach to the inside of the door with screws and hold significant weight. Prices start around $30.
For renters who can’t use screws, adhesive hooks rated for 5 pounds work for lightweight items. Tension rods also work well inside cabinet doors to hang small baskets.
The back of your kitchen door itself, the door that leads into the kitchen from a hallway or dining room, is another ignored surface. Hang a multi hook rack there. Use it for aprons, reusable shopping bags, a small basket for snacks, or a magnetic key holder.
This one change can remove 15 to 20 items from your counters and drawers without adding any new furniture.
Do this first: Open every cabinet door in your kitchen. Look at the inside face. Are any of them empty? Pick one and put an over door organizer on it this week.
10. How to Store 30 Spices Without Using Any Counter Space

The spice situation gets out of control fast.
You buy a new spice for one recipe. It joins the pile. Before long you have 30 bottles scattered across your counter and the back of a cabinet where you can’t see them and never find what you need.
Here are four ways to fix it, all without using counter space.
Option 1: Magnetic spice tins on the side of your fridge. Not the front. The side. It keeps them visible, accessible, and completely off your counter. Kamenstein makes a 12 tin magnetic set for around $25.
Option 2: A drawer spice insert. If you have one junk drawer you barely use, convert it into a spice drawer. The OXO Good Grips Spice Drawer Organizer costs around $20 and holds 24 jars flat, labels facing up. You pull the drawer open and see every spice at once.
Option 3: Inside cabinet door mounted spice racks. Mount a slim spice rack to the inside of a cabinet door near your stove. Everything is hidden when the door closes.
Option 4: Decant your spices into uniform small jars. When every jar is the same size and shape, they stack and organize far more efficiently than the mix of different bottles they came in. Talented Kitchen glass spice jars on Amazon are a popular choice.
Do a spice audit once a year. Smell each one. If it has almost no scent, it’s lost its potency and should be replaced or tossed. Ground spices last about 2 to 3 years. Whole spices last up to 4 years.
11. Pot and Pan Storage That Doesn’t Waste a Single Inch
Pots and pans are bulky. They’re awkward to stack. And most people store them badly.
Here’s what usually happens. Everything gets stacked on top of each other. You want the pan at the bottom. You pull out three things to get to it. Everything else falls over.
The fix is vertical storage. A vertical pan divider inside your cabinet stores pans upright, like files in a filing cabinet. You pull out exactly the one you need. The Lynk Professional Slide Out Pan Organizer fits most lower cabinets and costs around $40.
Lid storage is the most overlooked part of this. Lids are awkward, they don’t stack well, and they take up far more space than necessary. A simple door mounted lid holder or a standing rack on a shelf solves this completely.
If you have 8 foot ceilings or higher, a ceiling mounted pot rack is worth considering. It takes all your pots off the shelves entirely and turns them into a design feature. The Anna Kitchen Pot Rack costs around $60 and mounts with two hooks into ceiling joists. You need a stud finder and two hours.
For anyone who wants to solve the problem at purchase, nesting cookware sets are worth every penny. Caraway, Made In, and GreenPan all make sets where every piece nests inside the one above it. The entire set fits in the space of two regular pots.
12. Reclaim 20% More Space in Your Fridge in 20 Minutes
Open your fridge. What do you see?
Random containers pushed to the back. Half empty jars taking up a full shelf. Leftovers with no clear home. Things you’re not sure are still good.
This is a storage problem, not a fridge size problem.
Clear stackable bins are the fastest fix. They group like items together. Dairy in one bin. Leftovers in another. Drinks in another. When you pull the bin forward, everything in it comes with it. Nothing gets lost in the back.
The mDesign stackable fridge bin set (4 bins, around $30) is a popular starting point. Clear bins let you see exactly what’s inside without opening each one.
Add a lazy Susan to one shelf, ideally the one with small jars and bottles. Turn it to reach what’s in the back. This alone saves 10 minutes a week of fridge archaeology.
The top of your fridge is free real estate. Put a non slip mat up there. Use it to stage an appliance you don’t use every day, like a hand mixer or a food processor. Get it off the counter. Out of the way. Still accessible when you need it.
Check your fridge door shelves. Most people store things there that shouldn’t be there. Eggs belong in the coldest part of the fridge, not the door. Butter is fine on the door. Milk does better in the back.
13. What’s Under Your Sink Is Probably a Mess. Here’s the Fix.

The under sink cabinet is a graveyard.
Cleaning products. Plastic bags. Old sponges. Mystery bottles from two apartments ago. It’s dark, it’s awkward to access, and most people avoid dealing with it.
But it’s also valuable storage space that’s completely wasted.
Start with a two tier shelf riser. It fits inside most under sink cabinets and instantly doubles the usable height. Put cleaning products on the top level. Bags, gloves, and backup supplies on the lower level. The SimpleHouseware 2 tier under sink organizer costs around $20.
Use a tension rod mounted across the middle of the cabinet to hang spray bottles. The bottles hang by their trigger heads. The shelf below stays clear for other items. This one trick is popular on YouTube for a reason. It actually works.
A small pull out drawer ($30 to $80) mounted inside the under sink cabinet gives you the functionality of a real drawer in a dead zone. You pull it out to reach items in the back. No more crouching and squinting.
Keep a small caddy on or next to the sink for dish soap, a sponge, and a scrub brush. When these items have a dedicated spot, they stop accumulating and spreading across the counter.
14. When Your Kitchen Needs to Do Two Jobs at Once

In a small apartment, the kitchen doesn’t always stop at the kitchen.
Sometimes the kitchen is also the dining room. The prep space doubles as the homework desk. The island is the only table you have.
This is normal. And there are furniture options built exactly for this.
A fold down wall table is the most space efficient dining solution for a tiny kitchen. When you don’t need it, it folds flat against the wall. When you do, it extends to seat two or four people. The IKEA NORBERG fold down wall mounted table costs $35. It takes about an hour to install.
A bar cart earns its keep in a small kitchen. Use it as mobile prep space while cooking. Roll it to the table for serving. Fold the sides down and park it against the wall. It’s furniture with multiple jobs, which is exactly what small spaces need.
The IKEA STENSTORP kitchen island has two built in drawers, a lower shelf, and two bar stools that slide underneath. When the stools are tucked in, the footprint is compact. It functions as an island, a dining table, and extra storage all at once.
Avoid large kitchen tables in small kitchens. They take up space you need for movement. If you need a dining surface, go small and multifunctional, not large and traditional.
15. How Backsplash and Tile Make Your Walls Do More Work

Your backsplash is not just there to protect your wall.
It affects how big your kitchen looks. It affects how much light bounces around. And in 2026, you can change it without damaging your walls.
Peel and stick tile is now genuinely good. Smart Tiles and Aspect Peel and Stick are two brands worth looking at. They go on over existing tile or painted drywall. They come off cleanly when you move. Renters can use them without losing a security deposit. A pack costs $30 to $60 and covers a standard backsplash area.
The direction of tile installation changes how a room feels. Horizontal subway tile makes a kitchen feel wider. Vertical subway tile makes it feel taller. In a low ceiling kitchen, go vertical. In a narrow kitchen, go horizontal.
A mirror backsplash sounds bold. It is. But it doubles the visual depth of your kitchen. Light bounces off it. The back wall appears twice as far away. It’s a design trick used in restaurants and hotels to make small dining rooms feel larger. It works in kitchens too.
Grout color is underrated. When your grout matches your tile closely, the eye sees one continuous surface instead of a grid. That reads as bigger. Use a slightly lighter shade than your tile for a clean, seamless look.
16. Smart Kitchen Tools Under $100 That Give You Space Back

Technology has gotten compact and useful.
You don’t need to spend $500 on a smart kitchen. A few targeted purchases under $100 each can genuinely improve how your kitchen works.
The Instant Pot is not new. But it’s still the best space trade in a small kitchen. One appliance that functions as a pressure cooker, slow cooker, rice cooker, steamer, and saute pan. That’s five single purpose appliances replaced by one. The 3 quart size is ideal for one to two person households and takes up about the same counter space as a coffee maker.
A compact digital kitchen scale with an app connection eliminates measuring cups entirely. You measure directly into the bowl on the scale. Fewer dishes, faster cleanup, more counter space. The OXO Good Grips scale costs around $50.
An under cabinet phone or tablet mount means you never need a cookbook stand or a recipe printout cluttering your counter. Mount it once and use your phone screen to follow recipes while cooking. Mounts start at $15 on Amazon.
Smart plugs cost about $10 each. Plug a smart plug into an outlet and plug your coffee maker into it. Set it to turn on before your alarm goes off. You save time and stop keeping the coffee maker on the counter plugged in 24 hours a day.
A voice assistant like an Amazon Echo Dot sits small and takes no prep surface. You can set timers, convert measurements, and check recipe steps completely hands free.
17. How Professional Cooks Think About Small Spaces (And What You Can Learn From Them)

Here’s something that might change how you think about cooking.
Professional line cooks work in 2 to 3 linear feet of space. That’s it. Two or three feet. And they produce dozens of plates a night with speed and precision.
They don’t do it with more space. They do it with a different system.
That system has a name. Mise en place. It’s a French phrase that means everything in its place. Before a line cook turns on a single burner, every ingredient is prepped, portioned, and within arm’s reach. Nothing gets searched for mid cook. Nothing gets knocked over. The cooking itself is calm because the prep was deliberate.
You can use this in your kitchen starting tonight.
Before you cook anything, pull out every ingredient. Chop everything that needs chopping. Measure everything that needs measuring. Put it all in small bowls or on a cutting board, organized by when you’ll need it. Then start cooking.
This single habit means you’ll never need more counter space than a cutting board and a few small bowls. Because everything is handled before the heat goes on.
Joshua Weissman, a YouTube chef with over 9 million subscribers, has talked about this approach in his cooking videos. Kenji Lopez Alt, food science writer and author of The Food Lab, builds the same principle into almost every recipe he writes.
Clean as you go is the other half of this system. Wash the bowl you just used while the onions saute. Wipe the counter between steps. A clean kitchen mid cook sounds slow but saves 20 minutes of post dinner cleanup.
Small kitchens don’t reward accumulation. They reward flow.
What to Do Next
You just read 17 ideas. That’s a lot.
Don’t try to do all 17 this week.
Pick one section that spoke to your biggest frustration. Is it counter space? Do Section 4 this weekend. Is it storage? Start with Section 9 and the inside of your cabinet doors. Is it the overall feel of the space? Start with Section 6 and buy a $20 LED strip.
One change creates momentum. The kitchen starts to feel different. Then you want to do another change.
Small kitchen ideas don’t require a big budget or a renovation. They require looking at the space you already have and using it better.
Your 80 square feet is enough. You just need to work with it, not against it.

- 17 Classy Living Room Ideas for a Cozy Elegant Look - April 23, 2026
- 16 Dark Moody Living Room Ideas That Feel Rich and Warm - April 22, 2026
- 14 Elegant Bedroom Trends for 2026 You’ll Love - April 22, 2026