Your Basement Is Wasting Space Right Now — Here’s How to Fix It for Less Than You Think
Your basement is sitting empty right now. And it could be costing you thousands in missed home value.
Most homeowners think fixing a basement means spending $30,000 or more. That’s the national average cost for a full basement remodel, according to Angi’s cost data. So when you get a contractor quote, it feels impossible. You close the tab and go back to pretending the basement doesn’t exist.
But here’s the thing. You don’t need a full renovation to make your basement useful, comfortable, and worth real money.
Smart, phased DIY work can transform your basement for $1,500 to $10,000 depending on how far you want to go. Some of the biggest improvements cost under $500 and take a single weekend.
This guide gives you 12 specific, affordable basement remodel ideas. Each one includes real cost ranges, product names you can actually buy, and honest advice about what you can do yourself versus what needs a pro.
No vague tips. No $50,000 inspiration photos. Just practical ideas that work in 2026.
Start With a Plan: How to Budget Your Basement Remodel Before You Buy Anything
Before you spend a single dollar, you need to know what you’re working with.
Walk into your basement right now and look for three things. First, check for moisture. Are there water stains on the walls? White powder on the concrete? A damp smell? Any moisture problem must be fixed before you do anything else. Painting over a wet wall is money wasted.
Second, measure your square footage. Multiply the length by the width. A typical basement is 400 to 800 sq ft. Write this number down. You’ll need it when buying flooring, paint, and lighting.
Third, look up. What is your ceiling height? Anything under 7 feet will feel cramped once you add flooring and ceiling tiles. This affects which ceiling solution you choose later.
Set a Realistic Budget Before You Start
Here is a simple way to think about budget tiers:
- Cosmetic refresh ($500 to $2,000): Paint, lighting, basic flooring, organization
- Partial finish ($2,000 to $7,000): Flooring, feature wall, furniture, bar setup, office
- Full finish ($7,000 to $20,000): Framed walls, bathroom, drop ceiling, egress window
Most people reading this article will fall into that first or second tier. And that is completely enough to create a space you’ll actually use.
The 80/20 Rule for Basement Remodels
80% of the visual impact comes from just three things: paint, lighting, and flooring. You can skip the framing, skip the drywall, and skip the contractor entirely, and still have a basement that looks and feels completely different.
Do You Need a Permit?
Some projects require building permits. Adding a bathroom, framing walls, or creating a legal bedroom all typically require permits. Requirements vary by city and state. Check with your local building department before you start. Skipping permits can cause serious problems when you sell your home.
Fix Problems First
If you have cracks in the foundation, standing water, or active leaks, stop. Call a waterproofing contractor before doing any cosmetic work. Finishing a wet basement is one of the most common and expensive mistakes homeowners make.
Quick Tip: Use RoomSketcher.com (free) to sketch your basement layout before buying furniture or planning zones. It saves you from moving heavy items twice.
Idea #1: Paint the Walls and Ceiling to Transform the Space Instantly

The fastest way to make your basement feel finished costs less than $400 and takes one weekend.
Fresh paint is the single highest return project you can do in a basement. It costs almost nothing compared to any other change. And it makes every other project look better.
But basement walls are different from regular drywall. Concrete and block walls are porous. They hold moisture. If you use regular interior paint, it will peel within months.
Use the Right Paint for Basement Walls
You need masonry waterproof paint. Two products that work well are:
- DRYLOK Extreme Masonry Waterproofer (available at Home Depot for about $45 to $55 per gallon in 2025)
- Zinsser Watertite Waterproofing Paint (similar price range, available at most hardware stores)
These paints seal the concrete and block moisture from coming through. One gallon covers about 75 to 100 sq ft on rough concrete. Plan for two coats minimum.
For wall color, choose light and warm. Warm white, soft gray, or a light greige (gray beige) makes a basement feel bigger and brighter. Avoid cool whites. They make basements feel like a hospital.
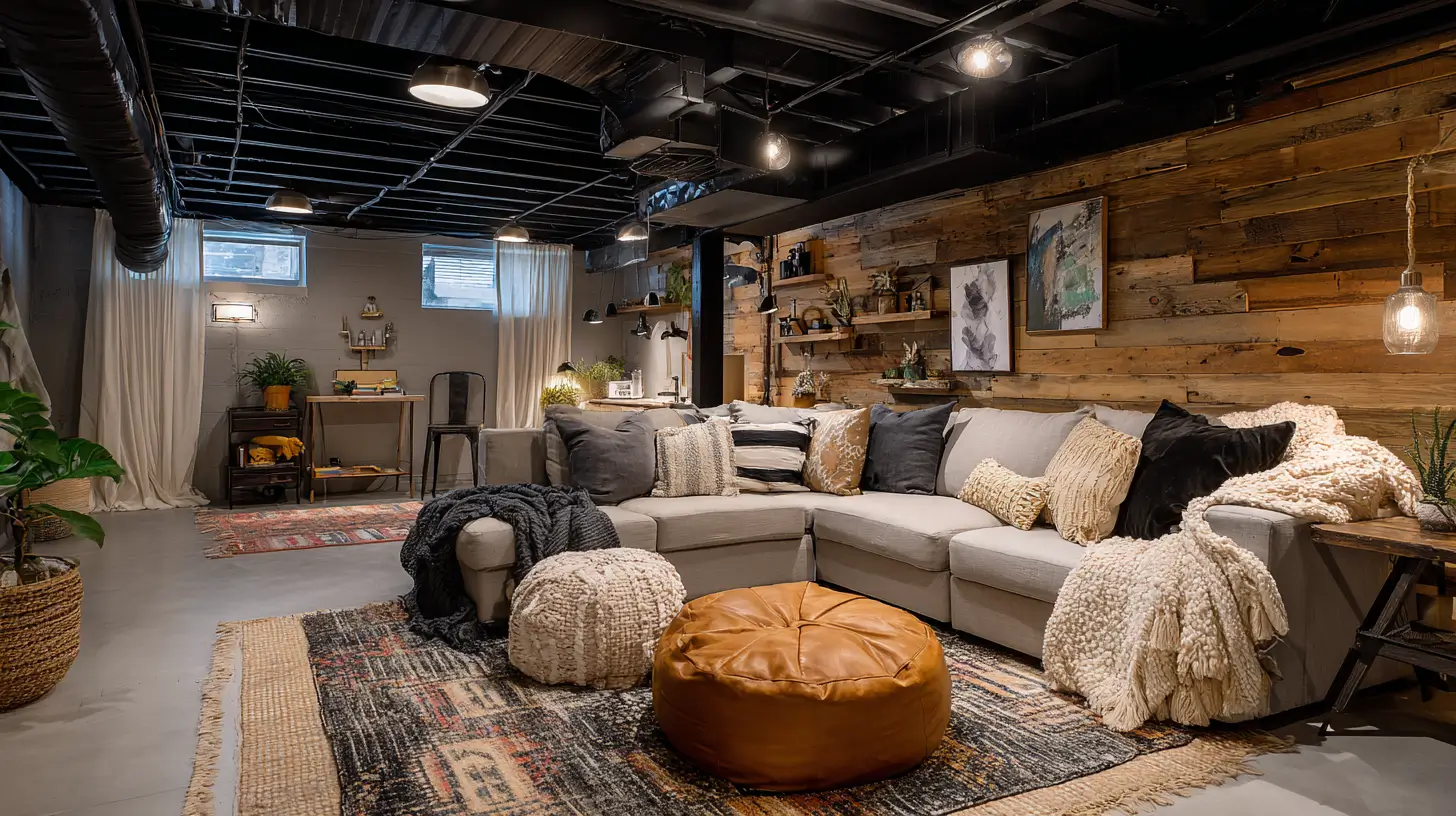
The Black Ceiling Trick
Here is the best cheap ceiling trick in home renovation. Instead of drywalling your ceiling, paint everything black.
Paint the joists, pipes, ducts, and wires all the same flat black. Everything blends together and disappears. The space suddenly feels like a stylish, intentional design choice instead of an unfinished mess. This look is featured regularly in This Old House and on HGTV.
One can of flat black ceiling paint costs about $20 to $35. For a 400 sq ft basement ceiling, you’ll need 2 to 3 cans. Total cost: under $100.
What to Do First
- Clean the walls with a wire brush and shop vac
- Fill cracks with hydraulic cement or masonry crack filler
- Let everything dry completely
- Apply DRYLOK with a thick nap roller (3/4 inch works best on textured concrete)
- Let first coat dry fully before second coat
💰 Estimated DIY Cost: $150 to $400 | Difficulty: Beginner | Time: 1 to 2 Weekends
Action step: Grab a quart of DRYLOK to test on one wall before committing to a full gallon order. It dries white and goes on thick, which surprises some first timers.
Idea #2: Install LVP or Peel-and-Stick Flooring Over Bare Concrete

Cold concrete floors kill the comfort of a basement faster than anything else. The fix is easier and cheaper than you think.
You have two solid options for budget basement flooring. Both are DIY friendly. Both are far better than bare concrete. The right choice depends on your budget and how long you want it to last.
Option 1: Luxury Vinyl Plank (LVP) — The Best All-Around Choice
LVP is 100% waterproof. It floats over concrete with a click-lock system. No glue. No nails. Most beginners can install 400 sq ft in a single day.
Top brands for basements in 2025 to 2026:
- LifeProof (Home Depot exclusive) — great warranty, waterproof core
- COREtec — thicker and more rigid, excellent for uneven concrete
- Pergo Extreme — available at Lowe’s, solid budget option
Cost range: $1.50 to $3.50 per sq ft for materials. A 400 sq ft basement typically costs $800 to $1,600 in materials total.
Option 2: Peel-and-Stick Vinyl Tiles — The Lowest Cost Option
These tiles cost $0.50 to $1.50 per sq ft. You press them directly onto clean, flat concrete. No tools needed. A 400 sq ft basement could cost as little as $200 to $600.
The downside? They are less durable. High traffic areas can peel over time. They also require very smooth concrete. If your floor is rough or uneven, they won’t stick properly.
What to Avoid
Do not install hardwood or laminate flooring in a below-grade basement. Ever. Moisture will warp and buckle both materials within months. This is one of the most common and expensive flooring mistakes in basement remodels.
One Step You Cannot Skip
Always install a vapor barrier underlayment beneath LVP on concrete. A basic 6-mil poly film or a foam underlayment with built-in moisture barrier costs $0.20 to $0.50 per sq ft. It protects your floor from moisture rising through the slab.
Simple Flooring Comparison
💰 Estimated DIY Cost: $300 to $1,600 | Difficulty: Beginner to Moderate | Time: 1 to 2 Days
Now that your floors are in, the next thing visitors will notice is the lighting.
Idea #3: Upgrade Basement Lighting Without Hiring an Electrician

Bad lighting makes even a finished basement feel depressing. You can fix it without touching a single wire.
Most basements have one or two bare bulb fixtures. The light is dim, harsh, and scattered. Fixing this is one of the highest-impact, lowest-cost changes you can make. And most options require zero electrical work.
Option 1: LED Linkable Shop Lights
These are the best value lighting upgrade for basements. A 4-foot LED shop light costs $25 to $35 at Home Depot (Commercial Electric brand is a reliable option at this price). They plug into a standard outlet. They also link together in a chain, so one outlet can power multiple lights across a long basement.
For a 400 sq ft basement, 4 to 6 shop lights provide solid coverage. Total cost: $100 to $210.
Option 2: Plug-In Pendant Lights
These hang from the ceiling and plug directly into an outlet. No wiring. No electrician. They cost $20 to $80 each on Amazon and add a finished, intentional look to any space. Place them over a bar area, seating zone, or workbench for focused light.
Option 3: Recessed Retrofit Kits for Drop Ceilings
If you have or plan to install a drop ceiling, retrofit recessed light kits are easy to install in existing ceiling tiles. Most snap in and connect to existing wiring. These do require some basic electrical comfort level, or you can have an electrician set up the circuit and then install the fixtures yourself.
Bulb Color Matters More Than You Think
Use warm white bulbs in the 2700K to 3000K range. Cool white (4000K or higher) makes basements feel cold and clinical. Warm light makes the space feel like a real room.
A Lumens Guide for Basement Lighting
- Small basement room under 200 sq ft: 2,000 to 3,000 lumens total
- Medium basement 200 to 400 sq ft: 4,000 to 6,000 lumens total
- Large basement 400 to 800 sq ft: 6,000 to 10,000 lumens total
LED shop lights typically produce 4,000 to 5,000 lumens each. Two of them can light a small basement room very well.
💰 Estimated DIY Cost: $75 to $350 | Difficulty: Beginner | Time: Half a Day
Idea #4: Finish One Feature Wall Instead of Drywalling the Whole Basement

You don’t have to finish every wall to make your basement look finished. One wall can change everything.
Full basement drywall is expensive and time consuming. Even a DIY full drywall job on a 400 sq ft basement can cost $1,500 to $3,000 in materials alone. But finishing just one focal wall costs a fraction of that, and delivers most of the visual payoff.
How to Pick Your Focal Wall
Choose the wall that faces you when you walk into the basement. Or choose the wall behind your TV or entertainment area. This is the wall guests see first. That is the wall worth finishing.
Option 1: Frame and Drywall One Wall
Basic steps:
- Frame the wall with 2×4 studs, 16 inches apart
- Attach moisture resistant drywall (green board or purple board)
- Tape, mud, and sand the seams
- Prime and paint
Cost for a 12-foot wall: roughly $150 to $400 in materials. Standard drywall sheets run $13 to $18 each at Home Depot or Lowe’s in 2025. Green board (moisture resistant) costs a few dollars more.
Option 2: Peel-and-Stick Shiplap Panels
This is the easiest way to get a finished wall look with zero construction. Brands like RoomMates and NovaBella make peel-and-stick shiplap panels that go directly over painted concrete. A pack costs $30 to $60 and covers roughly 20 to 30 sq ft.
You can do an entire 12-foot wall for $150 to $250. No tools. No framing. No mess.
Make the Wall Do Double Duty
Add floating shelves, a framed TV mount, or a gallery wall of framed photos to make the feature wall functional. A set of 3 floating shelves from Amazon costs $30 to $60 and can be installed in under an hour.
💰 Estimated DIY Cost: $150 to $500 | Difficulty: Beginner to Moderate | Time: 1 Weekend
Idea #5: Create a Multi-Use Room With Smart Furniture Layout

The biggest mistake in basement remodels isn’t spending too much. It’s designing a space that only works for one thing.
A basement used only as a guest room sits empty 350 days a year. One designed to work as a family room, guest space, AND home office works every single day. And you can set this up with smart furniture placement, no walls required.
Divide Space With Rugs, Not Walls
Area rugs are the cheapest way to define separate zones in an open basement. Place a large rug (8×10 or larger) under your sofa and TV area. Use a smaller rug at a desk or work area. Each rug tells the brain: this is a different space.
Rugs on LVP or concrete also add warmth underfoot. A large 8×10 area rug from IKEA, Amazon, or HomeGoods costs $80 to $300 depending on quality.
Use Furniture That Does More Than One Job
- Murphy wall bed: Turns a family room into a guest room instantly. IKEA offers the LUROY and MURBO Murphy bed systems for $500 to $1,200. Costco also carries wall bed kits in the $599 to $1,299 range including hardware.
- Sectional with pull-out bed: A 2-in-1 solution. A sleeper sectional provides daily seating and folds out for guests. Mid-range options run $600 to $1,500.
- Folding work desk: A wall-mounted fold-down desk from Amazon costs $60 to $150 and folds flat when not in use, freeing up floor space.
Go Vertical With Storage
Floor-to-ceiling shelving units define zones and add storage without walls. IKEA KALLAX shelving runs $70 to $195 depending on size. IKEA BILLY bookcases start at $69. Arranged in an L-shape or as a room divider, they visually separate spaces without blocking light.
According to a 2023 National Association of Realtors report, a finished basement is among the top five most desired features for homebuyers. A flexible, multi-use layout makes your space appeal to far more buyers than a single-purpose room.
💰 Estimated DIY Cost: $300 to $1,500 | Difficulty: Beginner | Time: 1 Weekend
Idea #6: Add a Drop Ceiling or Paint the Ceiling to Hide Ugly Pipes and Ducts

The ceiling is the one part of an unfinished basement that gives away the secret. Here’s how to deal with it without spending a fortune.
Exposed pipes, ducts, wires, and joists are one of the top reasons basements feel unfinished. You have two good options depending on your budget and how much access you need to those utilities.
Option 1: Drop Ceiling (Suspended Ceiling Tiles)
A drop ceiling hangs a grid system from the joists and fills it with ceiling tiles. It hides everything above it while leaving full access. You just pop a tile out to reach pipes or electrical panels.
Armstrong and USG are the two most common brands. Armstrong drop ceiling tile systems are available at Lowe’s and Home Depot. Starter kits covering a small room run $40 to $80. Full materials for a 400 sq ft basement ceiling typically cost $400 to $800.
One important note: drop ceilings reduce ceiling height by 3 to 5 inches. If your basement ceiling is already under 7 feet, this may not be a good option.
Option 2: Paint Everything the Same Dark Color
This costs under $100 for most basements and is one of the most popular trends in budget basement design right now.
Paint the joists, pipes, ductwork, and wires all flat black. Everything blends together. The eye reads it as a cohesive, designed look instead of an unfinished mess. This Old House features this approach regularly as a legitimate design choice, not just a budget workaround.
Use flat finish black paint only. Sheen on a ceiling with lots of surfaces and angles looks messy.
Option 3: Faux Wood Beam Overlays
If you want warmth without structural changes, faux wood beam wraps (hollow lightweight polyurethane beams) slip over existing joists. They cost $50 to $150 per beam and require only a few screws. Used selectively, two or three beams over a living area add a completely different character to the space.
💰 Estimated DIY Cost: $75 to $800 | Difficulty: Beginner to Moderate | Time: 1 to 2 Weekends
Idea #7: Build a Budget Home Bar Using Stock Cabinets

A basement bar sounds like a luxury project. It doesn’t have to cost like one.
Stock cabinets from IKEA or Home Depot, a simple countertop, and a small fridge can build a functional, great-looking bar for $500 to $1,500. That is well within a mid-range basement budget, and it adds real enjoyment and resale value to the space.
The Basic Bar Formula
Base cabinets + countertop + mini fridge + open shelving above = a complete bar.
Here is how each piece breaks down:
Base Cabinets:
- IKEA SEKTION base cabinets start at $80 per unit (2025 pricing)
- Home Depot stock base cabinets (Hampton Bay or Glacier Bay) run $80 to $200 per unit
- You need 2 to 3 base cabinets for a 6 to 8 foot bar
Countertop:
- Butcher block countertop from Lowe’s: $50 to $130 for a 6-foot section
- Laminate countertop remnants from a countertop shop: sometimes $20 to $50 for short sections
- Even a solid 2×12 piece of pine, sanded and sealed, works as a rustic bar top for $30 to $50
Mini Fridge or Beverage Cooler:
- A basic 1.7 cu ft mini fridge from Amazon or Walmart: $80 to $120
- A countertop beverage cooler with glass door: $150 to $350
Open Shelving Above the Bar:
- Simple floating bracket shelves from Home Depot or Amazon: $15 to $40 per shelf
- Two or three shelves above the bar hold glassware and bottles and create the “bar back” look
Materials Shopping List for a Basic 6-Foot Bar
- 2 base cabinets: $160 to $400
- Countertop: $50 to $130
- Mini fridge: $100 to $200
- 2 floating shelves: $30 to $80
- Hardware, screws, caulk: $20 to $40
Total estimated cost: $360 to $850
For inspiration, search YouTube for “budget basement bar build” on channels like The Excellent Lab or Bourbon Moth Woodworking. Both have well-produced, detailed tutorials with hundreds of thousands of views.
Adding a wet bar to a basement can increase resale value by 5 to 10% in some markets, according to HomeAdvisor data.
💰 Estimated DIY Cost: $500 to $1,500 | Difficulty: Moderate | Time: 2 to 3 Weekends
Idea #8: Set Up a Kids’ Play Area or Homework Zone That Actually Gets Used

If you have kids, the basement could be the most-used room in your home. Here’s how to set it up right for under $500.
Turning part of the basement into a dedicated kids’ space is one of the most practical uses of otherwise empty square footage. It keeps toys out of the main living areas, gives kids a space they feel ownership over, and is one of the most affordable projects on this list.
Start With the Floor
Bare concrete is hard, cold, and not safe for kids. Foam interlocking puzzle tile mats are the answer. They are soft, warm, colorful, easy to clean, and cost next to nothing.
Brands like BalanceFrom on Amazon sell puzzle mat floor tiles for about $0.90 to $1.20 per sq ft. A 10×10 play area (100 sq ft) costs $90 to $120 in foam tiles. They snap together in minutes. No tools. No adhesive.
Add the Right Storage
Kids’ toys take over any space without good storage. The IKEA TROFAST storage system is designed for exactly this. It is low and accessible, so kids can put things away themselves. Units start at $40. Add-on bins and boxes are $3 to $10 each.
For a more budget option, IKEA KALLAX works well too. Place it horizontally against a wall with fabric bins inside for toy storage.
Create an Activity Wall
Paint one wall with chalkboard paint. Rust-Oleum chalkboard paint costs about $12 to $18 per quart at most hardware stores. A quart covers roughly 50 sq ft. One wall can be entirely a chalkboard surface for under $40.
Kids love it. It adds creativity and activity to the space. And when they grow out of it, you paint over it.
Safety First
Before kids use the space, do a quick safety sweep:
- Cover all unused outlets with safety plugs
- Check for exposed nail ends on joists or walls
- Make sure shelving is anchored to a wall stud
- Add a smoke detector and carbon monoxide detector if not already present
💰 Estimated DIY Cost: $200 to $500 | Difficulty: Beginner | Time: 1 Weekend
Idea #9: Build a Home Office in the Basement for Under $1,000

Remote work is not going anywhere. A dedicated workspace in the basement can make you more productive and your home more valuable.
Working from a couch or a kitchen table gets old fast. A proper home office, even in a basement, changes how you feel about your workday. And you can build a functional, professional setup for well under $1,000 using some well-known budget hacks.
The Door Desk Trick
This is one of the most popular budget office hacks shared on Reddit’s r/HomeImprovement and r/WorkFromHome communities. Here’s how it works:
- Buy a solid core interior door blank (not hollow). Habitat for Humanity ReStore often has them for $20 to $60. Home Depot sells new ones for $80 to $120.
- Place it on top of two IKEA ALEX drawer units (4-drawer versions cost $129 to $179 each in 2025)
- You get a massive, sturdy work surface with built-in storage drawers for $260 to $490 total
That is a desk that rivals anything you’d see in a furniture store for $800 or more.
Deal With Echo and Sound
Basements are hard and reflective. Your voice echoes on video calls. Fix this cheaply with acoustic foam panels. A pack of 12 foam panels on Amazon costs $25 to $60. They stick to the wall behind you and dramatically reduce echo. Your video calls will sound professional.
Separate the Office From the Rest of the Basement
You don’t need walls to create a sense of an enclosed office. Use one of these no-construction options:
- A room divider or folding screen: $40 to $120
- A curtain hung from a tension rod or ceiling-mounted rod: $30 to $80
- A tall KALLAX bookshelf placed as a partial wall: $70 to $195
Make the Lighting Work for Video Calls
Position your desk facing away from any basement windows to avoid glare. Place a key light (a simple ring light or LED panel) in front of your face, slightly above eye level. A decent ring light on Amazon costs $20 to $50.
Stanford research on remote work productivity found that workers with a dedicated workspace are 13% more productive than those without one. A basement office is a real investment in your daily output.
💰 Estimated DIY Cost: $400 to $900 | Difficulty: Beginner to Moderate | Time: 1 to 2 Weekends
Idea #10: Add a Basement Half Bath or Use an Upflush Toilet System

Adding a bathroom to your basement is the single highest-ROI project on this list. And it doesn’t have to involve breaking concrete.
A basement without a bathroom is inconvenient. A basement with even a basic half bath (toilet plus sink) becomes dramatically more livable and valuable.
According to Remodeling Magazine’s 2024 Cost vs. Value Report, a bathroom addition consistently ranks among the highest ROI home improvement projects. Zillow data suggests a basement bathroom can add $10,000 to $30,000 to home resale value depending on your market.
Check for a Rough-In First
Before anything else, find out if your basement already has a rough-in. A rough-in means plumbing pipes are already stubbed up through the concrete slab, just capped off. Many newer homes have this.
If you have a rough-in, adding a toilet and sink could cost $1,500 to $4,000 with a licensed plumber. That is much less than a full bathroom installation.
No Rough-In? Use an Upflush Toilet System
This is a real budget saver. An upflush toilet (also called a macerating toilet) uses a grinding pump to move waste up and out through smaller pipes. It connects to existing waste lines without cutting or breaking concrete.
The Saniflo SaniStar upflush toilet system costs approximately $700 to $900 at Home Depot or on Amazon (2025 pricing). It can be installed by a competent DIYer or plumber in one to two days.
Keep the Rest of the Bathroom Budget Friendly
- Small vanity sink from IKEA (LILLANGEN or HEMNES series): $100 to $300
- Subway tile from Home Depot starts at $2.48 per sq ft (2025)
- Cement board for behind the tile: about $12 to $15 per sheet
- Basic vanity light fixture: $30 to $80
One Rule You Cannot Break
Always pull permits for bathroom additions. This protects your resale value, confirms the work is safe, and keeps your homeowner’s insurance valid. Unpermitted bathroom work is one of the most common problems flagged during home inspections.
💰 Estimated DIY/Pro Cost: $1,500 to $5,000 | Difficulty: Moderate to Advanced | Time: 1 to 2 Weeks with Plumber
Idea #11: Install a Basement Egress Window for Natural Light and Legal Bedroom Status

One window can turn a dark storage room into a legal bedroom worth tens of thousands of dollars more on resale.
An egress window is a large, code-compliant window that allows a person to escape in a fire. It is a legal requirement for any basement room used as a sleeping space. But it also solves the most common basement complaint: zero natural light.
What the Code Requires
According to the U.S. International Residential Code (IRC), a basement bedroom egress window must have:
- A minimum net clear opening of 5.7 sq ft
- Minimum clear opening height of 24 inches
- Minimum clear opening width of 20 inches
- Maximum sill height of 44 inches from the finished floor
Check with your local building department for your specific requirements. Local codes can be stricter than IRC minimums.
What It Costs
Professional egress window installation costs $2,500 to $5,000 on average. This is not a budget project. But the return is massive.
Adding a legal bedroom in a basement can increase home value by $20,000 to $50,000 depending on your market. In high-cost cities, that number is even higher.
Is This a DIY Project?
Generally no. Cutting through a foundation wall requires structural knowledge, waterproofing expertise, and often permits with inspections. Mistakes here can lead to water damage or structural issues.
Hire a licensed contractor for the window and well installation. Do the painting, trim, and interior finishing yourself to save money.
The Cheaper Version: Window Well Upgrade
If you already have small basement windows, you can upgrade the window wells to bring in more light without cutting new openings. Window well kits at Home Depot run $50 to $200. Adding a window well cover keeps out leaves and water while still allowing light in.
Even a standard basement window replacement (old window swapped for a new energy efficient one) costs $400 to $900 installed and makes a noticeable difference in light and warmth.
💰 Estimated Cost: $2,500 to $5,000 (with contractor) | DIY Difficulty: Not Recommended | Time: 2 to 5 Days
Idea #12: Use Smart Storage to Instantly Make Your Basement Feel Bigger

The cheapest remodel project on this list is also one of the most satisfying. Organized space feels finished, even without a single construction project.
Clutter is the enemy of usable square footage. A basement full of boxes stacked in random piles makes the space feel impossible to use, regardless of how nice the walls or floors are.
Smart storage systems fix this. And they cost a fraction of any construction project.
Wall-Mounted Pegboard or Slatwall Panels
Turn one basement wall into a full organizational system with pegboard.
A 4×8 ft pegboard sheet at Home Depot costs approximately $25 to $35. Add pegboard hooks, bins, and shelves ($20 to $50 in accessories) and you have a wall that stores tools, sports gear, holiday decorations, or anything else.
Slatwall panels are a step up in polish. They cost $30 to $80 per 4×8 panel and accept standard slatwall hooks and shelving.
Heavy Duty Metal Shelving
Get everything off the floor with heavy duty metal shelving units.
- Gladiator GarageWorks steel shelving at Home Depot: $80 to $180 per unit
- Husky heavy duty steel shelving at Home Depot: $70 to $150 per unit
- Both hold 1,000 to 2,000 pounds per unit and assemble in under an hour
Four units along one wall can hold an enormous amount of seasonal items, tools, and household overflow, all in clearly visible and accessible rows.
Overhead Ceiling Storage Racks
Ceiling storage racks mount to the joists and lift storage up off the floor entirely.
Costco carries 4×8 ft overhead storage racks for $100 to $180. They are great for holiday bins, large items, and anything you access only a few times per year.
Clear Bins and Labels
This sounds simple, but it makes a real difference. Replace old cardboard boxes with clear plastic bins. You can see what is inside without opening every box. Label each bin with a label maker or even masking tape and a marker.
A set of 10 clear stackable bins on Amazon costs $40 to $80.
Once everything is organized, your usable living square footage effectively increases without any construction. A National Association of Professional Organizers survey found that 82% of people feel less stressed and more productive in an organized space.
💰 Estimated DIY Cost: $150 to $600 | Difficulty: Beginner | Time: 1 Weekend
What to Tackle First: A Phased Approach for Your Basement Remodel
You do not have to do all 12 ideas at once. In fact, doing them in phases is smarter and easier on your wallet.
Here is a realistic roadmap for completing your basement remodel over 6 to 18 months. Each phase builds on the last, and every phase makes a real difference on its own.
Phase 1 — Under $500: The Quick Win Phase
Start here. This phase costs the least and gives you the most visible progress the fastest.
- Deep clean and declutter the entire space
- Add heavy duty shelving to organize what stays
- Paint walls with DRYLOK or masonry paint
- Paint the ceiling black (if exposed joists)
- Add LED shop lights or plug-in lighting
You will barely recognize your basement after Phase 1. And you will feel motivated to keep going.
Phase 2 — $500 to $2,000: The Livable Space Phase
Now the basement actually functions as a room.
- Install LVP flooring
- Finish one feature wall
- Add furniture and zone the space with rugs
- Set up a play area, office, or bar depending on your needs
Phase 3 — $2,000 to $5,000: The Polished Finish Phase
This is where the space goes from “pretty good” to “wow.”
- Install a drop ceiling or add faux wood beams
- Build out a full bar or fully equipped home office
- Add a second round of lighting, art, and decor
Phase 4 — $5,000 and Up: The Value Addition Phase
These are the big ticket items. Only tackle them when your budget allows and your plan is solid.
- Add a half bath or full bath
- Install an egress window for legal bedroom status
- Frame and drywall additional rooms
Spreading this across 12 to 18 months reduces financial strain. You also learn as you go, so later projects turn out better than earlier ones.
Your Basement Can Be Different Starting This Weekend
Your basement does not have to stay a dark, cluttered, wasted space.
You now have 12 specific ideas, real cost ranges, and a clear starting point. You know what to tackle first. You know what to DIY and what to hand to a pro. And you know that meaningful progress is possible for $500 or less if you start with the basics.
Pick one idea from this list. Just one. Start this weekend.
Even a $150 paint job can completely change how your basement looks and feels. That first win creates momentum. And that momentum carries you through the bigger projects.
Whether you’re looking for cheap basement finishing ideas for a tight budget or planning a complete DIY basement renovation on a budget over the next year, these 12 basement remodel ideas give you a real, affordable, and honest starting point.
Your extra square footage is waiting. Go use it.

- 16 Ideas for Dressing Large Windows with Blinds & Curtains - April 8, 2026
- How to Decorate a Bedroom From Scratch (Step by Step) - April 8, 2026
- 16 DIY Kitchen Ideas That Transform the Space Without a Contractor - April 8, 2026


