Your basement is probably the most expensive square footage in your home that you’re completely ignoring.
You walk down there to grab a box of Christmas ornaments, dodge a spider web, and think “One day I’ll do something with this space.” And then you don’t. Another year passes. The broken treadmill is still there.
Here’s the hard truth: professional basement renovations cost between $20,000 and $80,000, according to Angi’s 2024 cost data. That number alone is enough to make anyone close the browser tab and forget about it forever.
But you don’t need $20,000. You don’t need a contractor. And you definitely don’t need a permit for most of what’s on this list.
These 12 budget-friendly basement decor hacks are the ones real homeowners use. Most cost under $100. Many take a single weekend. None require special skills. YouTube creators, Reddit communities, and DIY homeowners across the country have tested and validated every single one of these approaches.
Here are 12 budget-friendly basement decor hacks that will transform your forgotten space into a room you actually want to use. No contractor required.
Hack #1: Peel-and-Stick Wall Panels That Hide Ugly Concrete

Concrete and cinder block walls are the number one reason basements feel like bunkers instead of living spaces.
The good news? You don’t need to hire a mason or install drywall to fix it. Peel-and-stick 3D wall panels now cost between $2 and $6 per square foot on Amazon and Wayfair. That’s a fraction of what real brick veneer or drywall finishing would cost.
These panels come in faux brick, shiplap, stone, and wood styles. They stick directly to concrete, painted cinder block, and existing drywall. All you need to do is clean the surface, let it dry, and optionally prime it with a coat of Kilz if the surface is chalky or dusty.
The smartest move for first-timers: start with one accent wall. Pick the wall behind your couch or TV. You’ll spend $50 to $100 and finish before dinner. Once you see the result, you’ll want to do the whole room.
According to a 2024 Houzz survey, textured accent walls ranked among the top five design trends homeowners wanted in their homes. Basements are the easiest and cheapest place to try this trend without risking the main living areas.
Start with one accent wall behind a couch or TV. You’ll spend about $50 to $100 and finish before dinner.
Hack #2: Use LED Strip Lighting to Kill the Dungeon Feel

If your basement lighting is a single bare bulb hanging from a chain, this one hack will change how you feel about the entire space.
Lighting is the most underrated design tool in any room. In basements, it’s not just about style. It’s about making the space feel like somewhere you’d actually want to spend time. Poor lighting is the main reason basements feel cold, uninviting, and depressing.
LED strip lights cost between $10 and $30 on Amazon. They install in minutes. You peel off the backing and press them along ceiling edges, underneath shelving, or behind your TV or furniture. No electrician needed. No tools required.
Choosing the right color temperature matters more than most people realize:
- 2700K to 3000K (warm white): Creates a cozy, living room feel. Best for movie rooms and lounges.
- 3500K (neutral white): Good for general-purpose basement living spaces.
- 4000K to 5000K (cool white): Better for home offices, workshops, and gyms.
Smart LED strips from Govee and Philips Hue connect to Alexa and Google Home. You can control color and brightness from your phone. Govee strip lights have over 100,000 ratings on Amazon with a consistent 4.5-star average.
Here’s the key thing most people miss: don’t rely on one light source. Overhead lighting alone makes a basement feel like a hospital hallway. Layer your lighting. Combine LED strips with a floor lamp in one corner and a table lamp in another. According to the American Lighting Association, layered lighting can make a room feel up to 30 percent larger.
Jeff Thorman from the YouTube channel “Home Renovision DIY” (1.5 million-plus subscribers) covers basement lighting strategies in detail. His channel is worth bookmarking if you’re serious about this process.
For under $25 and 30 minutes of work, you’ll wonder why you waited this long.
Hack #3: Paint Your Basement Ceiling Black (Yes, Really)

This is going to sound wrong. But hear me out: paint your basement ceiling black.
Most people’s first reaction is “won’t that make it darker?” That’s the right question. And the answer is actually no, not if you do it right.
Here’s what’s happening on most unfinished basement ceilings: exposed joists, pipes, ductwork, electrical wires, and maybe an old smoke detector that’s been up there since 2003. All of that visual clutter at different heights and colors makes the ceiling feel chaotic and low. It draws your eye upward in a bad way.
When you paint all of it the same flat black, something different happens. The ceiling visually recedes. The eye stops focusing on the details and the room suddenly feels taller. Combined with the LED strip lighting from Hack #2, the effect is “intentional industrial loft” instead of “unfinished basement.”
Here’s the cost comparison that makes this a clear winner:
What you’ll need:
- Behr Ultra flat black or Zinsser flat black paint: $25 to $35 per gallon, covers about 350 square feet
- A paint sprayer: Rent one from Home Depot for around $40 per day. It’s the only practical way to coat all those pipes and wires evenly
- A good dust mask and eye protection
Don’t try to roll paint around exposed pipes by hand. It takes forever and looks messy. The sprayer is the only approach that gives clean, even coverage in a single pass.
The r/HomeImprovement subreddit has hundreds of before-and-after posts for this exact project. Search “painted basement ceiling” there and you’ll find posts with over 1,000 upvotes showing the real results. This is real-world validation from people who’ve actually done it.
Designer Orlando Soria, author of “Get It Together,” has publicly recommended this technique as one of the most effective budget transformations for below-grade spaces.
Check out r/HomeImprovement and search “painted basement ceiling.” The before-and-after photos will convince you faster than I can.
Hack #4: Lay Interlocking Floor Tiles Over Concrete

Cold, gray concrete under your feet is a constant reminder that you’re in a basement. Covering it is easier and cheaper than you think.
You don’t need glue. You don’t need mortar. And you definitely don’t need a flooring contractor.
Interlocking floor tiles snap together like puzzle pieces and float right over your existing concrete. No adhesive. No tools required beyond a utility knife to trim edges. If you ever want to change the floor, or if you’re renting and need to take it with you, the tiles lift right back up.
LVP stands for luxury vinyl plank. It looks like real hardwood, it’s 100 percent waterproof, and it’s one of the most popular flooring choices for basements. Budget-friendly brands like TrafficMaster at Home Depot and Lowe’s start at around $1.50 per square foot.
The one thing you absolutely must not skip: a moisture barrier underlayment. Concrete sweats. Even if your basement feels dry, moisture vapor rises through the slab. Products like DMX One Step (around $1 per square foot) create a barrier between the concrete and your new floor. Skip this step and you’ll be dealing with mold within a year.
The National Association of Realtors’ 2024 Remodeling Impact Report ranked new flooring among the highest-satisfaction home projects, with a perfect Joy Score of 10 out of 10 for hardwood-style floor installations. That satisfaction carries over to basement floors too.
For a 400-square-foot basement, you’re looking at $600 to $1,200 in total materials. One person. One weekend. No contractor.
A 400-square-foot basement can get new flooring for $600 to $1,200 in materials, installed in a weekend by one person.
Hack #5: Create Zones With Area Rugs Instead of Walls

You don’t need walls to have rooms. You just need rugs.
Building actual walls to divide your basement requires framing, drywall, possibly a permit, and a minimum of $1,000 in materials alone. Area rugs do the same job visually for a fraction of the cost and zero construction.
Here’s how zone-defining works: each large rug anchors a “room.” The couch and coffee table sit on one rug. That’s your living area. A smaller rug under a desk and chair creates the home office. A runner between them becomes the hallway. No walls needed. The eye reads each rug as a separate zone.
Three basement layouts that work well with this approach:
- Media room plus home office: 9×12 rug under the seating area, smaller 5×7 rug under a desk
- Playroom plus guest sleeping area: Bright patterned rug for kids’ zone, neutral rug for sleeping area
- Home gym plus lounge area: Foam tiles in the gym zone (see Hack #4), area rug in the lounge corner
Where to buy rugs without overspending:
- Rugs USA: Regularly runs 70 to 80 percent off sales where 8×10 rugs go for $80 to $150
- IKEA: Flat-rate affordable options that work well in casual spaces
- Facebook Marketplace: Clean, used rugs often go for $10 to $40
- Amazon Unique Loom brand: Consistent quality at low prices
Interior stylist Emily Henderson has written extensively about using rugs to define zones on her blog at stylebyemilyhenderson.com. Her advice for open-plan spaces applies directly to unfinished basements.
Bonus benefit: rugs add warmth underfoot on cold concrete floors. They also absorb echo and sound in basements, which tend to be acoustically harsh.
A $100 rug from Rugs USA on sale does the work of a $2,000 framed wall.
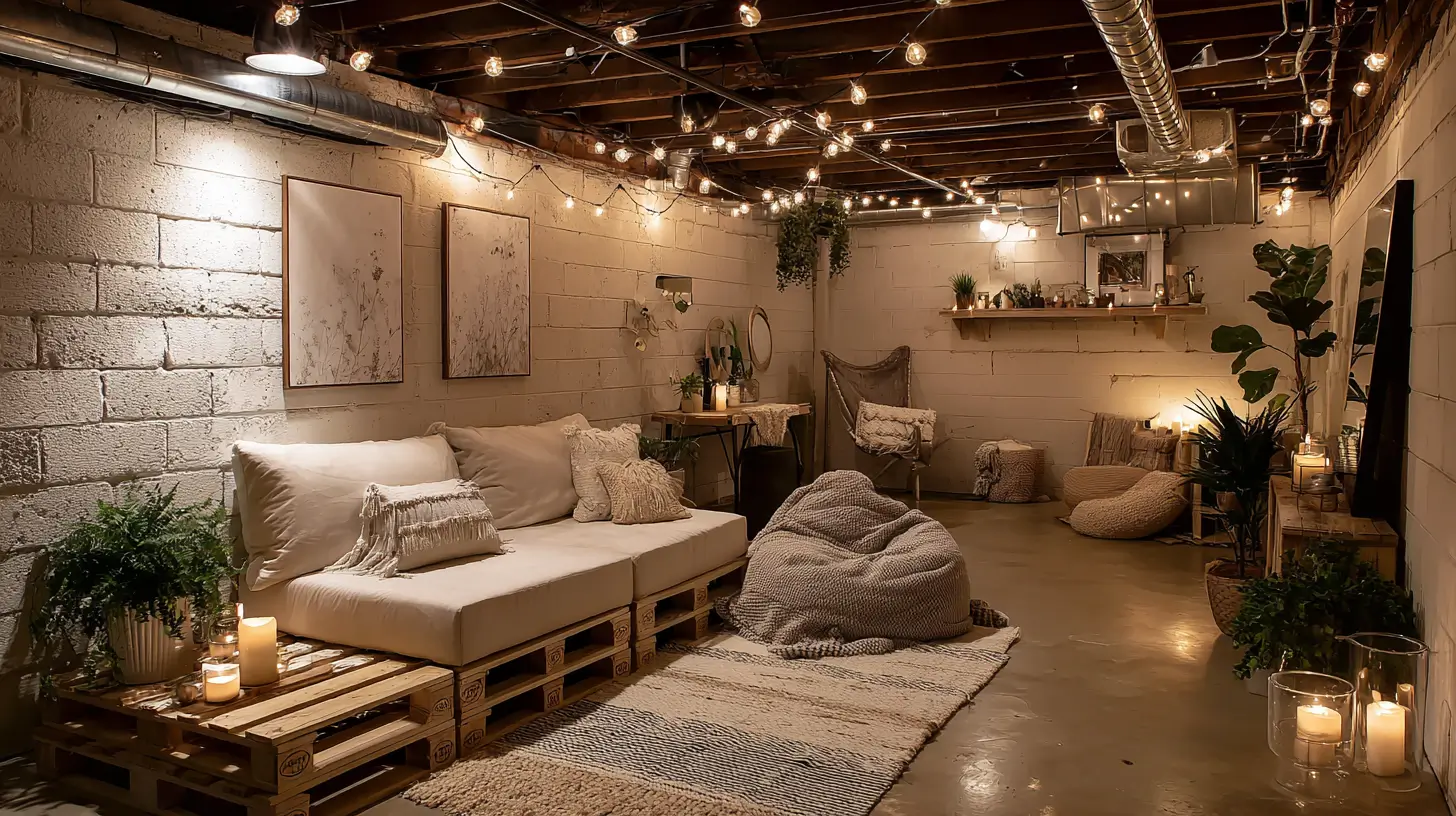
Hack #6: Build a DIY Accent Wall With Reclaimed Pallet Wood

Free materials, one power tool, and a Saturday afternoon. That’s all it takes to build the most talked-about wall in your house.
Reclaimed pallet wood accent walls have stayed popular for a reason. They add warmth, texture, and a rustic look that’s hard to fake with cheaper materials. And if you source your pallets for free (which you can), the whole project costs about $20 in sandpaper and stain.
Where to find free pallets:
- Facebook Marketplace (search “free pallets”)
- Craigslist free section
- Local warehouses, garden centers, and hardware stores
- Furniture and appliance delivery services
Critical safety warning before you go pallet hunting: Look at the stamp on the wood. Pallets stamped “HT” are heat-treated. These are safe for indoor use. Pallets stamped “MB” were treated with methyl bromide, a toxic pesticide. Never use MB-stamped pallets inside your home. This is the step most other guides skip, and it matters.
Also wear a dust mask while sanding. Pallet wood dust irritates the lungs, especially in a closed basement space.
The basic process:
- Find 10 to 15 HT-stamped pallets for a standard 8×10 wall
- Break them down into individual boards with a pry bar
- Sand down rough edges and surfaces
- Stain or leave natural (natural gray looks excellent as-is)
- Nail directly to wall studs or into existing drywall
If you’d rather skip the sourcing work, Stikwood and Weaber sell pre-made peel-and-stick reclaimed wood panels for $8 to $12 per square foot. A small feature wall (about 4×6 feet) comes in under $150 that way.
YouTube channels “Pneumatic Addict” and “Shanty2Chic” both have step-by-step pallet wall videos with millions of combined views. Worth watching before you start.
Total cost if you find free pallets: about $20. Total compliments from visitors: consistent and ongoing.
Hack #7: Hang Curtains to Cover Storage Areas and Utilities

No one wants to look at a water heater while watching a movie. Building a closet around it costs hundreds. Curtains cost $15.
Every basement has at least one ugly corner. Maybe it’s the furnace. Maybe it’s open wire shelving stacked with plastic bins. Maybe it’s a laundry area with pipes running up the wall. None of that has to be visible.
Floor-length curtains hung from tension rods or ceiling-mounted tracks hide anything instantly. No drilling into joists. No construction. And the effect is clean, intentional, and surprisingly polished.
Two installation options:
- Tension rods ($5 to $15): Press between two walls or inside a doorframe. Best for smaller utility closets and alcoves.
- Ceiling-mounted curtain tracks ($15 to $30 on Amazon): Screw into ceiling joists, then clip curtain rings onto the track. Best for longer runs and room dividers.
IKEA’s MAJGULL blackout curtains are the most recommended budget option for basements. They run $15 to $25 per panel, come in neutral colors, and block light effectively. They’re consistently among IKEA’s top-selling curtain styles in the US.
One important safety note: Keep curtains at least three feet away from furnaces and water heaters. If your curtain will be anywhere near a heat source, choose a flame-retardant fabric. This is not optional. It’s a fire safety requirement.
Pro tip from interior designers: hang your curtain rod as close to the ceiling as possible, not just above the door or opening. High-hung curtains make the room feel taller. This advice is backed by multiple articles on Apartment Therapy, one of the most-cited interior design resources online.
You’re not hiding the utilities. You’re giving your basement the permission to be a real room.
Hack #8: Furnish Your Basement for Less With Secondhand Finds

Your living room deserves new furniture. Your basement? It deserves character. And character comes cheap on Facebook Marketplace.
Basements are actually the perfect place for secondhand furniture. You’re not worried about impressing guests the same way you are upstairs. And because basements have humidity and temperature fluctuations, you won’t stress about a secondhand piece the way you might about a brand-new $800 sofa.
Best places to find secondhand basement furniture in 2025 and 2026:
- Facebook Marketplace: The best free resource. Set alerts for specific items in your zip code.
- OfferUp: Strong in urban and suburban areas with good photo listings
- Craigslist: Older platform but still active, especially for free items
- EstateSales.net: Find local estate sales with full household contents, often priced to clear fast
- Habitat for Humanity ReStores: Over 900 locations across the US at habitat.org/restores, with donated furniture and building materials at deep discounts
What to look for when buying secondhand for a basement:
- Solid wood frames (survive humidity better than particle board)
- Leather or vinyl upholstery (mold-resistant, easy to wipe clean)
- Metal frames and legs
What to buy new:
- Mattresses (always buy new for hygiene reasons)
- Particle board furniture (it swells and falls apart in basement humidity)
- Upholstered items with visible stains, odors, or unknown history
ThredUp’s 2024 Resale Report projected the global secondhand market would reach $350 billion by 2027. The stigma around used furniture has essentially disappeared. People on YouTube regularly show “Facebook Marketplace haul” videos where they furnished an entire basement room for under $200. Search that phrase on YouTube and you’ll find dozens of examples.
Set a Facebook Marketplace alert for “free couch” or “free bookshelf” in your zip code. You’ll be surprised what people are giving away.
Start your search tonight. You might have a full basement room furnished by the weekend.
Hack #9: Add a Gallery Wall Using Free and Cheap Printable Art

The walls are the biggest canvas in your basement. Leaving them bare is like buying a house and never moving in.
A gallery wall sounds expensive. It isn’t. You can build a professional-looking one for under $30 if you know where to get art for free.
Free and low-cost art sources:
- Rijksmuseum open-access archive (rijksmuseum.nl/en/rijksstudio): Over 700,000 high-resolution classic artworks, completely free to download and print
- NASA image gallery (nasa.gov): Free high-resolution space photography
- Unsplash (unsplash.com): Free high-resolution photos from professional photographers
- Etsy printable art shops: $2 to $5 per digital download for modern, curated designs
Budget frame sources:
- Dollar Tree frames: $1.25 each (16,000-plus locations across North America)
- IKEA FISKBO frames: $1 to $3 each in multiple sizes
- Thrift store frames: $1 to $5, spray-paint them a uniform color for a cohesive look
Here’s the step-by-step process to build your gallery wall:
- Pick a theme or color palette (black and white photography, botanical prints, vintage maps, etc.)
- Download or print 6 to 9 pieces
- Buy matching frames in a mix of sizes
- Lay your frames out on the floor exactly how you want them on the wall
- Take a photo of that layout on your phone
- Transfer to the wall using strips of painter’s tape as guides before hammering
- Hang the frames, using the photo as your reference
That painter’s tape step saves you from 20 unnecessary nail holes. Don’t skip it.
Etsy reported over 90 million active buyers in 2024, and printable wall art is consistently one of its top-selling digital product categories. The Sorry Girls on YouTube have excellent gallery wall tutorials with detailed budget breakdowns if you want to see the process in action before you start.
For under $30, you’ll have a wall that looks like you hired an interior designer. You didn’t. You just had WiFi and a printer.
Hack #10: Install Floating Shelves for Storage That Doubles as Decor

Floating shelves are the Swiss Army knife of basement decor: they store, they display, and they make blank walls interesting, all for about $15 each.
Most basements have a storage problem and a decor problem. Floating shelves solve both at the same time. They get things off the floor, they give you somewhere to put decorative objects, and they turn a boring wall into something worth looking at.
Budget-friendly shelf options:
- IKEA LACK shelves: $9.99 to $14.99 each, a bestseller for over a decade for good reason
- BAMFOX floating shelves: Sets of 3 for $15 to $25 on Amazon
- AMADA HOMEFURNISHING: Solid, inexpensive sets widely available on Amazon
Installing into a concrete wall requires a hammer drill, masonry bits, and Tapcon concrete screws. A basic hammer drill kit from Home Depot costs around $30. Once you have it, you can install shelves anywhere in the basement. If your walls are already drywalled, standard drywall anchors work fine.
What to put on your basement floating shelves:
- Low-light plants: pothos, snake plants, and ZZ plants thrive in basement conditions
- Books stacked horizontally or placed spine-out for a more textured look
- LED candles for warmth (real candles in a basement are a fire risk)
- Small framed photos or prints
- Decorative baskets or boxes that hide clutter while looking intentional
The rule of three: Group items in odd numbers. Three objects look better than four. Five looks better than six. This is a basic interior design principle that works every single time, and it costs nothing to apply.
The National Gardening Association has reported significant indoor plant growth since 2020, with low-light varieties like pothos consistently ranking among the most popular. Your basement shelves are a perfect place to add some green.
Three shelves, fifteen minutes of installation, and suddenly that boring wall is the most interesting thing in the room.
Hack #11: Use Mirrors to Double Your Light and Space

Interior designers have a secret weapon for making small, dark rooms feel bigger and brighter. It costs $30 at IKEA.
Mirrors are one of the most powerful and least expensive tools in any decorating project. They reflect light, which matters enormously in a basement. They make rooms look larger. And they add a visual anchor to empty walls without the effort of a gallery wall.
The placement rule is simple: put a mirror directly across from any light source. In a basement with windows, that means placing a mirror on the wall facing the window. In a windowless basement, put the mirror across from a floor lamp, LED strip, or overhead fixture. The light hits the mirror and bounces back into the room, effectively doubling the perceived brightness.
Where to find budget mirrors:
- IKEA HOVET full-length mirror: around $50
- Walmart and Target leaning mirrors: $30 to $60
- Facebook Marketplace and thrift stores: often $5 to $20 for large statement mirrors
Three mirror approaches for basements:
- The single statement mirror: One oversized leaning mirror propped against a wall. No mounting required. A current trend that requires zero tools.
- The mirror gallery wall: Group five to seven thrift store mirrors of different shapes on one wall. Spray-paint all the frames the same color for a pulled-together look.
- The faux window trick: Hang a mirror on the wall and drape sheer curtains on either side of it. From across the room, it reads like a window. It genuinely fools the eye.
The American Society of Interior Designers consistently ranks mirrors as the most cost-effective tool for making small, dark rooms feel larger. This isn’t a new trick. It’s a proven design principle.
One large mirror across from a light source can double the perceived brightness of your basement. That’s not an exaggeration. It’s how light actually works.
Hack #12: Control Moisture and Odor So Your Decor Actually Lasts

Here’s the truth that no Pinterest board will tell you: none of these hacks matter if your basement is damp and musty. This is the hack that protects every other hack on this list.
You could spend $500 on peel-and-stick panels, new flooring, and LED lights. Then one wet season later, the panels are peeling, the flooring is buckling, and everything smells like a wet dog. Moisture is the enemy of every basement decor project.
The good news is that controlling moisture is not complicated or expensive.
Step one: get a dehumidifier. A quality basement dehumidifier costs $150 to $250. Brands like hOmeLabs, Frigidaire, and Midea consistently earn top scores in Consumer Reports and Wirecutter testing. Frigidaire and hOmeLabs models regularly appear on “Best Budget” lists.
Run your dehumidifier to maintain 30 to 50 percent relative humidity. The EPA recommends this specific range to prevent mold growth and maintain healthy indoor air quality. You can verify this at epa.gov.
Step two: seal your concrete. Before you install any flooring or wall treatments, apply a waterproof concrete sealant like DRYLOK to your floors and walls. One gallon costs around $35 at Home Depot. It creates a vapor barrier that stops moisture from wicking through the slab.
Step three: add DampRid to problem spots. DampRid hanging moisture absorbers cost $3 to $5 each. Put one in every closet, corner, and utility area. They pull excess moisture out of the air passively, with no power required.
According to FEMA, over 60 percent of US homes have some form of below-grade moisture issue. So if your basement smells musty, you’re not alone and it’s fixable.
Your basement moisture maintenance checklist:
- Run the dehumidifier and keep humidity between 30 and 50 percent
- Check for water intrusion along walls after heavy rain
- Clean the dehumidifier filter monthly
- Reapply DRYLOK sealant every 3 to 5 years
- Replace DampRid containers when they’re full
A $200 dehumidifier protects thousands of dollars in future decor and furniture. It’s the least glamorous hack on this list. It’s also the most important one.
Your Basement Is Worth More Than You’re Using It For
You don’t need $50,000. You don’t need a contractor. You need a weekend, a plan, and about $100 to start.
Here’s a quick look at what these 12 hacks actually cost compared to their professional alternatives:
The best part: you don’t need to do all 12 at once. Pick one. Start this weekend. Take a before photo before you start so you can see the real difference when you’re done.
That momentum is real. Most people who try one hack come back for a second and a third. Within a few weekends, they have a basement that looks like it cost 10 times what they actually spent.
With these budget-friendly basement decor hacks, every homeowner can turn hundreds of wasted square feet into a room they actually want to be in.
Start with Hack #12 (moisture control) if your basement smells at all. Then pick whichever visual hack excites you most and begin there. Your forgotten space is waiting.

- 16 Ideas for Dressing Large Windows with Blinds & Curtains - April 8, 2026
- How to Decorate a Bedroom From Scratch (Step by Step) - April 8, 2026
- 16 DIY Kitchen Ideas That Transform the Space Without a Contractor - April 8, 2026


