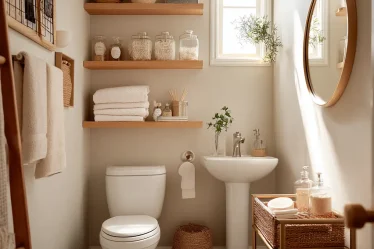
You walk into your bathroom and want to feel like you just stepped into a boutique hotel. No jackhammers. No dust clouds. No three‑week timeline. That’s exactly what modern peel and stick tile gives you.
The problem is simple. You love the look of high‑end materials—Carrara marble, Moroccan zellige, checkerboard floors—but you have barriers. Maybe you rent and can’t do permanent work. Maybe your budget is tight. Or maybe you just don’t want to learn how to use a wet saw and mix thinset.
This is not your grandmother’s contact paper. We’re going to walk through 16 high‑impact designs that use the 2026 trends in texture, scale, and waterproof technology. You’ll also get the exact installation tricks that make these tiles last, whether you put them on walls, floors, or even inside a shower.
Let’s get to work.
1. Marble Hexagons for a Spa Foundation

Want your bathroom to feel like a spa? Marble does that. Hexagon shapes make it even better because the six sides hide small wall imperfections that squares would show off.
Look for large‑format hex sheets—8 inches or bigger. Fewer sheets mean fewer seams, and fewer seams mean a more realistic look. Pay attention to the veining patterns, too. You want sheets that match up so the pattern flows instead of looking chopped up.
Smart Tiles and FloorPops make solid options in their Bowen series. For 2026, skip the warm Calacatta Gold. Designers are leaning toward Statuary or Gray Vein marble—cooler tones that give a clean, modern spa feel.
Pro‑tip: Use a laser level before you stick anything. Marble shows every mistake. A level line saves you hours of frustration.
2. Vertical Stack Bond to Fake Height

Low ceilings make a bathroom feel cramped. You can fix that without knocking down walls.
The trick is the stack bond pattern—rectangles stacked straight on top of each other, not staggered like a brick wall. This pattern pulls the eye upward. Pair it with long subway tiles, like 3×12 or 4×12 inches, and suddenly your ceiling looks taller.
Art3d makes flexible PVC panels that look like glossy ceramic but bend over curved walls. That matters because older bathrooms rarely have perfectly flat walls.
Pro‑tip: Run the tiles all the way to the ceiling, even above the shower. Stopping halfway kills the illusion.
3. Zellige Texture to Trick the Eye

In 2026, texture is everything. Flat, uniform tiles scream “fake.” Handcrafted zellige tiles—the real ones—have slight color variations and uneven surfaces that catch light beautifully.
Stick‑on versions now mimic that look. They use a soft gel coating that reflects light differently across each tile. The slight imperfections actually work in your favor: they hide bumps and dips in your walls better than a perfectly smooth tile ever could.
According to Houzz’s 2024 Bathroom Trends Study, homeowner interest in textured surfaces jumped 30% year over year. That trend is only getting stronger.
Pro‑tip: Buy an extra box and mix tiles from different batches. Random color variation makes the finish look intentional, not like a mismatch.
4. Checkerboard Floor (But Make it Vinyl)

Black and white checkerboard floors are timeless. But using tiny stick‑on squares to create that pattern is a pain. The seams never line up, and the pattern goes crooked fast.
Instead, use large‑format vinyl tiles—12×12 inches or even 18×18. Lay them in a checkerboard pattern with far fewer pieces. LifeProof and TrafficMaster make peel and stick vinyl tiles that are actually rated for wet areas if you seal the edges with a silicone bead around the perimeter.
Pro‑tip: Warm the tiles before you stick them. Set them in the sun for an hour or use a hair dryer. Warm vinyl bends easier and bonds tighter.
5. Shiplap Wallpaper for Coastal Texture

Not every stick‑on project needs to look like tile. 3D PVC shiplap panels give you the look of rustic wood without the maintenance. Real wood in a bathroom warps and swells. PVC never does.
These panels work best on an accent wall behind the vanity. That area gets splashes but not direct shower spray, so the material stays safe. The texture adds warmth and breaks up all the hard surfaces.
Pro‑tip: Run the panels vertically instead of horizontally. Vertical lines make the room feel taller, just like the stack bond trick we talked about earlier.
6. The “Faux” Mosaic Accent Strip

Covering an entire wall with stick‑on mosaic sheets can look fake. The pattern repeats too much, and the seams are hard to hide.
But using a single strip of mosaic—placed about one‑third of the way up the wall—looks intentional and high‑end. It acts like a chair rail, breaking the wall into two zones. Paint above, mosaic below. Or tile above, mosaic strip as the transition.
This works especially well in powder rooms where you want a little pop without overdoing it.
Pro‑tip: Use a wood trim piece (painted white) to cap the top of the mosaic strip. It gives a clean, finished edge that looks professionally installed.
7. Matte Black Penny Rounds

Penny rounds are gorgeous, but real ones require hours of setting tiny circles and then grouting them. Stick‑on penny rounds skip all that.
New silicone‑based versions, like those from Inovar, feel like real porcelain but install in minutes. They come in sheets just like real mosaic. Go with matte black instead of white. Black hides hair, soap scum, and water spots way better—a huge win for busy bathrooms.
Pro‑tip: Use a J‑roller (a small hand roller) over the sheets after you stick them. It presses every penny firmly into the adhesive and removes air bubbles.
8. Floor‑to‑Ceiling Slab Effect

Want the ultimate “real renovation” look? Use large‑format stick‑on panels that mimic a solid marble slab. We’re talking 4×4 foot panels that cover huge areas with almost no seams.
This is the best option for shower walls because real marble has grout lines that grow mold. With slab‑effect panels, you eliminate most grout lines entirely. The few seams you do have can be sealed with waterproof silicone.
Check The Tile Shop or Amazon for “large format peel and stick shower panels.” Look for panels with a UV‑resistant coating so they don’t yellow over time.
Pro‑tip: Use a helper. These big panels are awkward to handle alone, and once they touch the adhesive, you have seconds to position them perfectly.
9. High‑Gloss Ceramic Look

Nothing screams “cheap” like a flat, matte plastic finish. Avoid that at all costs.
Look for gel‑based tiles—often sold as “Smart Tiles.” These have a thick, 3D gel coating that reflects light almost exactly like real ceramic. When you walk by, you see light bouncing off the surface, not a dull plastic sheet.
These tiles also tend to be more heat‑resistant, so they hold up behind a stove in a kitchen and work just as well behind a bathroom vanity.
Pro‑tip: Wipe the surface with a microfiber cloth after installation. The gel coating picks up fingerprints during handling. A quick clean restores the high‑gloss shine.
10. Renter‑Friendly Border Trick

If you rent, you have a real problem: even “removable” adhesive can damage drywall paint. Landlords notice.
Here’s the workaround. Buy a sheet of ¼‑inch plywood and cut it to fit your backsplash area. Apply the peel and stick tiles to the plywood, not the wall. Then attach the whole panel to the wall using four small screws through the grout lines (or use heavy‑duty command strips if screws aren’t allowed).
When you move out, you unscrew the panel and the wall behind it is untouched. Full security deposit.
Pro‑tip: Paint the edges of the plywood the same color as your wall before you tile. That way any gaps blend in.
11. Geometric Terrazzo Revival

Terrazzo is back. According to Pinterest Predicts, it’s the number one pattern for 2026. The style uses large, colorful chip aggregates embedded in a smooth base. It’s playful, modern, and hides stains better than solid surfaces.
Stick‑on sheets now come in terrazzo patterns that look like the real cast‑in‑place material. Use them on a bathroom floor or as a bold vanity backsplash. The pattern is busy enough that you don’t need perfect alignment—another win for beginners.
Pro‑tip: Pair terrazzo with simple white fixtures. The pattern does the work; you don’t need competing colors or textures.
12. Waterproof Vinyl Plank Flooring (LVP)

Let’s clear something up. “Peel and stick tile” for floors usually means vinyl tiles that are 1/8‑inch thick. They work, but they don’t feel great underfoot.
Better option: luxury vinyl plank (LVP). These planks have a rigid core, an attached foam pad, and a thick wear layer. They cost a bit more but feel like real wood or stone. For a bathroom, look for a wear layer of 12 mil or higher—that’s the thickness of the clear coating that resists scratches and moisture.
Coretec and Shaw are two brands that make LVP with a simple peel and stick system. The planks interlock, so they stay flat even if the subfloor isn’t perfect.
Pro‑tip: Let the planks sit in the room for 48 hours before you install. They need to acclimate to the bathroom’s humidity level.
13. The 3D Brick Wall Illusion

Brick or stacked stone in a bathroom? Yes, but only in the right spot.
Flexible PVC panels molded to look like individual bricks or stone blocks add serious texture. They’re best for a rustic powder room or a wall away from the shower. Don’t use them inside a wet area—water can get behind the panels if they’re not perfectly sealed.
Installation is simple. You cut them with a utility knife and stick them to a clean wall. The 3D effect casts shadows that change throughout the day, giving the room a dynamic feel.
Pro‑tip: Paint the wall behind the panels black before you stick them. If any gaps show, the dark color disappears into the shadow lines instead of glaring white.
14. Pattern Matching for Wainscoting

Wainscoting makes a bathroom look traditional and well‑crafted. You can fake it in an afternoon.
Apply a bold, patterned stick‑on tile to the lower 36 inches of the wall. Then cap it with a wood molding—a simple chair rail or cove molding—painted white. The molding covers the top edge of the tile and creates a natural division between the tile and the upper wall paint.
This works especially well in small bathrooms because the busy pattern stays low, where it draws attention without overwhelming the space.
Pro‑tip: Use a miter box to cut the molding corners at 45 degrees. Clean corners make the wainscoting look like it was always there.
15. Metallic Accents for Vanity Surround

Metallic finishes—brass, copper, nickel—are having a moment. Use them sparingly behind the faucet area for a jewelry‑box effect.
These tiles are usually small, like 2×4 inches, and come in real metal or high‑quality metallic film. The reflection adds depth to the room.
But there’s a catch. Metal tiles near the faucet need extra sealing. Water splashes can seep between tiles and lift the adhesive over time. Run a thin bead of clear silicone along the edges and corners to lock everything down.
Pro‑tip: Pair brass tiles with matte black faucets. The contrast looks custom and intentional.
16. The “No‑Demo” Shower Surround

This is the hardest project on the list, but it’s also the most transformative. You have an old acrylic shower surround—maybe it’s stained, cracked, or just ugly. Removing it means cutting drywall and dealing with whatever’s behind it.
Instead, cover it with 100% waterproof panels. Brands like DuraBath and the panel systems used by Bath Fitter are designed to go directly over existing tile or acrylic. They use marine‑grade adhesive and interlocking edges that seal tight.
You can find a solid YouTube tutorial from Home RenoVision DIY that walks through the entire process. It takes a weekend, but the result looks like a full gut renovation without any demo dust.
Pro‑tip: Remove the toilet before you start. It’s a few extra bolts, but working around a toilet adds hours of fiddly cuts. Take it out and you’ll finish twice as fast.
Conclusion
The days of peel and stick looking like a cheap dorm room fix are over. You’ve got options now—textured 3D panels, waterproof vinyl planks, marble slabs with no grout lines. The real renovation look comes down to two things: choosing the right material for the zone (wet or dry) and prepping the surface correctly.
Clean walls. A laser level. The right primer for glossy surfaces. Those steps take an extra hour but make the difference between tiles that last years and tiles that peel in months.
Ready to transform your space? Start by measuring your bathroom’s square footage. Add 10 percent for waste—that accounts for cuts, mistakes, and future repairs. Order samples of your top three picks. Stick them on a hidden corner, like inside the vanity cabinet. Wait a day. If they hold and you love the look, you’re ready to go.
Your peel and stick tile bathroom upgrade is waiting. Go make it happen.

- 18 Scandinavian Bedroom Ideas That Are Calm & Livable (2026) - March 31, 2026
- 17 Kids Bedroom Ideas That Grow With Them - March 31, 2026
- 17 Industrial Bedroom Ideas for Urban Apartment Dwellers - March 31, 2026