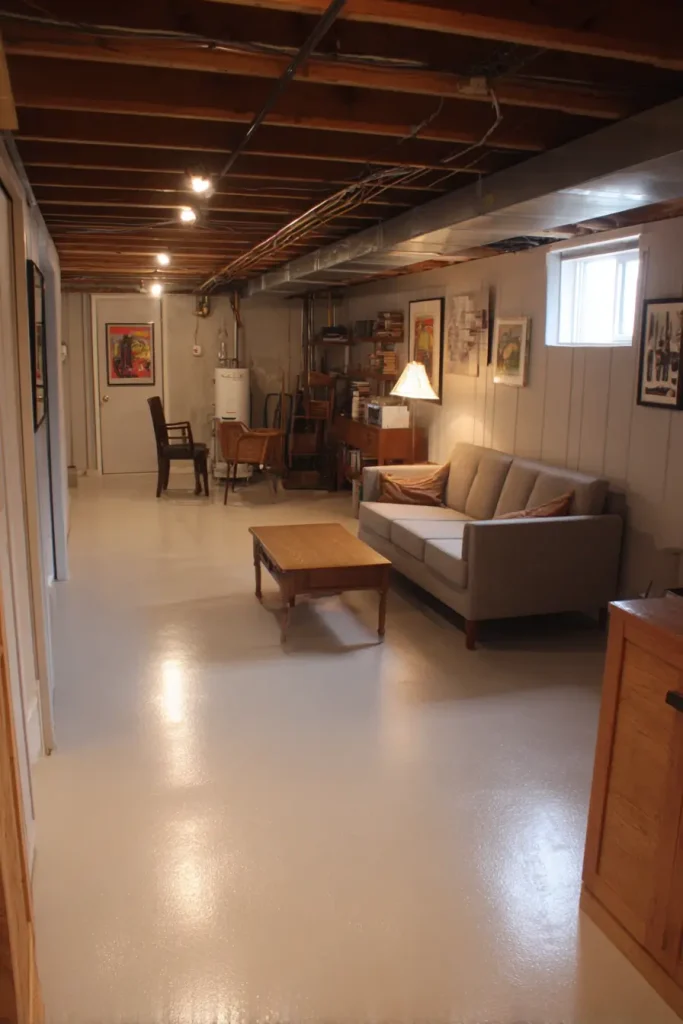
Most basements look the same. Exposed pipes. A dusty water heater. Boxes you packed in 2019 and never opened.
But your basement is probably the biggest unused room in your home. And with the right layout, it can become something you actually use every single day.
The problem is not money or space. The problem is not knowing where to start.
This guide gives you 17 real basement layouts that work. Each one fits a different size, budget, and goal. You will also learn how to pick the right one for your specific space and what mistakes to avoid before you spend a dollar.
Let us get into it.
What Makes a Good Basement Layout?
Before you look at any layout, you need to know your limits. Every basement has fixed constraints. If you ignore them, you waste time and money.
Here are the five things to check first.
Ceiling height. A habitable basement room needs at least 7 feet of ceiling height per the 2021 International Residential Code (IRC). A home gym needs 8 feet minimum. A home theater needs at least 7.5 feet. Measure before you plan.
Egress windows. If you want a bedroom in your basement, it needs an egress window. That window opening must be at least 5.7 square feet per IRC Section R310. No egress, no legal bedroom. Period.
Load bearing walls. Some basement walls cannot move. A structural engineer can tell you which ones those are. Do not guess.
Traffic flow. Main walkways need at least 36 inches of clearance. If your layout forces people to squeeze through tight spaces, the design is not working.
Moisture. Test for moisture before you frame a single wall. Skipping this step is the most expensive mistake a homeowner can make. Mold remediation costs more than almost any basement remodel.
According to the National Association of Realtors 2023 Remodeling Impact Report, a finished basement returns 86% of its cost at resale. The National Association of Home Builders reports that finished basements add an average of $50,000 to $75,000 in home value. But that only happens when the layout is done right.
Once you know your ceiling height, footprint, and code requirements, you are ready to look at layouts.
17 Basement Layouts That Actually Work
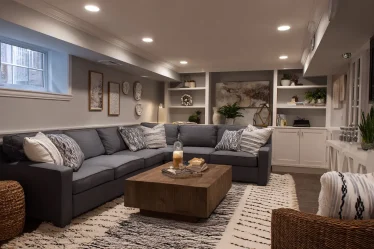
1. The Open Plan Multipurpose Layout
Best for: 800 to 1,200 sq ft basements with one large open space
This is the most flexible layout on the list. You divide the space visually, not physically. No walls needed.
You use rugs, furniture, and lighting to create separate zones. A sectional sofa becomes a room divider. A pendant light marks the dining or work area. A bookshelf separates the play zone from the lounge.
The result is a basement that feels open and bright. It also gives you room to change the layout later without tearing anything out.
Key design moves:
- Place the TV and seating zone farthest from the stairs
- Use a large area rug (9×12 or bigger) to anchor each zone
- Install recessed lighting in a grid so you can control zones separately
- Keep pathways clear at 36 inches minimum
Pro Tip: Open floor plans are preferred by 52% of homebuyers according to NAR 2023 data. If you ever plan to sell, this layout is a safe bet.
2. The Home Theater and Bar Combo
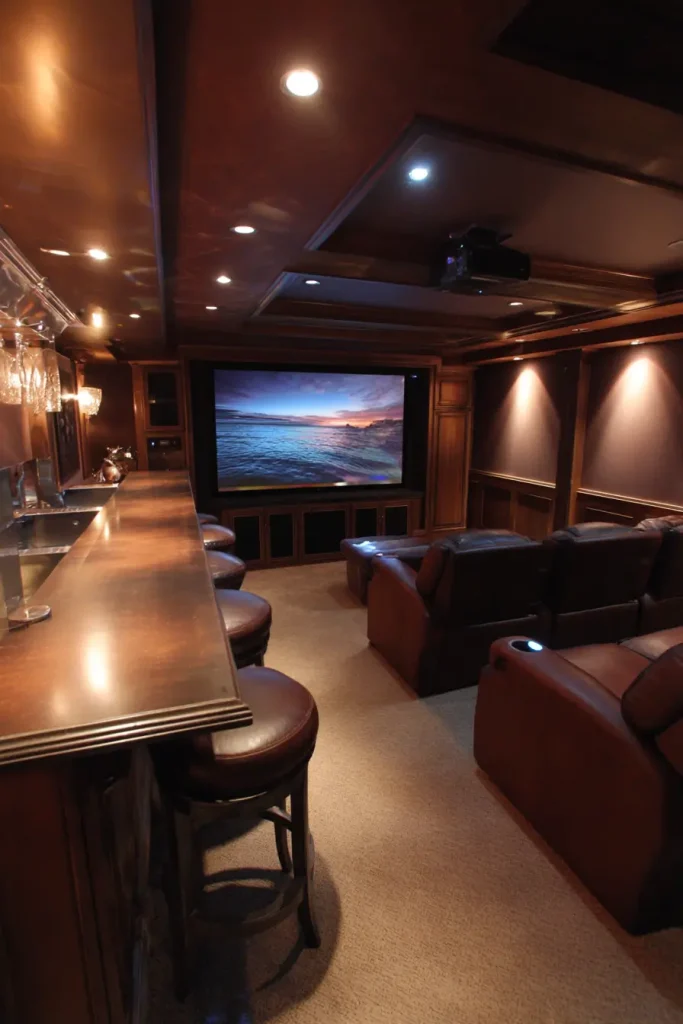
Best for: Rectangular basements, 600 to 900 sq ft
This is one of the most popular basement layouts on Houzz, with millions of saved photos in the “basement bar theater” category.
The concept is simple. One wall gets the screen. The opposite or side wall gets the bar. Everything in between is seating.
What makes it work is the details.
Acoustic panels on the screen wall cut echo. A drop ceiling helps with sound too. The bar should include a mini fridge, sink, and enough counter space for two or three people to stand at once.
Key design moves:
- Avoid placing the screen wall on the same side as egress windows (the light kills the picture)
- Keep the bar at 42 inches high for standing use or 36 inches for seated bar stools
- Install dimmable lighting on separate circuits for the screen area and bar area
- Run the electrical before you frame the bar so outlets end up in the right spots
Pro Tip: A wet bar with plumbing rough in costs more upfront but adds real resale value. A dry bar with a beverage fridge is cheaper and still looks great.
3. The In Law Suite Layout
Best for: Basements with an existing egress window or room to add one
This layout turns your basement into a self contained living space. It includes a bedroom, a bathroom, and a small kitchenette. A separate entrance is a big bonus but not always possible.
ADU (accessory dwelling unit) additions increased 9% year over year in 2024 according to the Urban Land Institute. Demand is real. People are building these to house aging parents, adult kids, or renters.
The legal requirements are strict. You need:
- An egress window with at least 5.7 square feet of opening (IRC R310)
- A closet in the bedroom
- A working bathroom with proper ventilation
- Smoke and CO detectors wired to code
Key design moves:
- Place the bathroom against an existing plumbing wall to save money on new drain lines
- Use a sliding barn door to separate the sleeping area from the living area without losing floor space
- Install a mini split system for independent temperature control
Pro Tip: Check your local zoning laws before you build. Some cities require a separate permit for ADUs. Some do not allow them at all. Do this before you spend anything.
4. The Home Gym Layout
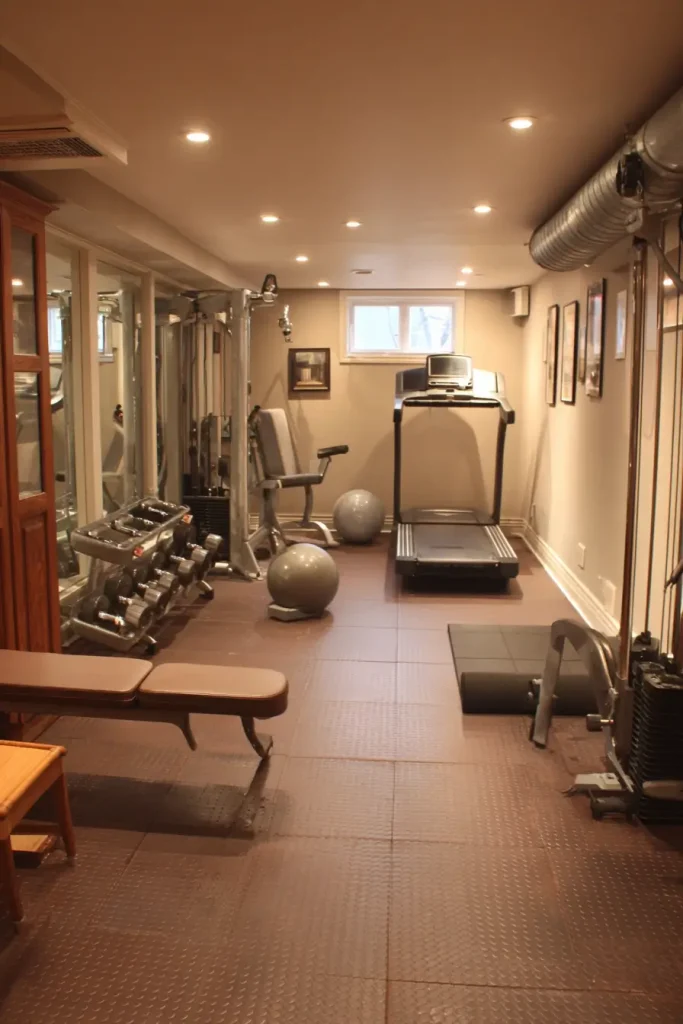
Best for: 400 to 700 sq ft basements with 8 foot ceilings or higher
72% of home gym owners say having a dedicated space makes them work out more consistently according to a RunRepeat 2023 survey. A basement gym works because it is private, close, and always available.
But the layout matters more than most people think.
You need to zone the space by activity. Free weights go near the mirror wall. Cardio machines go near the HVAC vent. Stretching or mat work goes in the open center.
Key design moves:
- Use rubber flooring tiles (3/8 inch minimum) to protect the concrete and reduce noise
- Leave at least 2 feet of clearance around every machine
- Install a large mirror on the main wall, floor to ceiling if possible
- Plan for extra HVAC capacity because gyms generate serious heat and humidity
Pro Tip: A ceiling height under 8 feet makes overhead exercises dangerous. If your basement is 7 feet, skip the barbell work and focus on machines and cables instead.
5. The Kids Playroom and Storage Wall Layout
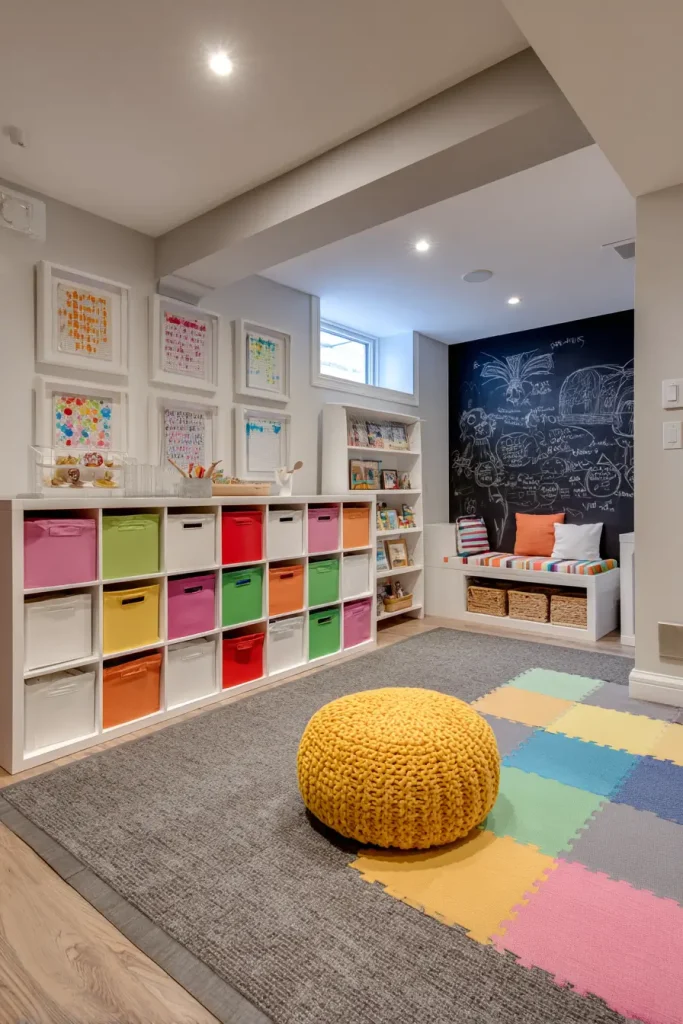
Best for: Families with young kids, 300 to 600 sq ft
This layout solves a real problem. Toys take over the house. A dedicated basement playroom gives kids their own space and keeps the rest of your home clean.
The key is a full storage wall on one side. IKEA KALLAX units work well and cost a fraction of custom built ins. You can add bins, baskets, and door panels as the kids grow.
Key design moves:
- Use foam tile flooring or carpet squares for soft landings
- Add a half wall to separate the play zone from a small seating area for parents
- Install a chalkboard or whiteboard on one wall (kids love it, easy to update)
- Keep outlets high and use covers on any low ones
Pro Tip: Build the storage wall before the kids start using the space. It is much harder to add later when there are bikes and toys everywhere.
6. The L Shaped Layout for Awkward Spaces

Best for: Basements where stairs land off center or mechanical equipment takes up one corner
Most basements are not perfect rectangles. Stairs land in weird spots. Support columns sit in the middle of the room. Mechanicals take up an entire corner.
The L shaped layout works with those problems instead of fighting them.
You assign the short leg of the L to storage, mechanicals, or a utility area. The long leg becomes the living space. The result is a clean, usable room that feels intentional.
Key design moves:
- Frame around the mechanical area to create a clean utility closet
- Use the dead corner behind the stairs for built in shelving or a small office nook
- Keep the traffic path along the inside of the L for easy movement
- Use consistent flooring across both legs to make the space feel connected
Pro Tip: If you have a support column in the middle of the space, build around it. Add shelving to it. Make it a design feature. Fighting it costs money and never looks good.
7. The Walk Out Basement Layout
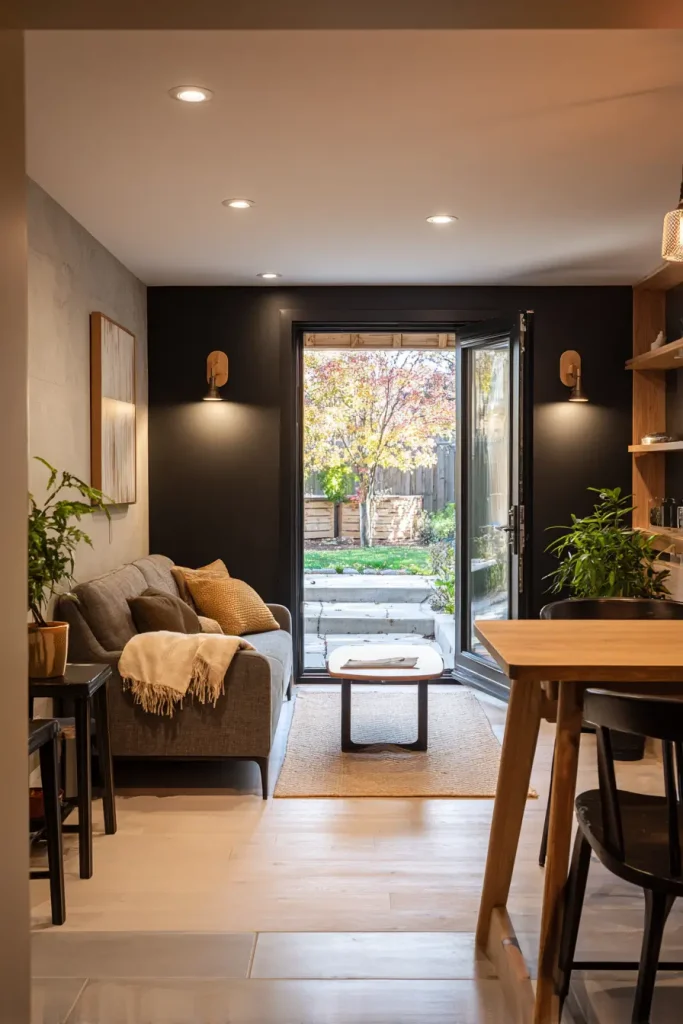
Best for: Homes with a walk out door on the lower level
Walk out basements are a gift. Natural light comes in from the walk out side. That changes everything about how the space feels.
Put your living areas near the door where the light is. Push storage and mechanicals to the dark back wall. If you can add a small patio outside the door, you extend the living space outdoors.
Zillow Research data shows walk out basements add 10 to 15% more value than standard below grade finished basements. That is a real return.
Key design moves:
- Place large furniture (sofa, dining table) within 10 feet of the walk out door
- Use light colored flooring and walls to bounce natural light deeper into the space
- Add window treatments that let light in but reduce glare on screens
- Consider a small covered patio or deck directly off the walk out door
Pro Tip: If your walk out door faces north, you will get less direct sun. Use warmer light bulbs indoors to compensate.
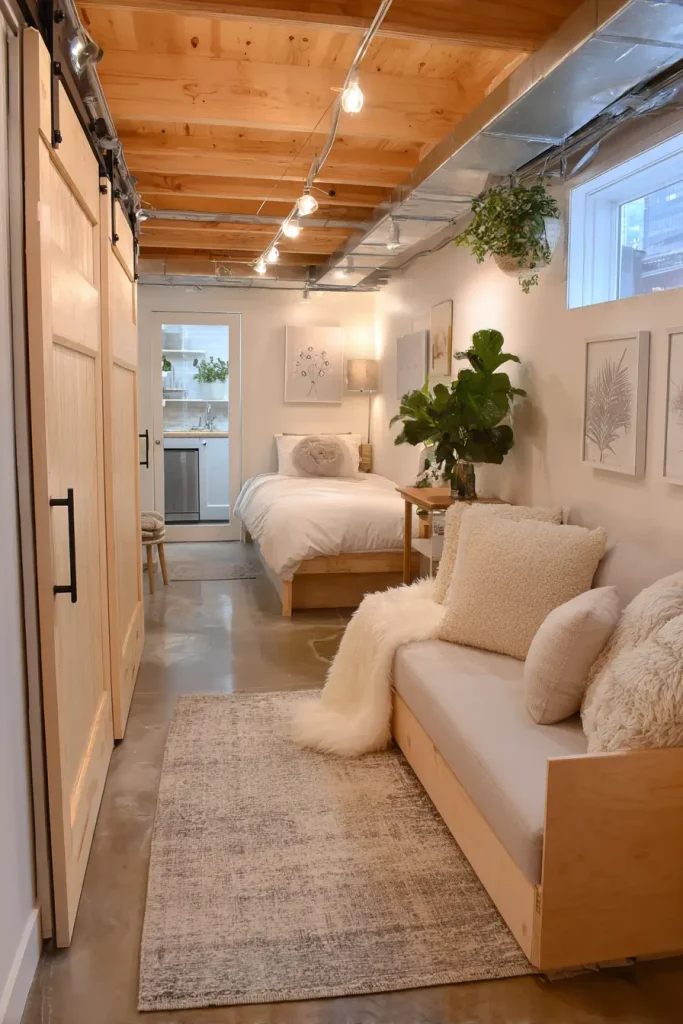
8. The Dual Zone Office and Guest Room
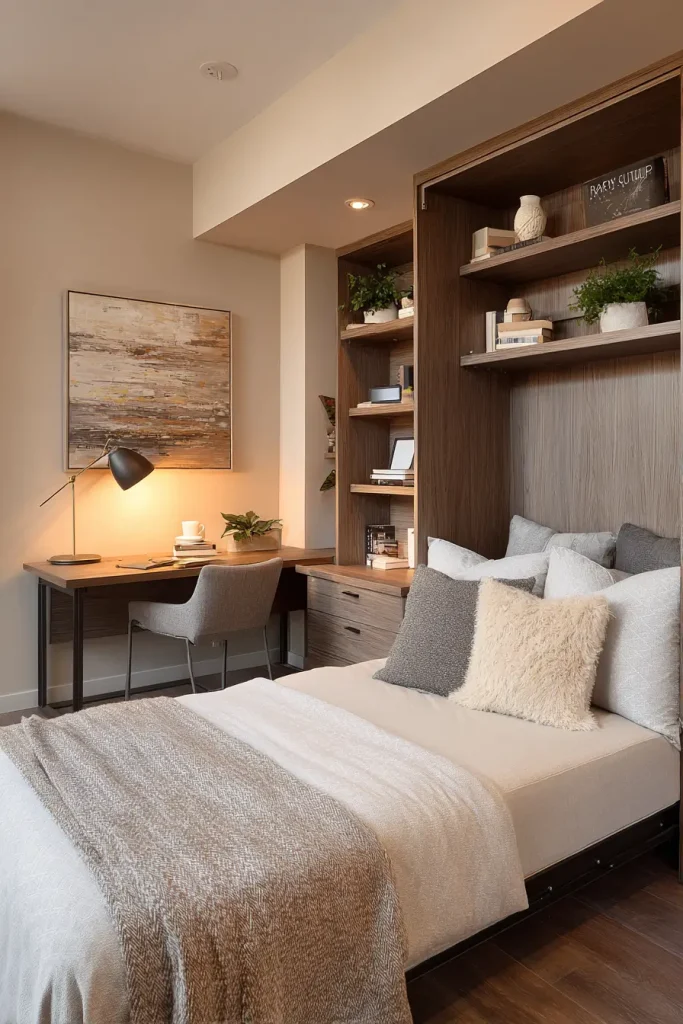
Best for: Basements between 200 and 400 sq ft with limited headroom
This layout does two jobs in a small footprint. It is a home office during the week and a guest room when family visits.
The secret is a Murphy bed. A quality wall bed folds up flush against the wall when not in use. A desk and shelving occupy the same wall space. When guests arrive, the desk folds away and the bed comes down.
The Murphy bed market is growing at 6.2% per year through 2028 according to Grand View Research. More people are figuring out that small spaces can do double duty.
Key design moves:
- Buy a Murphy bed unit that includes a built in desk, not a separate piece of furniture
- Add acoustic insulation in the ceiling to separate office noise from the rest of the house
- Install a closet (required for a legal bedroom in most jurisdictions)
- Use task lighting at the desk and softer ambient lighting for the guest area
Pro Tip: Spend money on a good Murphy bed mechanism. Cheap versions wobble and fail within a few years. A quality unit from Resource Furniture or Wilding Wallbeds lasts decades.
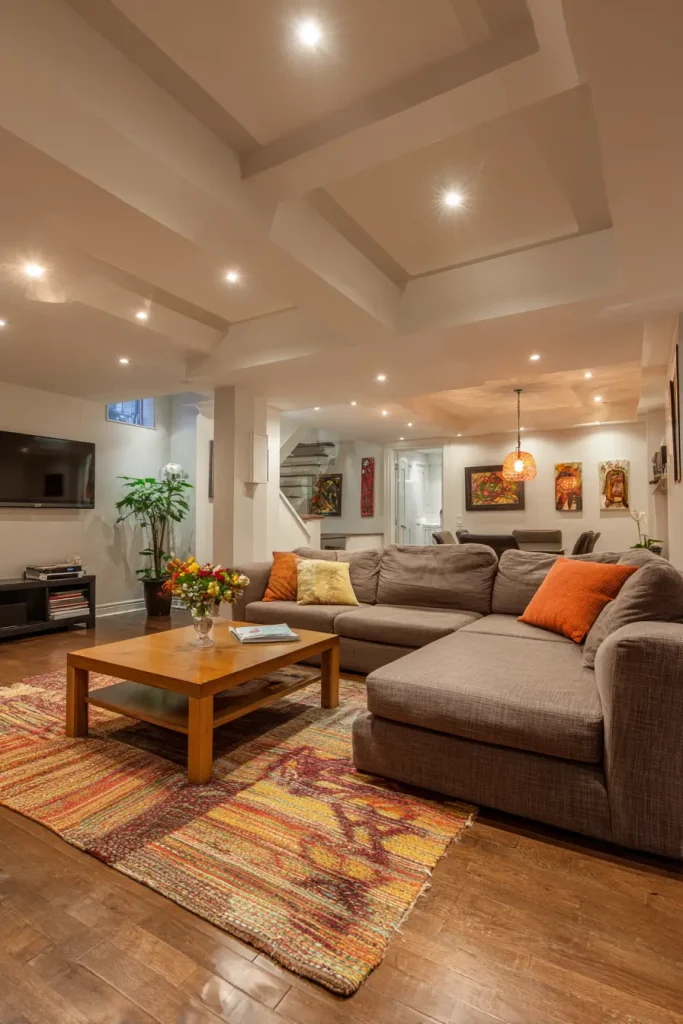
9. The Teen Hangout and Rec Room Layout
Best for: Families with teenagers, 500 to 900 sq ft
Teenagers need their own space. This layout gives them one. And when it works well, it keeps the main living areas of your home quiet.
The layout combines three zones: a gaming or TV area, a lounge with seating, and a snack station with a mini fridge. A half bath is a huge upgrade if the plumbing allows it.
Key design moves:
- Install sound dampening insulation between the basement ceiling joists and the floor above
- Use durable, easy to clean flooring (LVP or stained concrete, not carpet)
- Add a dedicated circuit for gaming setups and a TV, not just a standard outlet
- Consider a separate entrance if possible, so teens can come and go without walking through the main house
Pro Tip: Do not put in carpet. Teens spill things. Use luxury vinyl plank flooring and thank yourself later.
10. The Rental Unit and Basement Apartment Layout
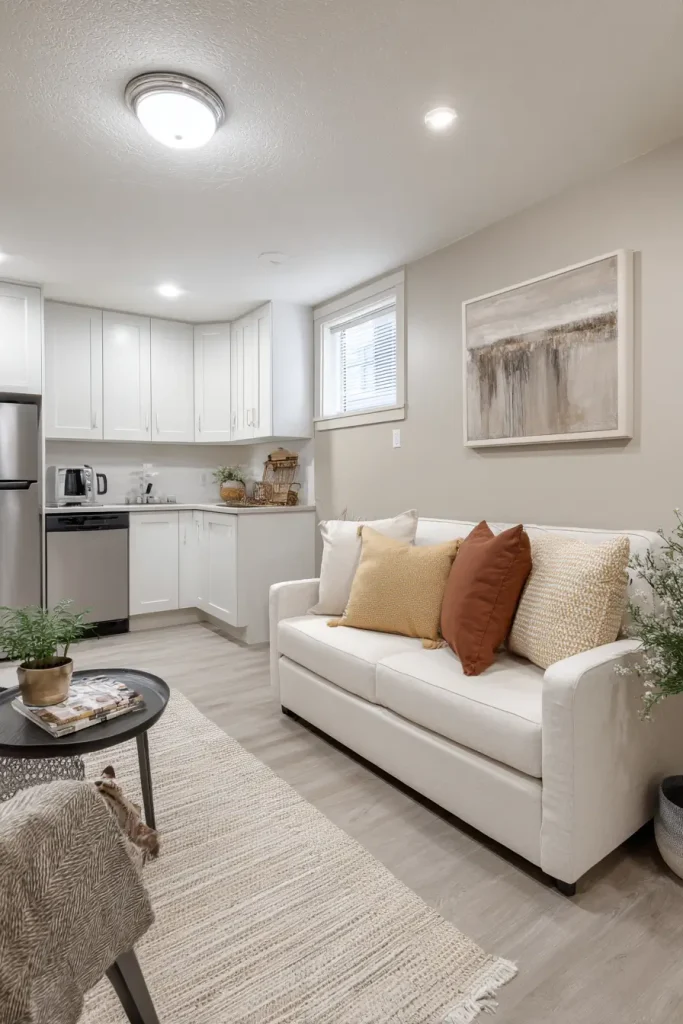
Best for: Homeowners who want rental income, larger basements with separate entrance potential
A finished basement apartment adds $800 to $1,500 per month in rental income according to Rentometer 2024 data. That is real money toward your mortgage.
But this layout has the strictest requirements of any on this list.
You need a full kitchen, a bathroom, a legal bedroom with egress, and a separate entrance. Local ADU zoning rules vary by city and state. Some allow it easily. Some have a long approval process. A few ban it outright.
Key design moves:
- Check your local permit portal before spending anything on design
- Place the kitchen against a wall with existing plumbing to reduce rough in costs
- Install a separate electrical panel for the unit so utilities can be split
- Add CO detectors, smoke alarms, and fire rated drywall between the unit and the main home
Pro Tip: Hire a local real estate attorney to review your local ADU rules before you start. A $300 legal consult could save you from a $30,000 mistake.
11. The Workshop and Maker Space Layout
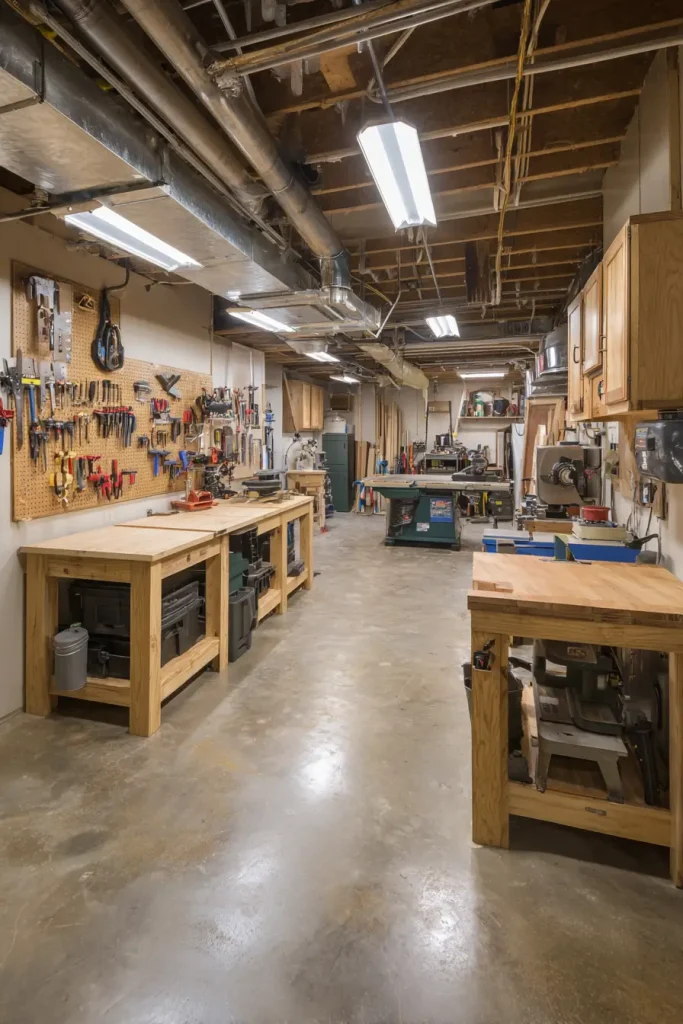
Best for: Hobbyists, woodworkers, makers, 400 to 800 sq ft
If you work with tools, a dedicated basement workshop changes your life. Everything stays in one place. You can leave projects out overnight. And you stop taking over the garage.
The layout revolves around the workbench wall. Your main bench runs along one full wall at counter height (34 to 36 inches). Tool storage goes above it. Heavy stationary tools like table saws and band saws go in the center of the room where you can walk around all four sides.
Key design moves:
- Use epoxy coated concrete or sealed concrete for the floor, never carpet
- Run a dedicated 240V circuit for table saws, planers, and dust collectors
- Install a central dust collection system with drops at each major tool station
- Add pegboard above the workbench for hand tools
Pro Tip: Plan your electrical before you build anything. Most workshop tools need dedicated circuits. Running wire after the walls are up costs three times as much.
12. The Home Bar and Wine Cellar Layout
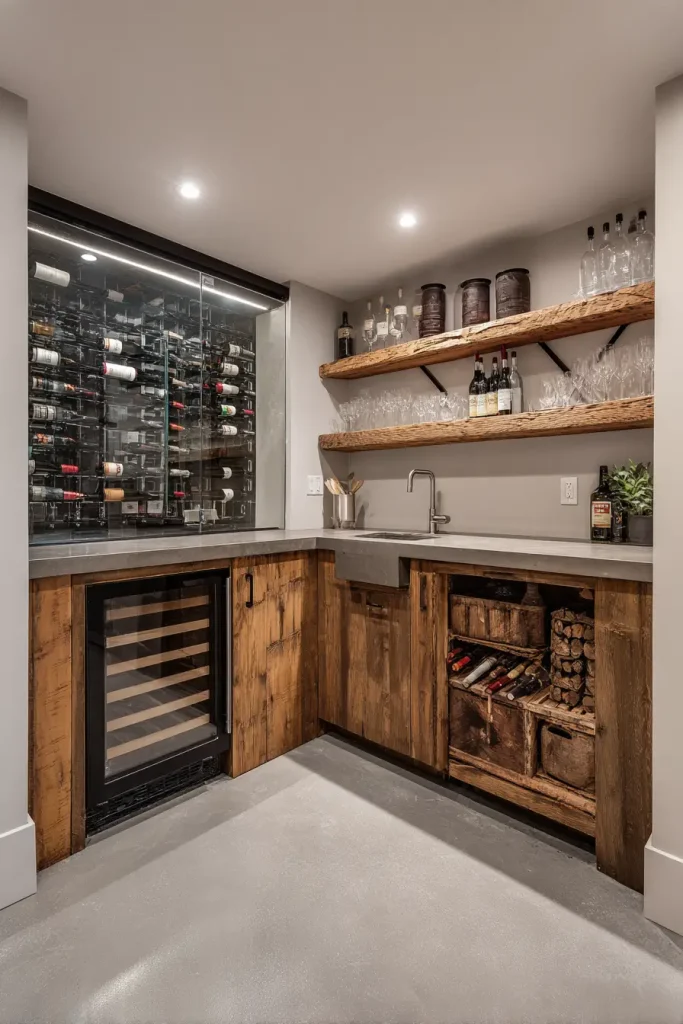
Best for: Entertaining focused homeowners, 300 to 600 sq ft
This layout combines a functional wet bar with a dedicated wine storage area. It works best in a corner of a larger basement or as the anchor of an entertainment space.
A proper wine cellar needs constant temperature between 55 and 65 degrees Fahrenheit. That requires a dedicated mini split or a purpose built wine cooling unit. A regular HVAC system will not maintain that range consistently.
Wine cellar additions recoup 72% of their cost at resale according to the Remodeling Magazine Cost vs. Value Report 2023.
Key design moves:
- Place the wine cellar on an interior wall away from exterior temperature swings
- Use a glass wall or glass door for the cellar if you want to show it off
- The wet bar needs a sink, a beverage fridge, and at least 6 feet of counter space
- Display shelving adds visual interest and doubles as storage
Pro Tip: A glass fronted wine cellar is one of the most photographed features in luxury home listings. If resale is on your mind, this one gets attention.
13. The Narrow Basement Layout
Best for: Basements under 20 feet wide
Narrow basements are tough. You cannot put furniture on both sides of a room and still have a walkway. Most layout ideas just do not work.
The fix is a gallery style layout. Everything runs along one long wall. Seating faces that wall. Storage and display go vertical instead of horizontal.
Key design moves:
- Run built in shelving or cabinetry along the entire long wall from floor to ceiling
- Keep the opposite wall completely clear to preserve walkway space
- Use recessed lighting in a single row down the center of the ceiling
- Paint everything light, including the ceiling, to reduce the tunnel feeling
- Use mirrors on the short end walls to add perceived depth
Pro Tip: Furniture scale matters more in narrow spaces than anywhere else. Oversized sofas and coffee tables will kill the room. Choose compact pieces and measure twice before you buy.
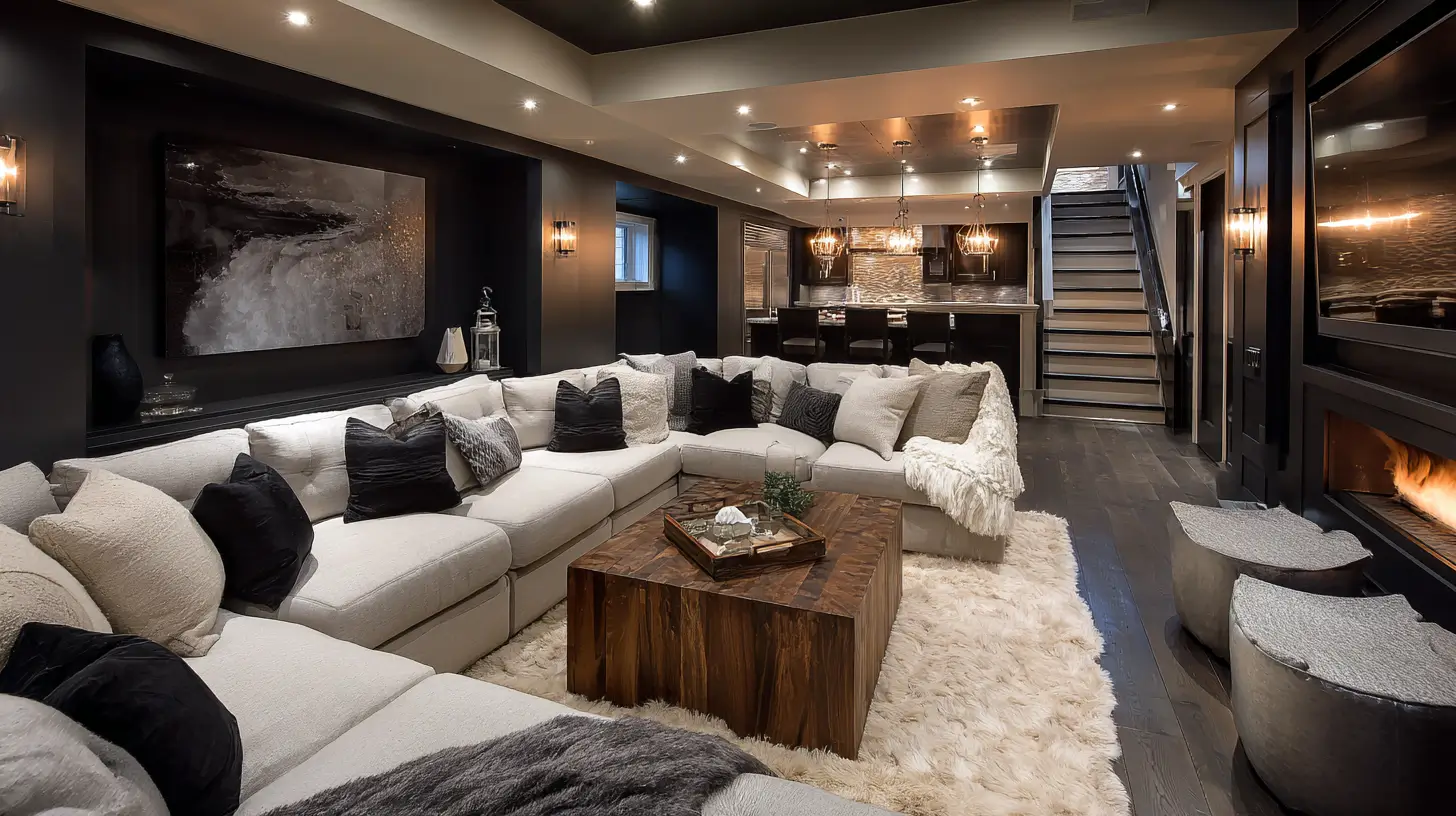
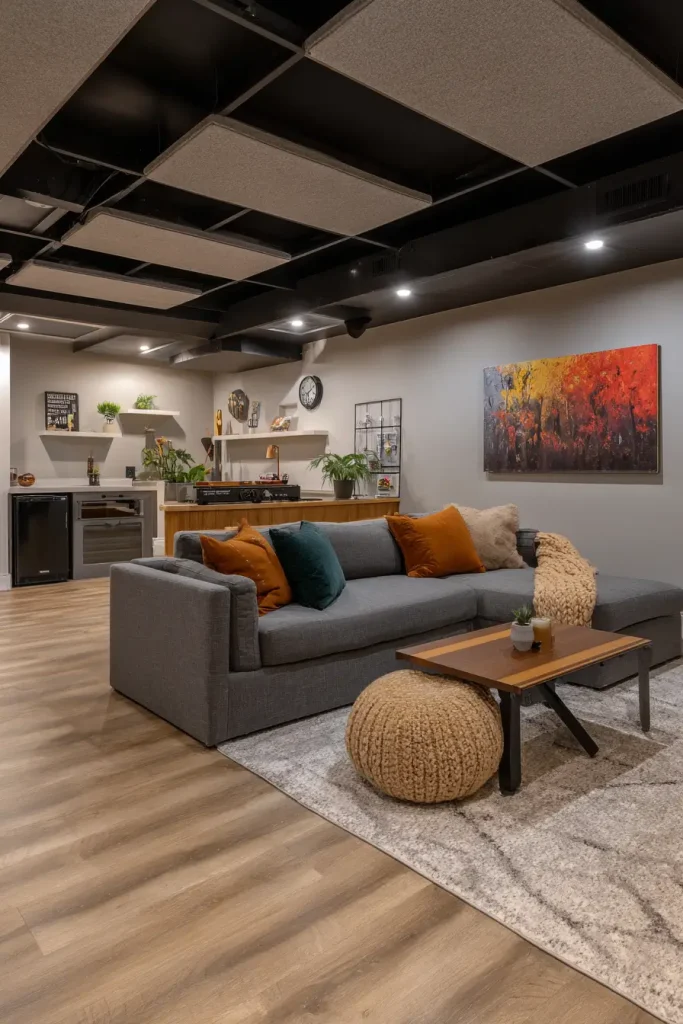
14. The Full Family Entertainment Hub
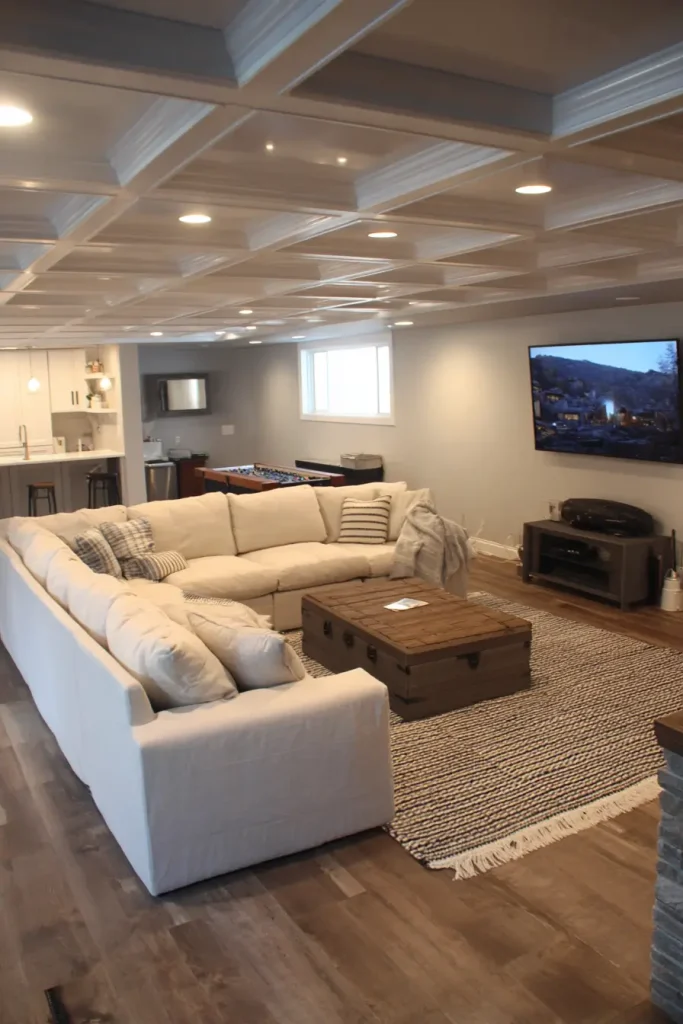
Best for: Larger basements, 1,000 sq ft or more
This is the biggest layout on the list and the most ambitious. It combines a main seating and TV area, a gaming station, a kitchenette, and a half bath into one cohesive space.
What makes it work is zone separation without hard walls. You use ceiling height changes, dropped soffits, different flooring materials, or partial walls to define each area.
Key design moves:
- Anchor the layout with the TV and main seating area first, then build outward
- Place the kitchenette adjacent to the half bath to share plumbing lines and save money
- Use a different flooring material in the gaming zone (a platform or rug works too) to visually separate it
- Install a dropped soffit over the bar area to create an intimate feel
Pro Tip: This layout needs a real HVAC plan. One big open space with a kitchenette and multiple people generates a lot of heat. Get an HVAC contractor involved early.
15. The Yoga and Meditation Studio Layout
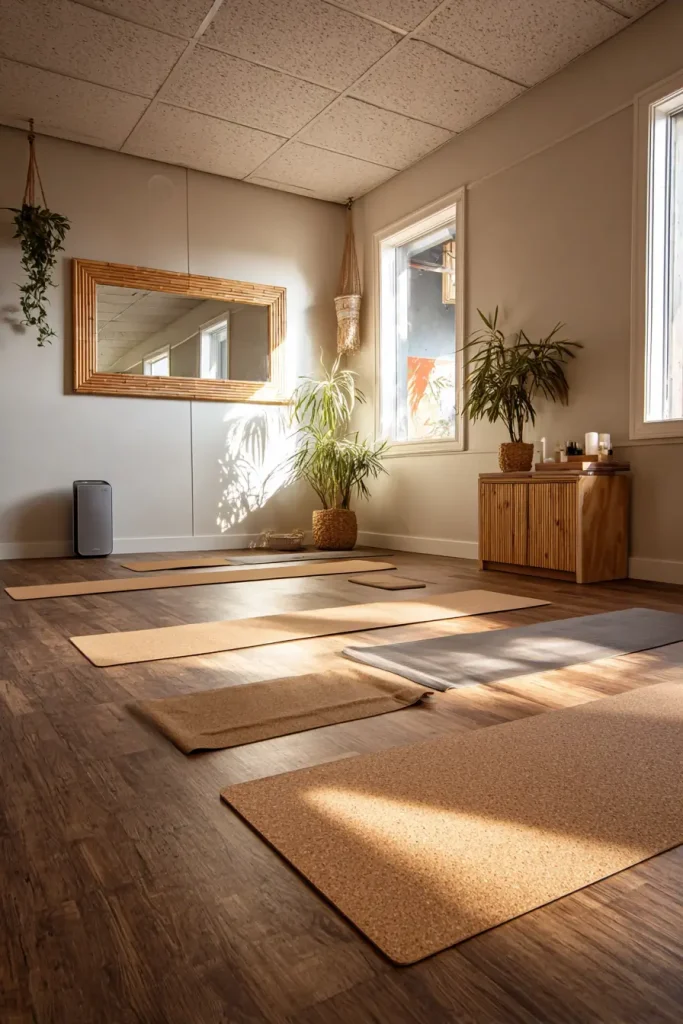
Best for: Wellness focused homeowners, 200 to 400 sq ft
This is a simple layout with a specific goal. You want a quiet, clean space with no clutter and good air quality.
The flooring matters most here. Cork is ideal. It is soft underfoot, naturally antimicrobial, and provides some sound absorption. Bamboo is a close second. Both are better than carpet for a yoga practice.
Key design moves:
- Keep the room minimal. One storage cabinet is enough for mats and props.
- Install dimmable lighting and avoid harsh overhead fixtures
- Add acoustic panels to the ceiling and at least one wall to absorb echo
- Use an air purifier with a HEPA filter (basements can have higher humidity and mold risk)
- A small wall mounted mirror is helpful but not required
Pro Tip: Basements stay cooler than upper floors. For yoga, that is actually an advantage in summer. In winter, add a small space heater so the room is warm before you start.
16. The Smart Storage First Layout
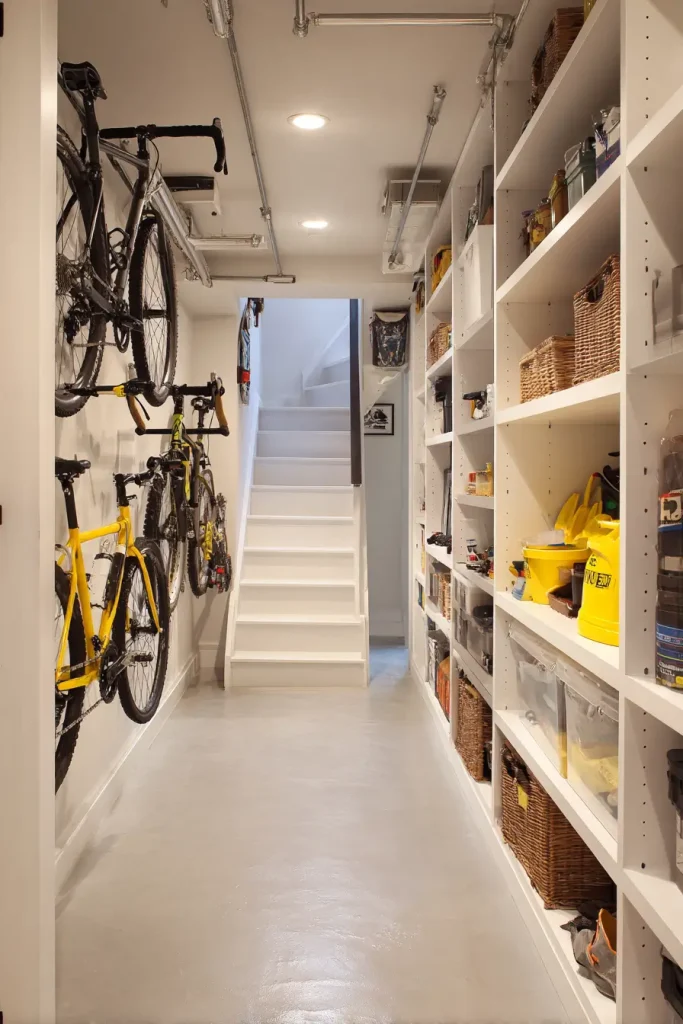
Best for: Homeowners who need function more than fun, any size basement
Not every basement needs to be a living space. Some basements just need to be organized.
This layout treats every wall, corner, and ceiling as a storage opportunity. Built in floor to ceiling shelving runs along the perimeter. Overhead bike storage mounts to the joists. Under stair space gets built out with pull out drawers or deep shelves.
Key design moves:
- Use adjustable shelving systems (ClosetMaid, Elfa, or custom) so you can reconfigure as needs change
- Install ceiling mounted hooks or pulley systems for bikes, kayaks, and seasonal items
- Build out the space under the stairs completely. That area is almost always wasted.
- Add adequate lighting so you can actually find what you are looking for
Pro Tip: This layout is also smart for homes going on the market. A well organized, fully functional storage basement photographs better and tells a better story to buyers than an empty unfinished space.
17. The Hybrid Unfinished and Finished Layout
Best for: Budget focused homeowners, anyone not ready for a full remodel
Here is an honest option that most guides skip. You do not have to finish the whole basement.
Finish 60% of the square footage for living use. Leave 40% as a utility and storage area without drywall or flooring. You get a real usable room without paying for a full remodel.
The cost difference is significant. A partial finish runs $15,000 to $30,000. A full basement finish averages $28,000 to $55,000 according to the Angi 2025 Cost Guide.
Key design moves:
- Use a framed and drywalled wall to separate the finished area from the unfinished area
- Add a door between the two zones so the utility area stays hidden
- Focus your finish budget on the most used area, usually the main living zone
- Leave mechanicals, water heater, and HVAC in the unfinished zone
Pro Tip: This layout is easy to expand later. You have already done the planning. When the budget is ready, you just extend into the unfinished zone.
How to Pick the Right Layout for Your Basement
Here is the honest truth. The best basement layout is not the prettiest one. It is the one that fits your actual space.
Follow these five steps before you make any decisions.
Step 1: Measure everything. Get the exact square footage and ceiling height. Measure the height in multiple spots because basement floors and ceilings are often uneven.
Step 2: Map your fixed constraints. Mark where the stairs are, where the mechanicals sit, where the support columns are, and where the windows are located. These things are not moving.
Step 3: Pick one primary use. Most people try to do too much in one basement. Pick one main purpose and one secondary purpose at most. Two clear uses work. Five uses in one space is a mess.
Step 4: Check your local building codes. Permits are required for finished basements in the vast majority of US jurisdictions. Call your local building department or check their website before you frame anything. Building without a permit causes real problems when you sell.
Step 5: Draft your layout before you build. Use one of these free tools:
- RoomSketcher at roomsketcher.com gives you 2D and 3D views
- Planner 5D at planner5d.com has a drag and drop interface with a free tier
- SketchUp Free works for more detailed 3D planning
Draw it out. Live with the plan for a few days. Then build.
5 Basement Layout Mistakes That Cost Real Money
Mistake 1: Skipping moisture testing. This is the most expensive mistake on the list. If you frame walls and lay flooring over a wet basement, you will have mold within one to two years. Test for moisture with a plastic sheet test first. Tape a 2 by 2 foot piece of plastic sheeting to the floor and walls. Leave it for 48 hours. If moisture collects underneath, you have a problem to fix before anything else happens.
Mistake 2: Not planning for HVAC duct clearance. Ducts, pipes, and beams eat ceiling height. Many homeowners plan their layout assuming the full 8 foot ceiling and end up with a finished room that feels low and cramped. Measure your actual clear height below the lowest obstruction, not the slab to slab height.
Mistake 3: Ignoring egress requirements. Building a bedroom without a legal egress window is a code violation. It also creates a safety risk. And it will come up during a home inspection when you sell. Do it right the first time.
Mistake 4: Too many rooms. Dividing a 700 square foot basement into four rooms gives you four small, dark, unusable rooms. Bigger open zones work better in most basements. Fewer walls also means lower framing costs.
Mistake 5: No lighting plan. Basements have no natural light except near windows. Recessed lighting in a grid pattern is the standard fix. But you also need task lighting over work areas and soft ambient light in lounge zones. Plan three layers of light: ambient, task, and accent. A single overhead fixture in the center of the room is not a lighting plan.
Avoiding these five mistakes will save you money, stress, and a very expensive call to a remediation company.
Now Pick Your Layout and Start Planning
There is a layout on this list for every basement size, every budget, and every goal.
If you have a big open space, start with the open plan multipurpose layout and go from there. If you have a narrow basement, go straight to layout 13. If your goal is rental income, layout 10 is your starting point.
The next step is not buying materials. It is grabbing a tape measure and mapping out what you actually have to work with. Measure your square footage. Check your ceiling height. Identify your fixed constraints.
Then match your space to the layout that fits.
Whether you are starting from scratch or rethinking an existing basement layout, you now have a clear roadmap for turning that unused space into your home’s most useful room.

- 18 Scandinavian Bedroom Ideas That Are Calm & Livable (2026) - March 31, 2026
- 17 Kids Bedroom Ideas That Grow With Them - March 31, 2026
- 17 Industrial Bedroom Ideas for Urban Apartment Dwellers - March 31, 2026