You’re running late, and you can’t find your concealer. You know it’s under the sink somewhere. Buried under half‑empty bottles and cleaning supplies you haven’t touched in months.
Sound familiar?
The area under your bathroom sink is a mess magnet. Pipes get in the way. Things fall to the back. And before you know it, you have a pile of stuff you can’t reach. Toiletries alone make up 54% of bathroom clutter.
This guide gives you 14 separate ideas to fix that. Each one is actionable in 2026. No fluff. Just help.
Let’s get started.
Idea 1: Empty Everything First

You cannot organize a full cabinet. You have to start fresh.
Open the cabinet door. Take everything out. Every bottle, sponge, old razor, and half‑used tube of toothpaste. Put it all on the bathroom floor or counter.
This step feels annoying, but it’s the most important one. You need to see the full disaster before you can fix it.
Most people find things they forgot they owned. An old hair gel from two years ago. A bottle of cough syrup that expired last spring. Three nearly empty shampoo bottles.
Once the cabinet is completely empty, wipe down the inside. Use a disinfecting wipe or a spray cleaner. Get rid of dust, grime, and sticky residue from old leaks.
Now you have a clean, empty box to work with. That’s your canvas.
Pro tip: Take a photo of the empty cabinet. It will help you remember the layout when you go shopping for organizers.
Idea 2: Check Expiration Dates

This is where you get ruthless.
Pick up each item you pulled out. Look for a small jar symbol with a number. That’s the expiration date after opening. For example, “12M” means it’s good for 12 months after you first opened it.
Makeup expires. Sunscreen expires. Medicine expires. Old lotions grow bacteria.
Here’s a simple rule: If you haven’t used it in a year, toss it. If it smells weird or looks separated, toss it. If you can’t remember when you bought it, toss it.
Throw away expired products immediately. Do not put them back.
For prescription medicines, do not flush them. Check your local pharmacy. Many have drop‑off boxes for old meds.
This one step usually removes 20–30% of the clutter. You’ll be shocked at how much room you gain just by throwing away old stuff.
What to keep: Only items you have used in the last three months and that are still good.
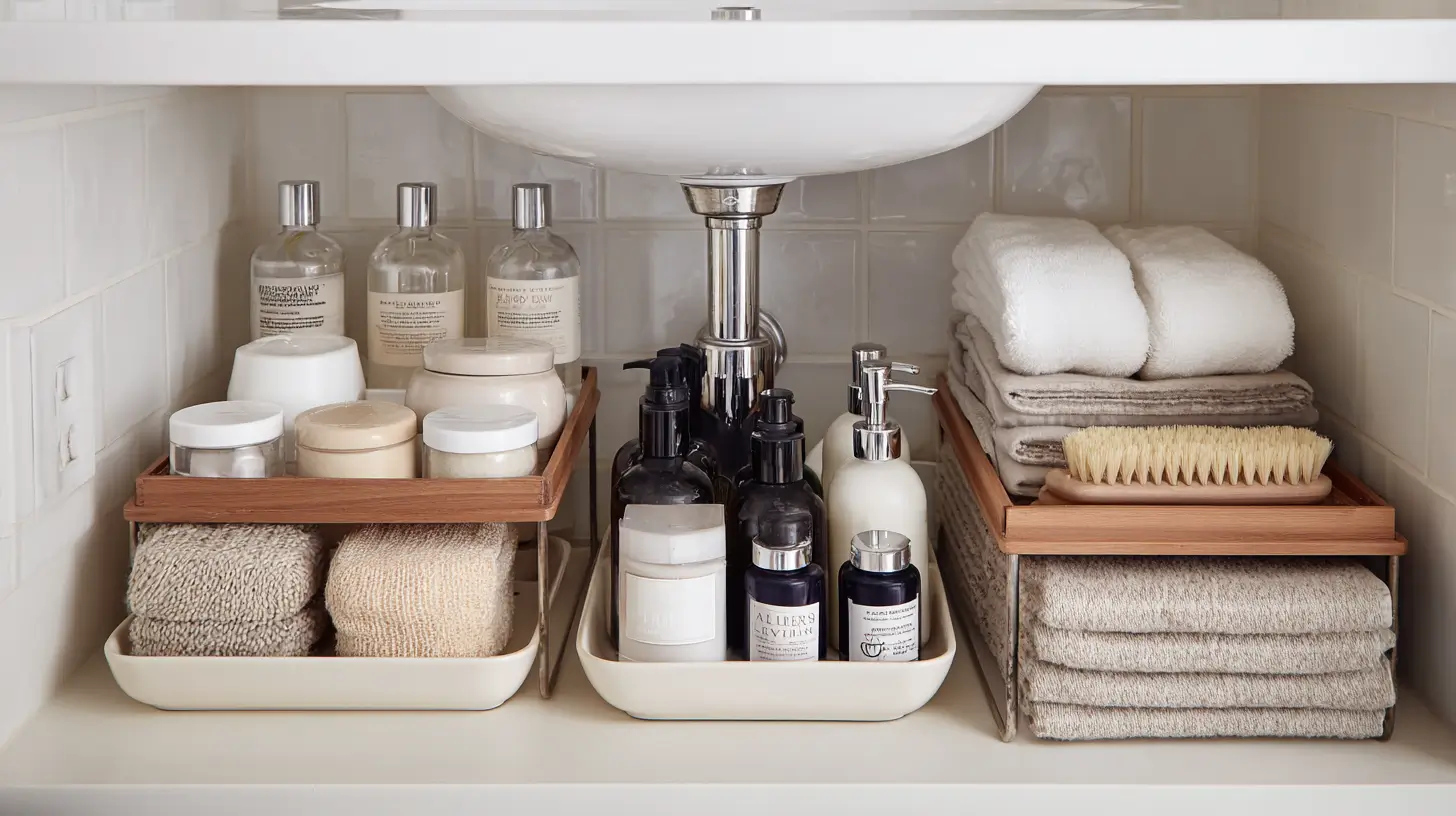
Idea 3: Group Items Into Zones

Now take the pile of “keep” items and sort them.
Put all hair products in one pile. Shampoo, conditioner, hair spray, gel, and brushes.
Put all skin care in another pile. Face wash, moisturizer, sunscreen, and serums.
Put all dental care in a third pile. Toothbrushes, toothpaste, floss, and mouthwash.
Put cleaning supplies in a fourth pile. Sprays, sponges, gloves, and toilet cleaner.
Put first aid and medicine in a fifth pile.
This is called zoned storage. It stops you from searching everywhere for one thing. When you need a Band‑Aid, you know exactly which zone to look in.
You can use small bins or baskets to keep each zone separate. That comes later. For now, just group them on the floor.
Why this works: Your brain doesn’t have to hunt. You create a home for each category. And when everything has a home, it’s easier to put things back.
Idea 4: Measure Your Cabinet Before Buying Anything

Do not buy a single organizer until you measure.
Grab a tape measure. Write these numbers down on your phone or a sticky note.
- Height from the floor to the bottom of the sink pipe. This is the most important number. Most pipes hang down about 10–15 inches from the sink. You need to know exactly how tall your organizers can be.
- Width of the cabinet inside. Measure from left wall to right wall.
- Depth of the cabinet inside. Measure from the back wall to the front edge of the cabinet frame.
Also look at where the pipe is. Is it in the center? Off to one side? Does it have a U‑shape trap that takes up extra room?
Write down any weird obstacles.
Now when you shop online or at a store, you only look at organizers that fit those numbers. This saves you from buying things that don’t work. Most returns happen because people skip this step.
Pro tip: Take a photo with the tape measure in the frame. That way you have proof of the measurements when you’re shopping.
Idea 5: Use a Two‑Tier Sliding Shelf

A standard shelf hides everything in the back. You end up pulling out three bottles to reach the one you need. A two‑tier sliding shelf fixes that.
The bottom tier holds taller items like cleaning sprays or shampoo bottles. The top tier is shorter. Perfect for face wash, lotion, or cotton rounds. And because the whole thing slides forward, you see every item at once.
Look for one with a cutout in the back. That lets it fit around your sink pipe. The DEKAVA 2‑Tier Organizer has a cutout and nearly 9,400 positive reviews. It also has non‑slip feet so it doesn’t slide around when you pull it.
How to install it:
- Measure your cabinet’s height from floor to pipe again.
- Choose a shelf that is at least 2 inches shorter than that measurement.
- Place the shelf on the cabinet floor. Adjust the tier heights if your model allows it.
- Put taller items on the bottom. Shorter items on top.
This one change can double your usable space. And it costs around $20–$30.
What fits well: Spray bottles, lotion pumps, hair dryers (on bottom). Face wash tubes, cotton rounds, small jars (on top).
Idea 6: Stack Clear Plastic Bins

You don’t have to buy fancy organizers. Clear plastic bins from a discount store work great.
The key word is “clear.” You need to see what’s inside without pulling the bin out. Opaque bins hide things, and you’ll forget what you have.
Stackable bins save even more space. Put one bin on top of another. Just make sure the bottom bin isn’t taller than your pipe clearance.
The Delamu Stackable Organizer is a popular choice. It has movable dividers inside, so you can adjust the compartment sizes. The Vtopmart 3‑Pack Bathroom Plastic Storage Organizer is another good option. It’s simple, clear, and cheap.
How to use them:
- One bin for dental care. Toothbrushes, toothpaste, floss picks.
- One bin for first aid. Bandages, antiseptic wipes, tweezers.
- One bin for hair accessories. Clips, ties, headbands.
Label each bin with a piece of masking tape and a marker. Write “Dental,” “First Aid,” etc. Labels stop family members from putting things in the wrong spot.
Stack them on the side of the cabinet opposite the pipe. This keeps them out of the way but still easy to grab.
Idea 7: Install Pull‑Out Drawers

There’s nothing worse than reaching into the back of a deep cabinet and pulling out nothing but dust.
Pull‑out drawers fix that completely. They slide out so every item comes to you. No bending. No digging. No knocking things over.
You can buy two‑tier sliding basket systems. They are designed to fit around pipes. Some have cutouts in the back for plumbing.
A great cheap option is the IKEA UPPDATERA Box with Slider set. For about $25, you can create mini drawers in any cabinet. The sliders attach to the cabinet floor. The boxes click onto the sliders.
Professional organizers call sliding drawers “the most effective solution” for small items. Here’s why:
A shelf hides what’s in the back. A drawer brings it to you.
What to put in pull‑out drawers:
- Makeup you use daily
- Small skincare bottles
- Razors and shaving cream
- Cotton balls and Q‑tips
More than 60% of homeowners say their under‑sink storage stops working within six months of a renovation. That’s because they didn’t use pull‑outs. Once you switch, you’ll never go back.
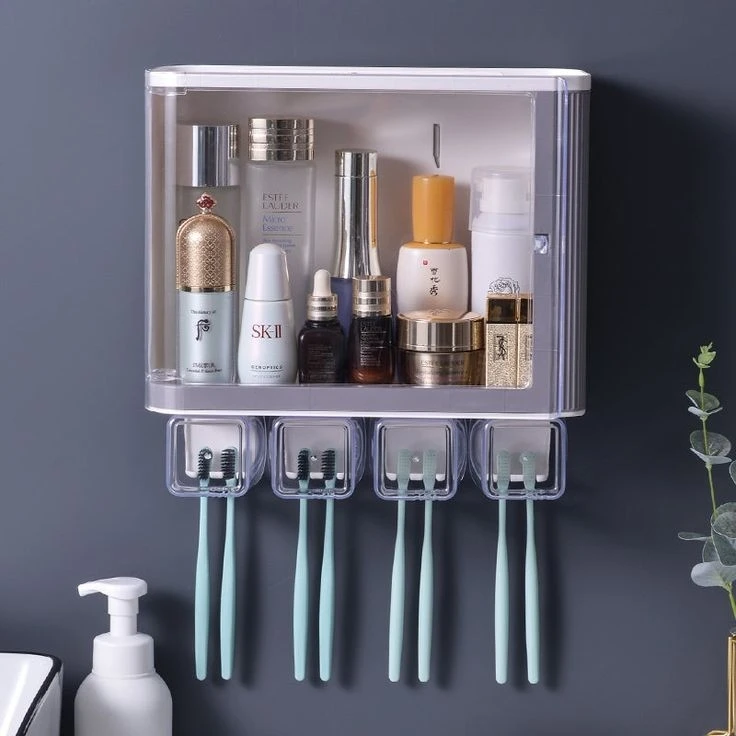
Idea 8: Use an Over‑the‑Door Organizer

The inside of your cabinet door is prime real estate. Most people ignore it.
Buy an over‑the‑door organizer that hangs on the cabinet door. Look for one with clear vinyl pockets. These cost $10–$15 on Amazon or at Target.
Hang it so the pockets face into the cabinet. The organizer will hang over the top edge of the door. It should not stop the door from closing. Test it before you load it up.
What to put in the pockets:
- Hair ties and bobby pins
- Cotton pads and cotton swabs
- Small tubes of ointment
- Travel‑size products
- Nail clippers and files
This keeps tiny items off the cabinet floor. No more searching for a lost bobby pin. No more cotton pads scattered everywhere.
One warning: Don’t put heavy items in an over‑the‑door organizer. It can pull the door down or tear the pockets. Stick to lightweight stuff.
Renter friendly: This does not require any drilling or permanent changes. Hang it and go.
Idea 9: Add a Tension Rod to the Door

This is a genius hack that costs almost nothing.
Buy a small tension rod. The kind you use for a shower curtain, but shorter. You can find them at any hardware store for $5–$10.
Open your cabinet door. Install the tension rod horizontally across the inside of the door. Twist it until it’s tight against the sides of the door frame. Not the cabinet walls. The door itself.
Now buy a pack of small S‑hooks. Hang the S‑hooks on the tension rod.
Take your spray bottles – cleaning sprays, air fresheners, even hairspray. Hang them upside down by their trigger handles. The trigger rests on the S‑hook. The bottle hangs down.
Why this is brilliant:
- Spray bottles take up zero shelf space.
- The nozzles never get clogged because they hang open.
- You can see every bottle at a glance.
- It costs under $15 total.
You can also hang small mesh bags with sponges or scrub brushes. The tension rod holds them fine.
This is one of those ideas that makes people say, “Why didn’t I think of that?”
Idea 10: Put a Lazy Susan in a Corner

Corners under the sink are dead space. Items get pushed into the corner and never seen again.
A Lazy Susan fixes that.
Place a small rotating tray in the corner of the cabinet. Choose one that is no bigger than 10 inches wide. Any larger and it might hit the pipe.
Put your daily products on the Lazy Susan. Lotion bottles, body spray, deodorant, or face wash. When you need something, just spin the tray.
What size to buy: Measure the corner space first. A 9‑inch or 10‑inch Lazy Susan fits most standard cabinets. If your cabinet is very small, get a 7‑inch one.
You can find Lazy Susans at kitchen supply stores, home goods stores, or online. Plastic ones cost $8–$12. Bamboo or metal ones cost $15–$25.
Pro tip: Get one with a raised lip around the edge. That stops bottles from sliding off when you spin it.
This is especially good for people who have a lot of small bottles. Hair serums, face mists, roll‑on perfumes. Put them all on the Lazy Susan. One spin and you see everything.
Idea 11: Attach a Magnetic Strip
Losing tweezers and nail clippers is annoying. You know you have them somewhere, but they always hide under a towel or behind a bottle.
A magnetic strip solves that.
Buy a magnetic strip from a hardware store. The kind people use to hold kitchen knives. A 6‑inch or 8‑inch strip works best. Cost is about $5–$10.
Peel off the adhesive backing. Stick the strip to the inside of the cabinet door or the side wall of the cabinet. Make sure the surface is clean and dry first.
Now take your metal grooming tools. Tweezers. Nail clippers. Small scissors. Cuticle pushers. Bobby pins. Stick them onto the magnetic strip.
What sticks: Anything with iron or steel. Most grooming tools are magnetic. Test yours before you buy the strip by seeing if a fridge magnet picks them up.
What doesn’t stick: Plastic tools, aluminum items, or stainless steel without iron content.
This keeps small metal items visible and organized. No more digging through a drawer. No more losing your favorite tweezers.
You can also stick a small magnetic strip to the side of a shelf inside the cabinet. That works too.
Idea 12: Use a Cutlery Caddy

Go to your kitchen. Grab a plastic cutlery caddy. The kind you put forks, spoons, and knives in. Wash it out and bring it to the bathroom.
Place the cutlery caddy inside your under‑sink cabinet. Put it in a spot where the pipe doesn’t get in the way.
What to put in each compartment:
- Compartment 1: Toothbrushes and toothpaste tubes.
- Compartment 2: Face wash tubes and lotion tubes.
- Compartment 3: Razors and shaving cream.
- Compartment 4: Hairbrushes and combs (if they fit standing up).
The compartments keep bottles from falling over. Tubes stay upright. You can see everything at once.
A cutlery caddy costs $3–$8 at a dollar store or discount store. That’s much cheaper than a “bathroom organizer” that does the same thing.
Why this works: The compartments create natural zones. You don’t need to buy a special product. You just repurpose something you probably already own.
If you don’t have an extra cutlery caddy, check a thrift store. They always have them for under $2.
Idea 13: Store Cleaning Supplies in a Separate Bin

This is about safety, not just organization.
Storing cleaning sprays right next to your toothbrush is unsanitary. You don’t want chemicals touching your personal care items. And you definitely don’t want to accidentally grab a cleaning spray instead of a face mist.
Use a dedicated bin for bathroom cleaners. A small plastic tote with a handle works great. Label it “CLEANING” in big letters.
What goes in the cleaning bin:
- Toilet bowl cleaner
- Bathroom spray cleaner
- Glass cleaner
- Sponges and scrub brushes
- Rubber gloves
Keep this bin on one side of the cabinet. Keep all personal care items on the other side. Do not mix them.
If you have small children, put a childproof lock on the cabinet door. Better yet, store cleaning supplies up high where kids can’t reach. The under‑sink cabinet is not safe for dangerous chemicals if kids can open it.
One more tip: Use a separate small bin for pet supplies if you have them. Shampoo, brushes, and ear cleaner go in that bin. Keep it away from human products.
Idea 14: Schedule a Quarterly Audit

Even the best system fails without maintenance.
Decluttering expert Gerrit Jan Reinders says this: “Even the best organization system fails without maintenance.” He recommends a quarterly audit. That means four times a year, you check your system.
Pick a date. The first weekend of each season works well. Spring, summer, fall, winter. Put it on your calendar right now.
On that weekend, do these five things:
- Pull everything out of the cabinet.
- Check every product for expiration dates. Toss anything old.
- Wipe down the cabinet floor and walls with a disinfecting wipe.
- Look for leaks or moisture. Fix any drips.
- Put everything back in its correct zone.
This whole process takes 15 minutes. That’s it.
Most people think organizing is a one‑time project. It’s not. Clutter creeps back slowly. A shampoo bottle sits sideways. A tube falls behind a bin. Before you know it, you’re back to chaos.
The quarterly audit stops that creep. You catch problems early. You stay organized forever.
Pro tip: Keep a small trash bag inside the cabinet. When you finish a product, throw the empty bottle away immediately. Don’t let empties pile up.
Conclusion
You can fix your under‑sink chaos. You don’t need a big budget or a full weekend.
Start with just three ideas from this list. Maybe you try a two‑tier shelf (Idea 5), a tension rod on the door (Idea 9), and a Lazy Susan (Idea 10). That’s enough to see a huge difference.
Implement those this weekend. Your morning routine will thank you.
Remember, the goal of under sink bathroom organization isn’t just about looking pretty. It’s about creating a calm, functional space that makes your daily life easier. No more digging. No more frustration.
Now go open that cabinet and get started. Pick one idea. Do it today. Then pick another one tomorrow. In one week, you’ll have a completely different space.
And don’t forget Idea 14. Put that quarterly audit on your calendar right now. Future you will be grateful

- 17 Classy Living Room Ideas for a Cozy Elegant Look - April 23, 2026
- 16 Dark Moody Living Room Ideas That Feel Rich and Warm - April 22, 2026
- 14 Elegant Bedroom Trends for 2026 You’ll Love - April 22, 2026

