If you’re planning a new kitchen, you probably spend hours looking at photos online. Everything looks beautiful. But you still don’t know what actually works for your space.
Here’s the problem: most kitchen ideas you see are from 2020 or 2021. Kitchen trends change fast. What looked good five years ago feels dated now. And picking the wrong cabinets? That’s an expensive mistake you’ll look at every single day.
This guide covers the top 16 kitchen cabinet ideas for 2026. You’ll learn what colors last, which layouts save space, and how to add storage without tearing down walls. Let’s get started.
Color Ideas: What’s New for 2026
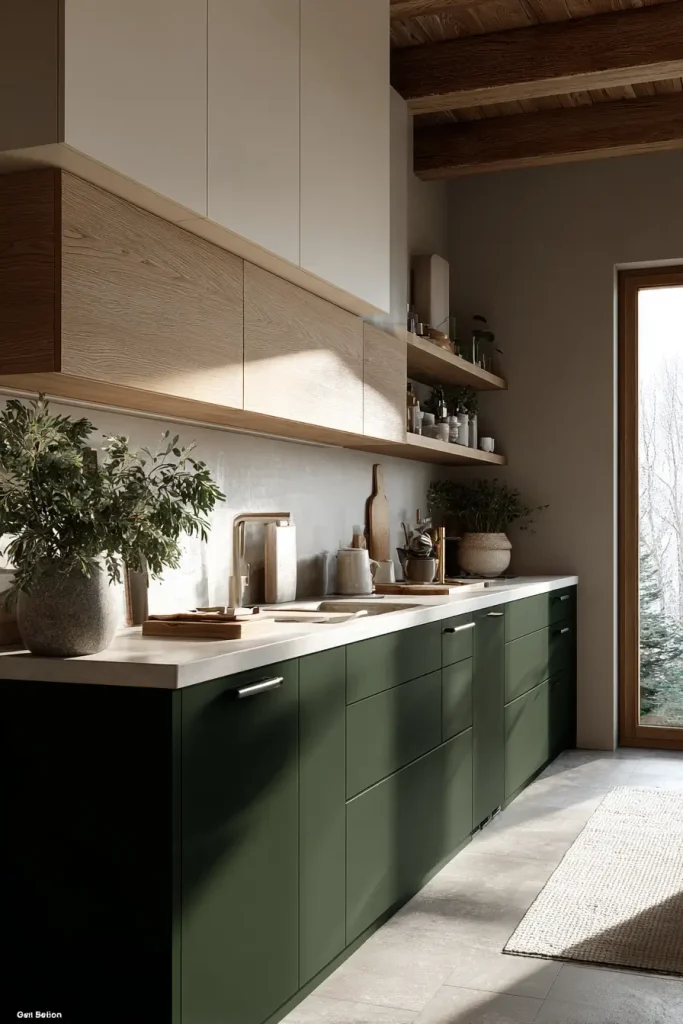
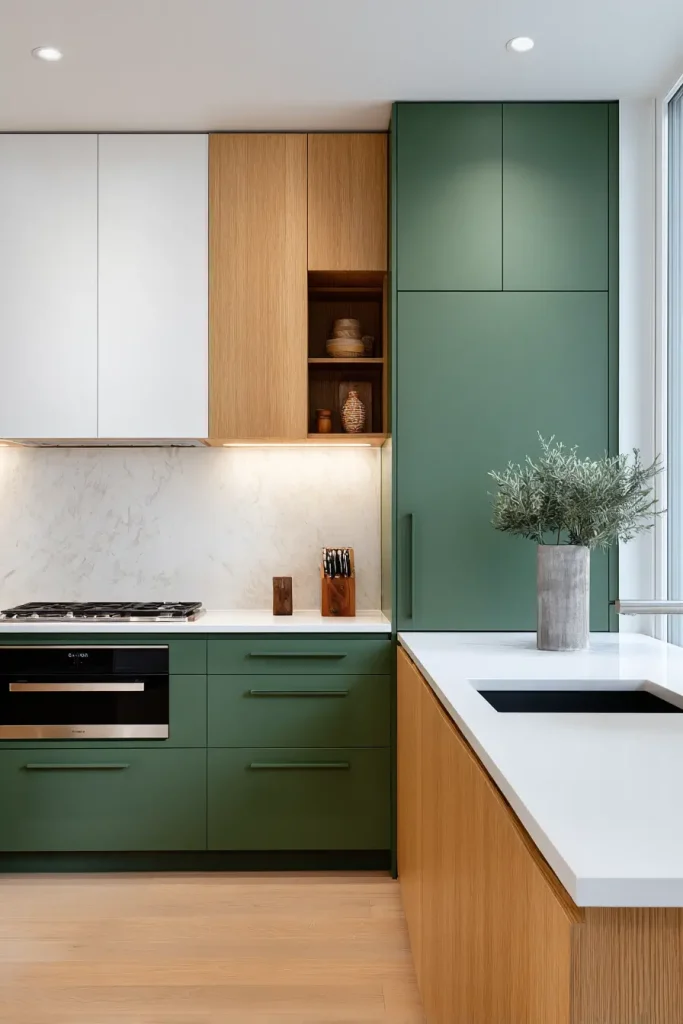
1. Dark Green Lower Cabinets
White kitchens are still around. But they’re not the only option anymore.
Dark green cabinets on the bottom feel fresh but not crazy. They ground the room. They hide dirt well. And they work with almost any countertop material.
Here’s what to do: Paint your lower cabinets a deep forest green. Keep the uppers white or light cream. This split stops the room from feeling like a cave.
Why it works in 2026: People want nature inside their homes. Green brings that feeling without being loud. A color called “Black Forest” will be big next year. It’s green. But it’s so dark it almost looks black in some light.
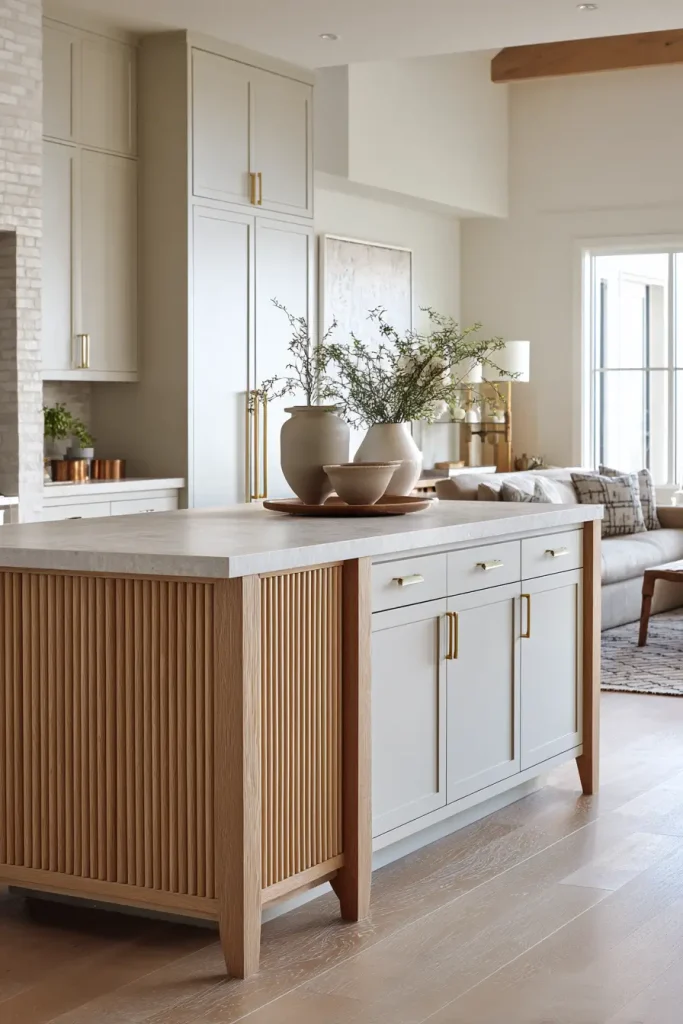
2. Warm Wood Tones Are Back
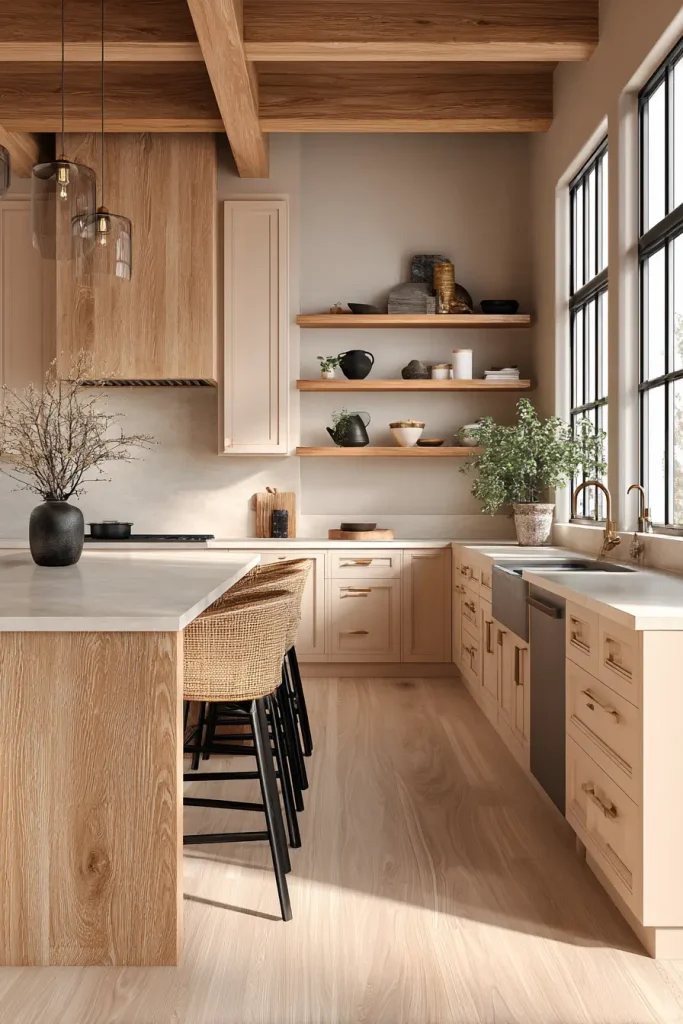
For years, designers pushed gray wood. Gray oak. Gray maple. Gray everything.
That’s ending.
Warm wood is coming back hard. Think oak with visible grain. Think honey tones. Think cabinets that look like actual trees grew somewhere.
The catch: You can’t fake this. Cheap wood with orange stain won’t work. Real oak or elm with a clear finish shows the natural pattern. It feels expensive because it is.
Try this: Use warm wood on your island only. Paint the rest. Or do open shelves in warm wood above painted base cabinets. You get the trend without the full commitment.
3. Two-Tone Is Now Vertical
Two-tone kitchens aren’t new. But how you split the colors is changing.
Before, people did white uppers and dark lowers. That’s fine. But 2026 is moving toward vertical splits. One side of the kitchen in a dark color. The other side light. Or the tall pantry wall dark, the rest light.
Why this works: Vertical color makes your ceilings look higher. Your eye moves up instead of side to side. It also lets you hide the “working” side of the kitchen (sink, dishwasher, mess) in a darker color.
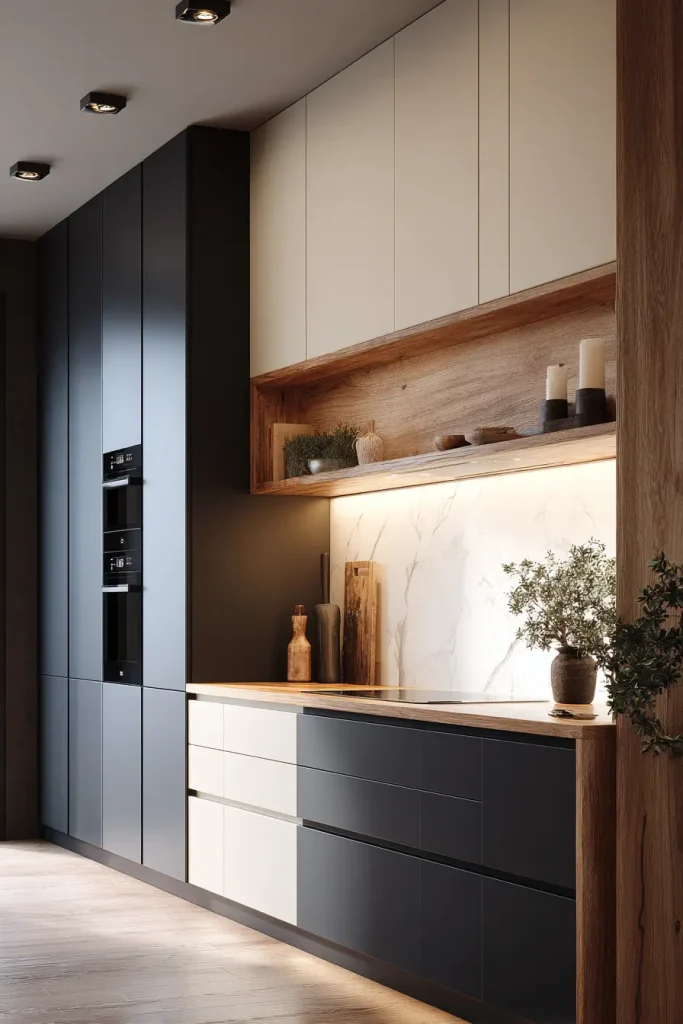
4. Black Kitchens Done Right
Full black kitchens scare people. That’s fair. A bad black kitchen looks like a cave.
But done right? Black cabinets look sharp, modern, and expensive.
The rule: If you go black, you need contrast. Light countertops. Light backsplash. Light floors. Open shelving with white dishes. Without contrast, the room disappears.
For 2026: Look at black with brown undertones. Not blue-black. Not gray-black. Warm black. It feels softer and more livable.
Smart Layouts: Make Your Kitchen Work Harder
5. The Coffee Station Cabinet
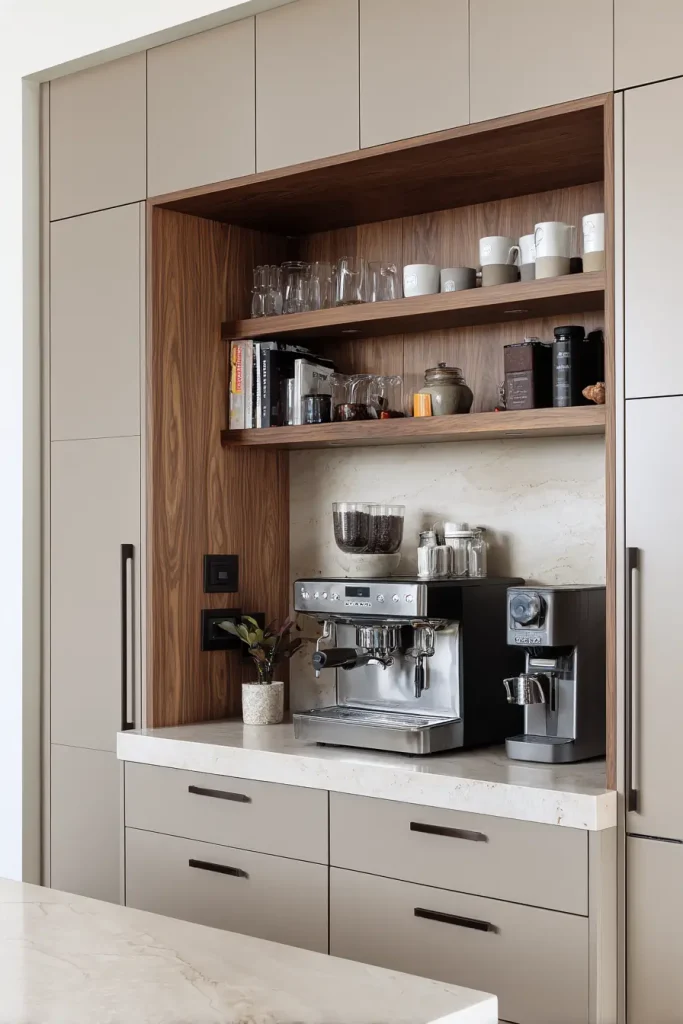
Think about your morning. You stumble into the kitchen. You need coffee. Now.
A dedicated coffee cabinet changes everything.
How to build one: Pick an upper cabinet near your sink or fridge. Remove one shelf. Add an outlet inside if possible. Store your machine there. Put mugs on hooks under the shelf above. Coffee pods or beans in a small drawer below.
Why you’ll love this: The counter stays clear. Everything for coffee lives in one spot. Guests can find it themselves. And when you sell the house, this little detail makes buyers smile.
6. The “Messy Kitchen” Pantry
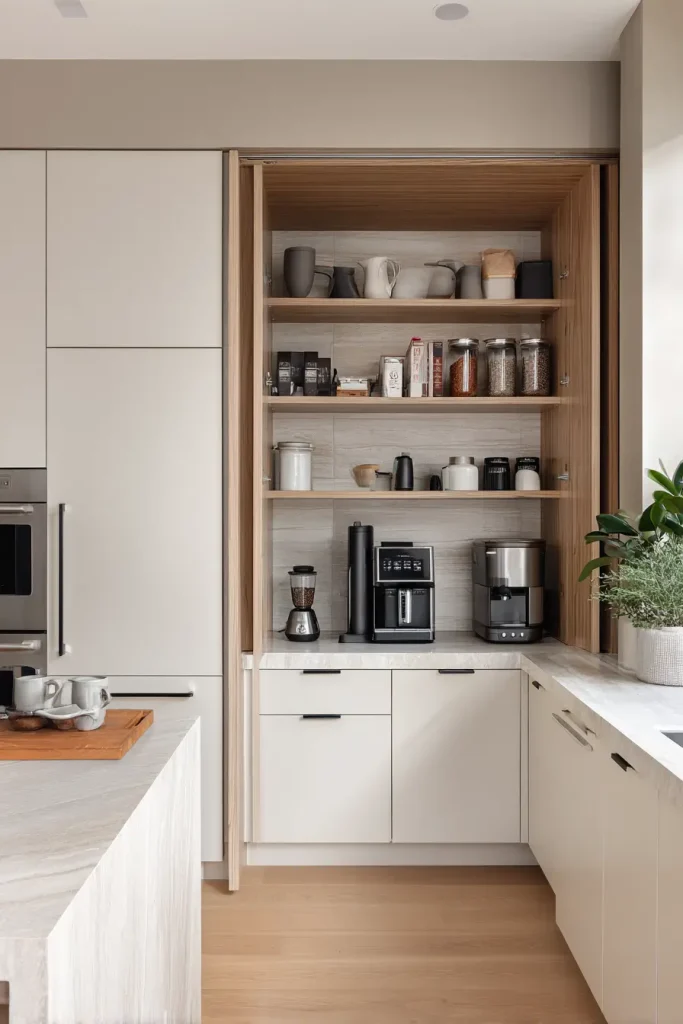
This sounds weird. But hear me out.
A “messy kitchen” or “scullery” is just a second kitchen hidden behind cabinet doors. It’s a walk-in pantry with counter space and outlets.
What goes in there: Small appliances. The air fryer. The Instant Pot. The blender. Extra dishes. Bulk food storage. The stuff you use but don’t want on display.
The smart part: Close the doors and your main kitchen stays clean. Open them and everything is ready to use. No hauling appliances from the basement. No cluttered counters.
7. Drawers Instead of Lower Cabinets
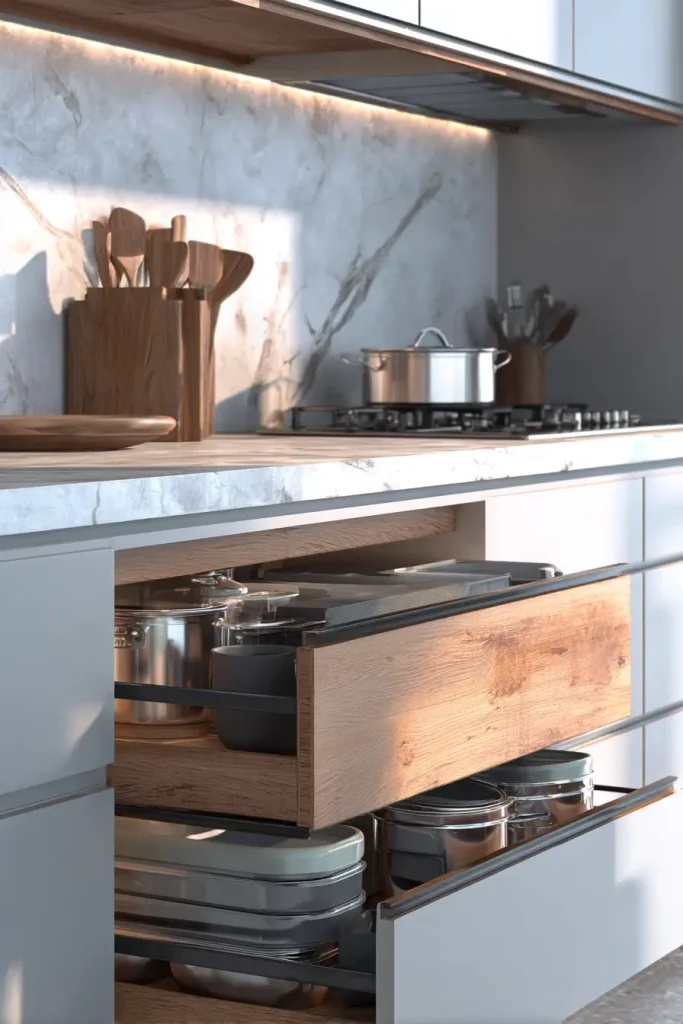
Standard lower cabinets with doors seem fine. Until you try to find a pot in the back.
Drawers change everything.
Full-extension drawers pull all the way out. You see everything. No reaching. No bending. No forgotten pans in the back.
Where this matters most: Pots and pans. Plastic containers. Baking sheets. These items stack terribly in regular cabinets. In deep drawers, they lay flat and stay organized.
The cost: Drawers cost more than standard cabinets. You might not do the whole kitchen. But do one bank of drawers near the stove for pots and pans. You’ll thank yourself later.
8. Toe-Kick Drawers
Look at the bottom of your cabinets. See that empty space between the floor and the door?
That’s wasted space.
Toe-kick drawers pull out from that bottom strip. They’re shallow. Maybe four inches deep. But perfect for flat items.
Store these there: Baking sheets. Cutting boards. Placemats. Trays. Things you don’t need daily but want access to without digging.
Installation note: You need to plan this before cabinets are built. Retrofitting is hard. Mention it to your cabinet maker early.
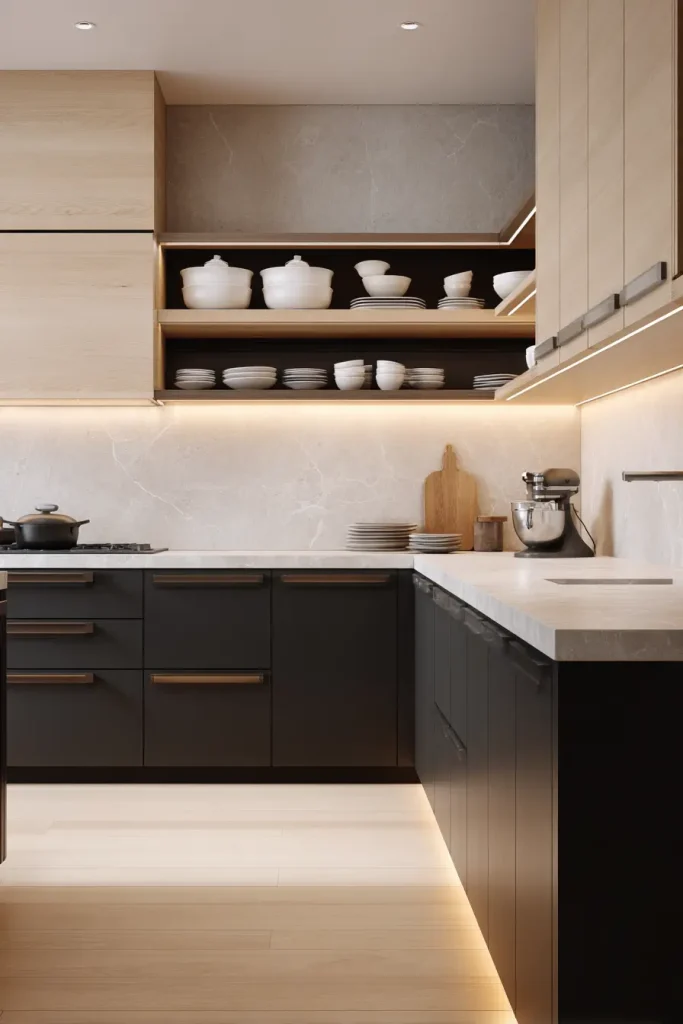
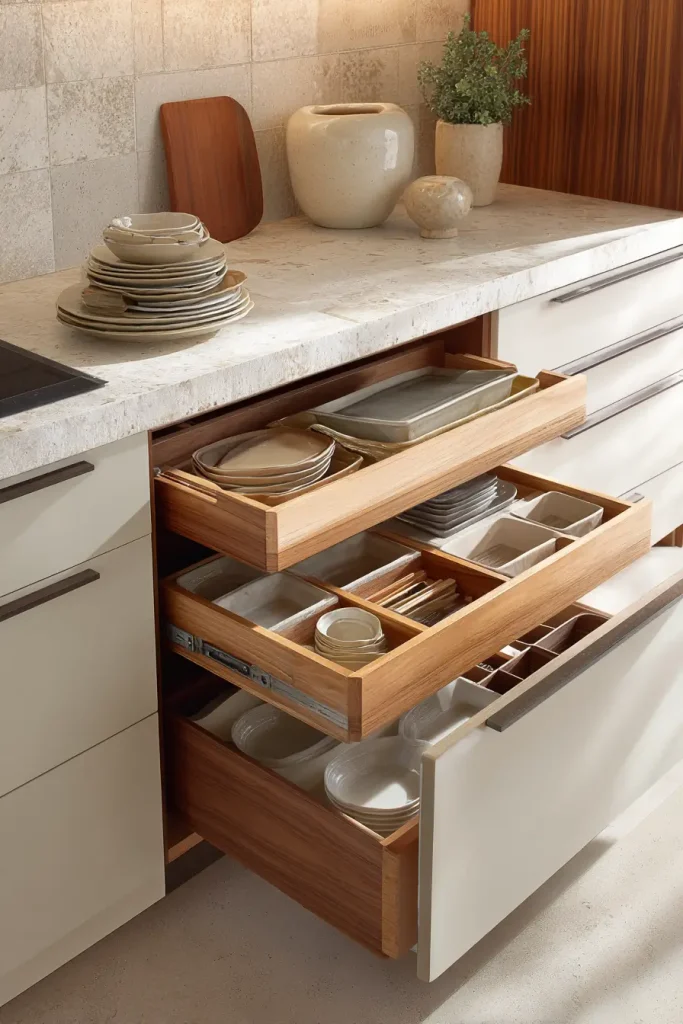
9. Pull-Out Pantry Shelves
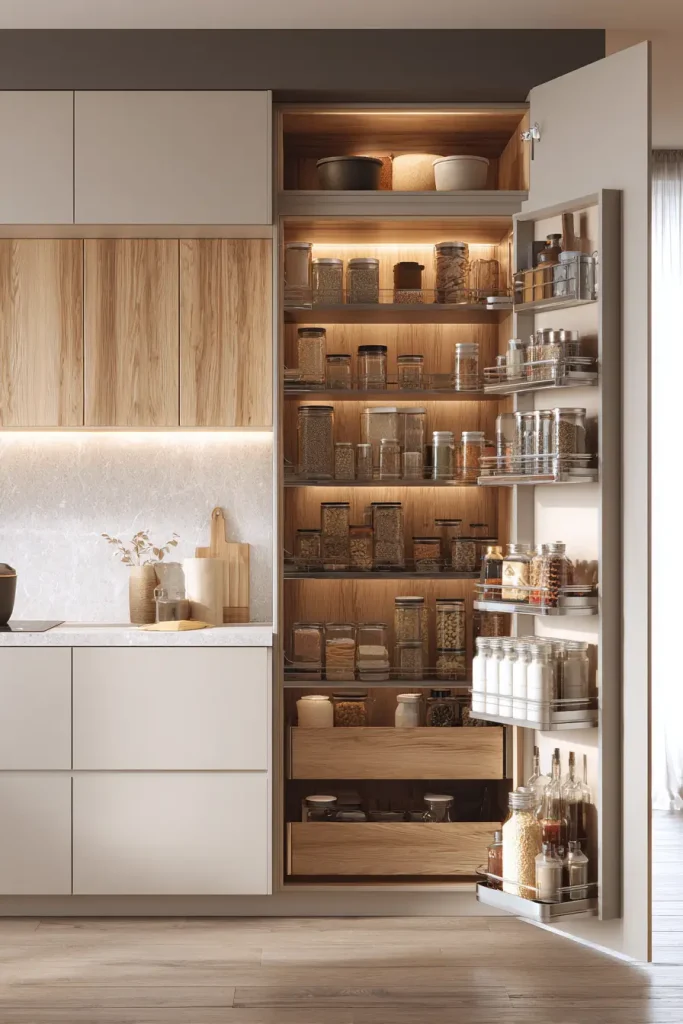
A standard pantry cabinet has fixed shelves. You stack things. You lose things in the back. You buy duplicates because you forgot what you had.
Pull-out shelves fix this.
These are shelves on rails. They slide out like drawers. Everything is visible. Everything is reachable.
Best use: Narrow cabinets next to the fridge. Deep pantries. Anywhere you’d normally stack cans or jars. You’ll use more of what you buy because you’ll actually see it.
10. The Baking Center
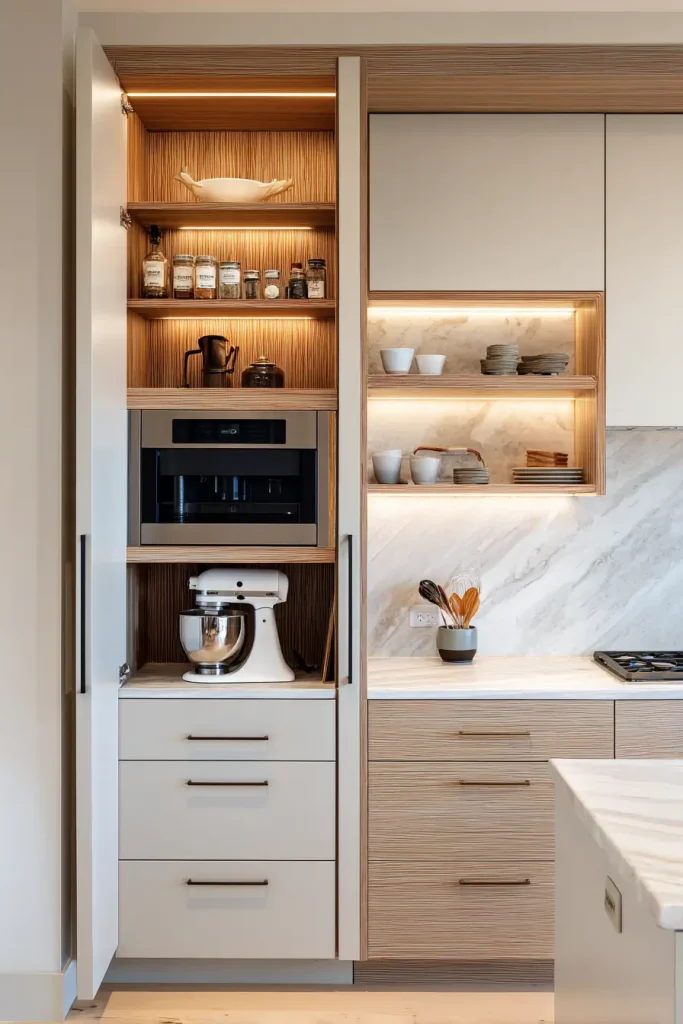
If you bake, you know the struggle. Mixer on the counter. Ingredients in three different cabinets. Baking sheets somewhere else.
A baking center solves this.
Design it like this: Lower cabinet with a lift-up shelf for the mixer. Store the mixer there. When you need it, pull the shelf up to counter height. No lifting heavy machines. Above that, shallow shelves for spices and extracts. A deep drawer below for pans.
The bonus: If you add an outlet inside the cabinet, the mixer stays plugged in. Pull the shelf up, flip the switch, start mixing.
Materials and Finishes: What to Pick and Why
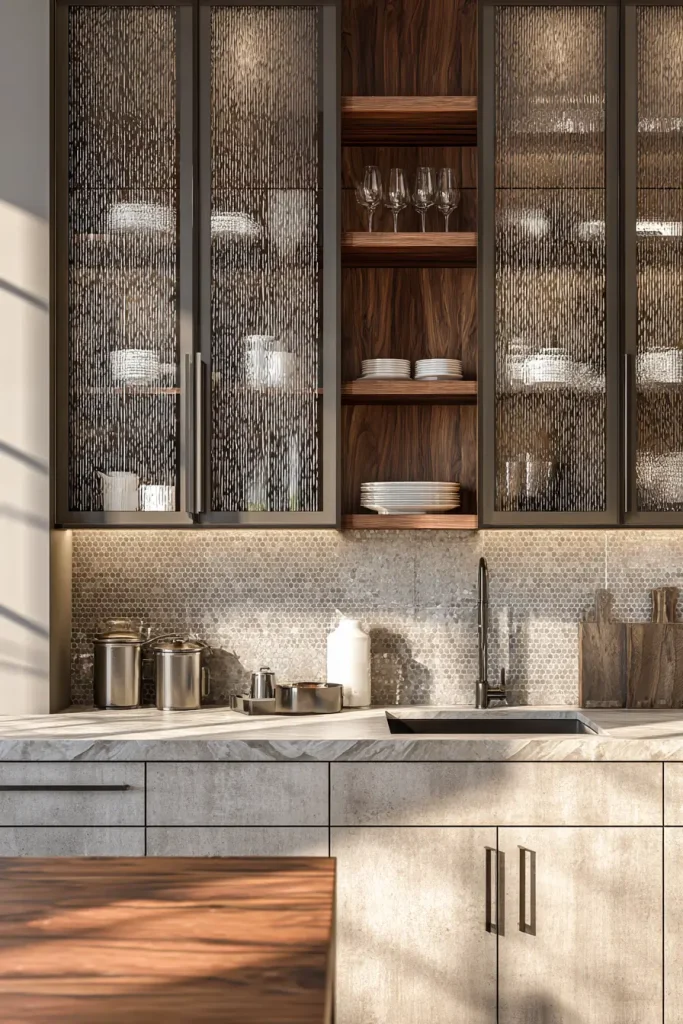
11. Fluted Glass for Upper Cabinets
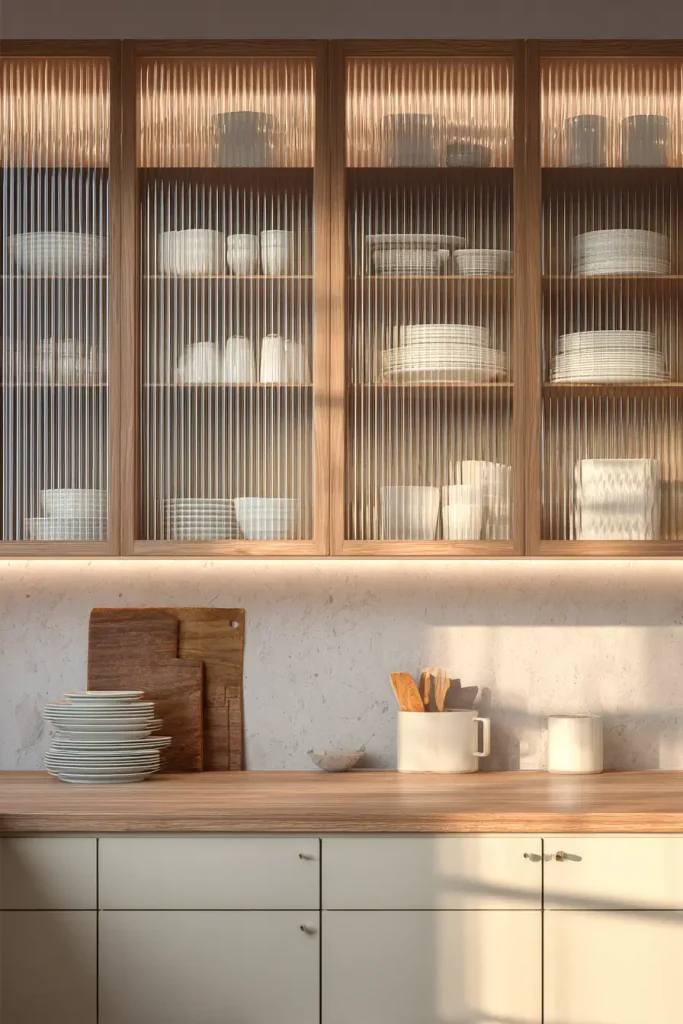
Clear glass cabinets look pretty in photos. In real life, they show every dirty dish and mismatched mug.
Fluted glass fixes this.
Fluted glass has ridges. It’s textured. Light passes through, but you can’t see clearly. Items behind it look blurred and soft.
Where to use it: A few upper cabinets. Not all of them. Pick one section near the dining area. Put your nicer dishes there. The texture adds interest without the stress of keeping everything perfect.
12. Mixed Metal Hardware
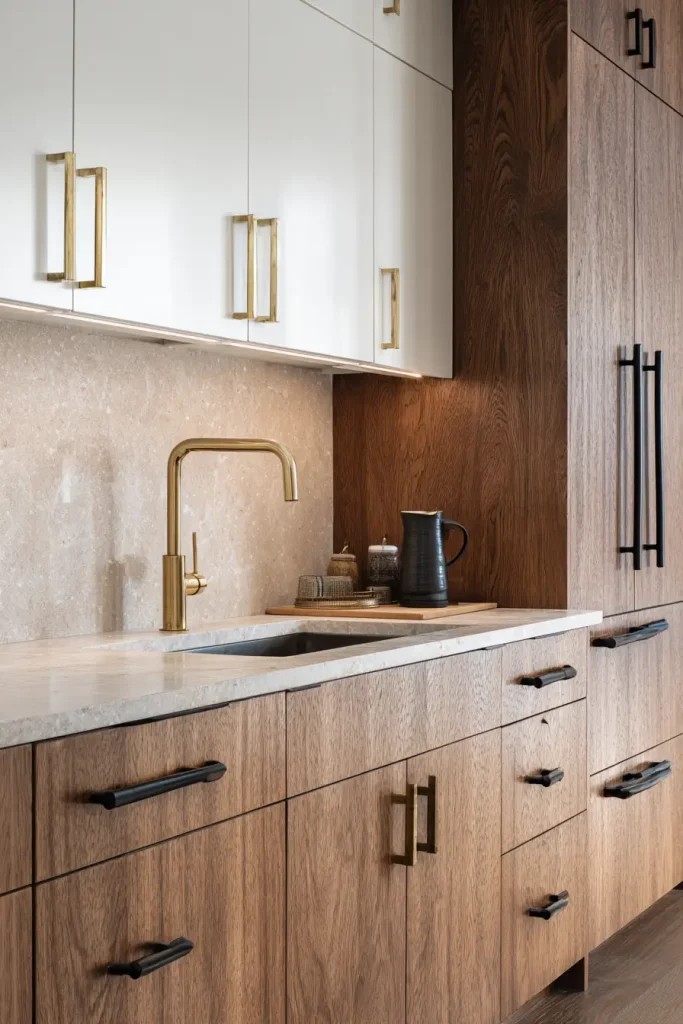
One finish for all hardware feels safe. It also feels boring.
2026 is mixing metals. Brass pulls on white cabinets. Black knobs on wood. Chrome fixtures with bronze hardware.
The trick: Pick one dominant metal (60% of the hardware) and one accent (40%). Keep the undertones similar. Warm metals (brass, bronze, copper) mix well. Cool metals (chrome, nickel, black) mix well. Don’t mix warm and cool in the same small space.
13. Handleless Cabinets
You know those kitchens where cabinets look like flat panels? No knobs. No pulls. Just smooth fronts.
That’s handleless design. And it’s getting bigger.
How it works: Cabinets have a groove on top or a push mechanism. You push, they pop open. No hardware to clean around. No knobs to catch on clothes.
Who this works for: Modern homes. Small kitchens where every inch counts (no handles sticking out). Anyone who hates cleaning behind cabinet pulls.
The downside: Push mechanisms can break. Spend money on good ones. Cheap hardware fails fast.
14. Furniture-Style Cabinet Ends
Standard cabinets end flat. A panel covers the side. Done.
Furniture-style ends treat cabinets like actual furniture pieces.
What this means: You add details to exposed ends. Fluted panels. Reclaimed wood. A different color. Furniture feet (bun feet or tapered legs) at the bottom.
Why bother: Kitchens open to living rooms now. The side of your island faces the couch. Make it look intentional, not like an appliance.
Details That Matter
15. Glass Doors That Aren’t Clear
We talked about fluted glass. But other options exist.
Smoked glass. Bronze glass. Textured glass. Patterned glass.
Pick this if: You want open feeling without open shelving stress. Dark glass hides more than clear. Patterned glass catches light and casts interesting shadows.
Placement: Upper cabinets only. Glass on lower cabinets shows too much dust and clutter.
16. Better Corner Solutions
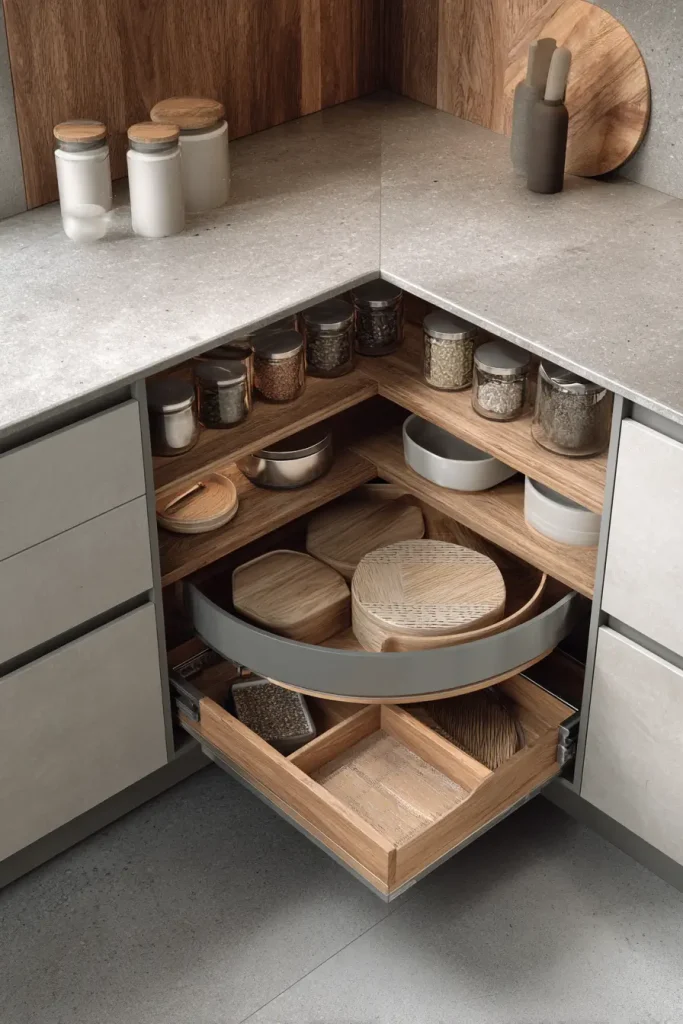
Corner cabinets are the worst part of any kitchen. You lose things there. You forget what you own.
2026 has better options.
The lazy Susan: Old but good. Modern versions have non-slip surfaces and higher sides so things don’t fall off.
The blind corner pullout: This pulls out like a drawer, then swings into the corner. Everything comes to you. No reaching.
The corner drawer: Yes, corner drawers exist. They’re shaped weird but work great for small items.
Don’t skip this: Bad corners waste feet of storage. Spend the money on good hardware here.
What to Do Next
You just read 16 ways to update your kitchen cabinets for 2026.
Here’s what matters most:
Color is getting darker and warmer. Green, black, and wood tones replace gray and white.
Storage is getting smarter. Dedicated zones for coffee, baking, and small appliances save daily frustration.
Materials have texture. Fluted glass, mixed metals, and furniture details add interest without clutter.
You don’t need all 16 ideas. Pick two or three that fit your space and your habits. Maybe you need that coffee station. Maybe you’re finally fixing that blind corner. Maybe you just want better hardware.
Start saving photos of what you like. Pinterest works great for this. Then talk to a kitchen designer. Show them your favorites. Ask what fits your budget and your space.
Your new kitchen should make your life easier, not harder. These ideas point in the right direction. Now go make it happen.
Got questions about a specific idea? Take photos of your current kitchen and ask a local cabinet shop what’s possible. Most give free estimates.

- 17 Classy Living Room Ideas for a Cozy Elegant Look - April 23, 2026
- 16 Dark Moody Living Room Ideas That Feel Rich and Warm - April 22, 2026
- 14 Elegant Bedroom Trends for 2026 You’ll Love - April 22, 2026

